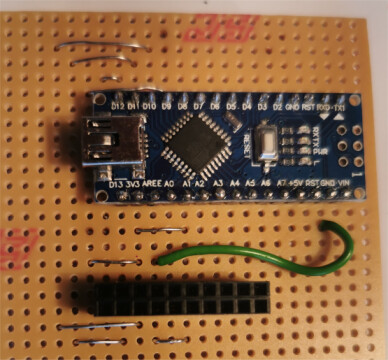
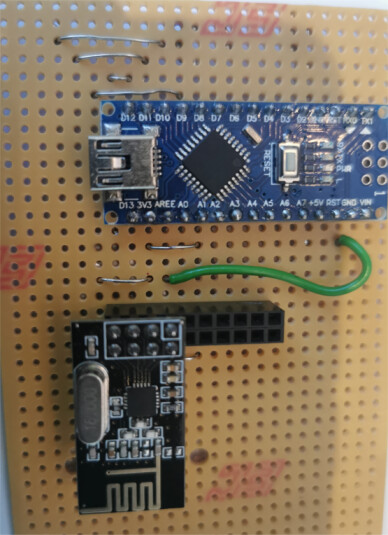
adapted a stripboard PCB with Nano to take a NRF24L10
if pins are adjacent it is possible to cut the stripboard tracks, e.g.

with tracks close together and cutting tracks between adjacent pins it is easy when soldering to short circuit tracks, etc - testing for continuity and short circuits using a multi-meter is essential
top of PCB
with NRF24L01 fitted
tested as a transmitter
// Nano > NRF24L01 transmitter test using a text string

// RP2040 connections
// RP2040 SPIO_SCK pin GP18 goes to NRF24L10_pin SCK
// RP2040 SPIO_RX pin GP16 goes to NRF24L10_pin MISO
// RP2040 SPIO_TX pin GP19 goes to NRF24L10_pin MOSI
// RP2040 pin SPIO_CSn GP17 to NRF24L10 CSN
// RP2040 pin GP20 to NRF24L10 CE
// RP2040 GND and 3.3V to NRF24L10  GND and VCC

// Leonardo connections ???
// Leonardo ICSP SCK  pin 15 to NRF24L10_pin SCK
// Leonardo ICSP MISO pin 14 to NRF24L10_pin MISO
// Leonardo ICSP MOSI pin 16 to NRF24L10_pin MOSI
// Leonardo pin 10 to NRF24L10 CSN
// Leonardo pin 9  to NRF24L10 CE
// Leonardo GND and 3.3V to NRF24L10  GND and VCC

// ESP8266 connections
// ESP8266 SCK pin GPIO14 goes to NRF24L10_pin SCK
// ESP8266 MISO pin GPIO12 goes to NRF24L10_pin MI
// ESP8266 MOSI pin GPIO13 goes to NRF24L10_pin MO
// NRF24L10 CE to ESP8266 pin GPIO4
// NRF24L10 CSN to ESP8266 pin GPIO5

// UNO/Nano connections
// arduino MOSI pin 11 goes to NRF24L10_pin MOSI
// arduino MISO pin 12 goes to NRF24L10_pin MI
// arduino SCK  pin 13 goes to NRF24L10_pin SCK
// NRF24L10 CE to arduino pin 9
// NRF24L10 CSN to arduino pin10
// NRF24L10 VCC to 3.3V and GND to GND


#include <SPI.h>
#include "RF24.h"
#include <printf.h>

#define CE_PIN 9
#define CSN_PIN 10

bool radioNumber = 0;
RF24 radio(CE_PIN, CSN_PIN);

byte addresses[][6] = { "1Node", "2Node" };

void setup() {
  Serial.begin(115200);
  delay(2000);
  Serial.println("\n\nNano > NRF24L01 transmit text");
  radio.begin();
  if (radio.isChipConnected())
    Serial.println("Transmitter NF24 connected to SPI");
  else {
    Serial.println("NF24 is NOT connected to SPI");
    while (1)
      ;
  }
  radio.setChannel(125);
  radio.setPALevel(RF24_PA_MIN);
  printf_begin();  // needed only once for printing details
  radio.printDetails();
  radio.powerUp();
  radio.setDataRate(RF24_1MBPS);
  //radio.setDataRate(RF24_250KBPS);

  if (radioNumber) {
    radio.openWritingPipe(addresses[1]);
    radio.openReadingPipe(1, addresses[0]);
  } else {
    radio.openWritingPipe(addresses[0]);
    radio.openReadingPipe(1, addresses[1]);
  }
  radio.stopListening();
  //radio.setPayloadSize(sizeof(Struct1));
}

// loop transmiting data packet
void loop() {
  static char testString[10] = "text 0";
  radio.write(testString, sizeof(testString));
  Serial.print("transmit ");
  Serial.println(testString);
  delay(1000);
  testString[5]++;
}
serial monitor output
Nano > NRF24L01 transmit text
Transmitter NF24 connected to SPI
SPI Speedz	= 10 Mhz
STATUS		= 0x0e RX_DR=0 TX_DS=0 MAX_RT=0 RX_P_NO=7 TX_FULL=0
RX_ADDR_P0-1	= 0x65646f4e31 0x65646f4e32
RX_ADDR_P2-5	= 0xc3 0xc4 0xc5 0xc6
TX_ADDR		= 0x65646f4e31
RX_PW_P0-6	= 0x20 0x20 0x20 0x20 0x20 0x20
EN_AA		= 0x3f
EN_RXADDR	= 0x03
RF_CH		= 0x7d
RF_SETUP	= 0x01
CONFIG		= 0x0e
DYNPD/FEATURE	= 0x00 0x00
Data Rate	= 1 MBPS
Model		= nRF24L01+
CRC Length	= 16 bits
PA Power	= PA_MIN
ARC		= 2
transmit text 0
transmit text 1
transmit text 2
transmit text 3
transmit text 4
transmit text 5
transmit text 6
transmit text 7
transmit text 8
transmit text 9
transmit text :
transmit text ;
transmit text <