Hi all.
I have been creating a arduino based board and program to control a few functions on my RC Corsair. I am at a stage where the prototype board is working as desired and as such would like to take it to the next stage and get a custom pcb made.
At the moment I have the arduino mega and my proto board is mounted on top of it. The proto board has 2 pro servo controlers, 24 servo 3pin outputs, 8 Rx 3pin inputs, utilises 3 serial interfaces and the I2c Coms, A 6v servo power supply, a 4.8V servo supply and a board supply, 8 digital IO and 13 Analog IO. I would like to make an all in one board that has the controller and all IO, etc on it. This would tidy up the whole install.
As I have no experience in this sort of thing what so ever and as such I have a few questions.
1 - How do I know what other parts on the arduino mega board are needed for my project? Or any other project for that matter?
2 - Is there anyone that could help with the design of the pcb if I can give a schematic of what is on my proto board and where I would like everything to be located on it?
3 - Would option 2 be viable? This is only a one of board for my own use.
4 - If 2 is not viable what software is recommended?
5 - Once the board is made how do you ever solder on the ATmega2560 chip? The feet are so small.
grantastley:
2 - Is there anyone that could help with the design of the pcb if I can give a schematic of what is on my proto board and where I would like everything to be located on it?
3 - Would option 2 be viable? This is only a one of board for my own use.
Ordering just 1 PCB can be quite expensive.
I'm planning on getting back into the PCB designs as a hobby after being absent for 10 years, I was looking to create something for myself but after I viewed the prices i found that for just 1 board, proto is the way to go!
Usually pcb's get cheaper per unit if you buy a bunch of them. Like 50 or 100 units.
grantastley:
1 - How do I know what other parts on the arduino mega board are needed for my project? Or any other project for that matter?
2 - Is there anyone that could help with the design of the pcb if I can give a schematic of what is on my proto board and where I would like everything to be located on it?
3 - Would option 2 be viable? This is only a one of board for my own use.
4 - If 2 is not viable what software is recommended?
5 - Once the board is made how do you ever solder on the ATmega2560 chip? The feet are so small.
Understand the design of the Arduino board. The mega is more complicated than most, since it's got the USB->Serial adapter built in (that's the chip near the USB connector), and a regulator. Study the schematic of the Arduino Mega and go from there. You may want to see if you can drop the USB -> serial adapter, and instead just give it a header for an FTDI adapter - that'd also save space on board, hence money.
Not I.
Unlikely, routing a board takes a while, and you're unlikely to get someone to put that kind of time into your personal project. Moreover, what if they screwed up? Who would want to put themselves in a position where the person they helped could turn around and yell at them because they made a mistake, and they paid and waited weeks for useless coasters?
Eagle. Eagle can do schematic and layout, and can generate the files you need to send to your fab. It has a bit of a learning curve, but it's well worth knowing how to use.
Use Drag-soldering. You can find videos of it online. The trick is that no-clean gel flux. It's like magic - you put it on, then touch a soldering iron with solder on it... and with a puff of smoke, it's soldered.
In general, it'd be a lot easier if you were able to fit it into an ATMega 328 (ie, arduino uno), but it looks like your project is way too big for that
I'll be willing to route the PCB for you if you can get me Eagle file schematic.
I would go with suggestion to use mini (whatever) with processor already soldered in and just piggy-back it onto the main board.
The main issue is - do you have ALL the parts you want to put on the PCB?
It is messy to change things designed for wrong dimensions!
A prototype house I use will make 3 boards for about $5 per square inch.
Cheers Vaclav
My apologies, re reading that im not sure that mini/nano has enough i/o for your use.
Carriers can be had which convert surface mount to pins, that may help especially if you can find someone to solder the chip for you.
There is a charge for this but for a one off it may help you .
Yes I know that the cost of just 1 PCB may cost a bit however I do not think the cost should be too high. Over all board size I would estimate at 10 by 5 cm on a 2 layer board or there about, at $5 per sq inch (as Vaclav said) this does not add up to be too much.
The main reason for wanting to do this is to reduce the size of the unit, reduce weight (yes I know minimal but on an RC plane every gram counts) and improve appearance and I also believe that it would improve reliability especially with with the vibrations that will be present.
Understand the design of the Arduino board. The mega is more complicated than most, since it's got the USB->Serial adapter built in (that's the chip near the USB connector), and a regulator. Study the schematic of the Arduino Mega and go from there. You may want to see if you can drop the USB -> serial adapter, and instead just give it a header for an FTDI adapter - that'd also save space on board, hence money.
Is there anywhere you know of that outlines all the parts on the board and what they are used for? I believe this is where I need to spend some time in getting to know the board and what each component does and therefore if I need it or not. Yes I would defiantly be looking at just adding a FTDI header instead of the on board serial adapter for both the reasons you mentioned.
Eagle can do schematic and layout
I have heard good things about eagle in the bit of research I have done. I know it will be a learning curve to learn to drive the software. (What is one more though this whole project has been one big learning curve) I just thought if there was someone out there that would do this for me it would be an easy way out. Think its best to bite the bullet and do it myself though.
Use Drag-soldering
I have watched a few videos on this since you mentioned it. Looks easy however I am sure its not as easy as it looks and that some practice will be in order.
My apologies, re reading that im not sure that mini/nano has enough i/o for your use.
Thats alright yes not enough IO or memory for my use I have though of using multiple ones on the one board though and have them communicate to each other. Use one as a master and one just for its IO. Basicly the master tells the slave what outputs to send high/low and the slave sends all input data to the master. The master does al of the calcs, etc.
OK, unless you want to learn how to do schematics in Eagle, I'll do that for you.
The "learning curve" is to navigate thru all the parts libraries, that is why I mentioned to have ALL the parts before you do the layout. Actually the layout is pretty much automated! Be aware that "free" Eagle is limited to about 4x3 inches in total size of PCB.
Have you look at Teensy? Tons of I/O and memory, small size too. I would guess about 1/3 of Uno, but do not quote me.
Cheers Vaclav
Itead do pcbs for a very reasonable price and i have no qualms about their quality.
Assembly, there are assembly houses who will do this for you, iv ebeen quoted in uk under 10 ph.
As you describe your board would take 1 to 2 hrs i think although setup charges may be high for a one off.
Also may have to pay for a solder stencil.
Drag soldering, - try it i suppose , iv never mastered it but i have dexterity problems these days.
Used to be practice soldering boards at one time though i dont know now, however if you use itead min order of 10 boards will solve that, btw ordering 10 from itead will cost less than one from pcb pool or similar.i like them.
Im very curious though, dont have a corsair but keen modeller, what are you doing to it that requires so much i/o.
Im very curious though, don't have a corsair but keen modeller, what are you doing to it that requires so much I/O.
Hi glad to here from another modeller here I am building the Brian Taylor 82" corsair. It will have folding wings a fair bit of the IO etc is for this function 1 servo for the wing lock (to drive a pneumatic valve) 1 for each wing fold (a linear actuator from Firgelli). When the wing fold is initiated it also takes control of the flaps and drives them to fully deployed and the throttle limiting it to 10% power. There is also interlock for this function that is the landing gear, all three, must be down (detected by a micro switch on each) before the wing fold can be initiated There is also a micro switch on each air cylinder used for the wing lock to verify that they are locked.
This unit also controls the landing gear sequencing, oil cooler flaps and cowl flaps can be set to be automatically adjusted by the temp of the engine of set to the same position of the flaps servo. Also controls the canopy open and close as well as the lights that are on board (navigation, identification, Landing, etc) There is also a battery monitor for all 5 batteries on board and the air pressure in the tanks is also monitored. Depending on what area monitored goes below a set limit a variety of things happen from sound an alarm and flash all lights to deploy landing gear. All areas servo end points, reversing, speed, alarm limits, etc can be set via a program on the computer which I have also created using visual studio There is a few extra IO digital and analogue as well as servos bought out just in case
Also I was going to use the mega to drive the servos directly however the servo lib and the pulsin function conflict with each other causing the pulsin (used to read the RX signals) to behave erratically. So 2 12ch servo pros are used instead. These take care of all the servo related control, speed, direction etc all stored on their own memory and accessed through I2C communication.
OK, unless you want to learn how to do schematics in Eagle, I'll do that for you.
The "learning curve" is to navigate through all the parts libraries, that is why I mentioned to have ALL the parts before you do the layout. Actually the layout is pretty much automated! Be aware that "free" Eagle is limited to about 4x3 inches in total size of PCB.
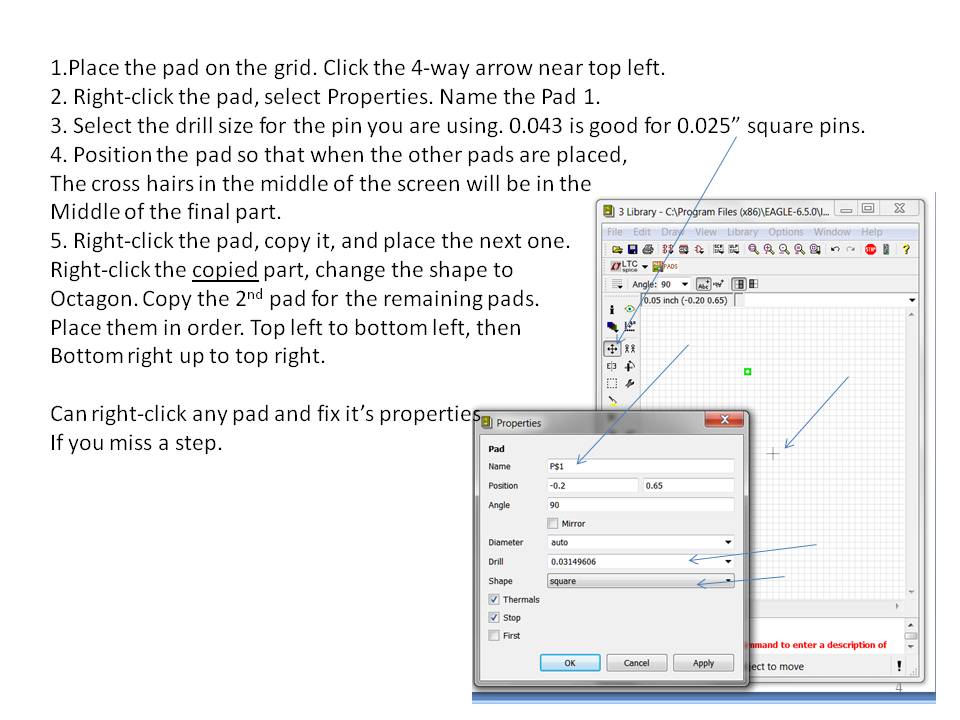
I have had a bit of a play today on eagle and I am finding it pretty easy to use. The hardest thing is finding the correct components in the library. Is there a way to make your own chip if you have the dimensions? I cannot find the 12ch pro servo controller however still have not looked that hard. I am also sure it would be a standard size chip so maybe just finding a chip with the same dimensions will do? I don't think the board will be larger than the free version allows. However I will cross that bridge if I have to.
Also I found that in the examples there is a schematic and board layout of the arduino mega WIN!!! Hopefully I will just be able to modify this to my needs and this will save a fair amount of time
Have you look at Teensy
No I have not heard of them until now. However I have invested so much time in the arduino environment (I would hate to think how many hrs if not 100s of hrs I have spent on this) so to swap platforms now would not be worth it. However I will keep it in mind for the next project.
Im very curious though, don't have a corsair but keen modeller, what are you doing to it that requires so much I/O.
Hi glad to here from another modeller here I am building the Brian Taylor 82" corsair. It will have folding wings a fair bit of the IO etc is for this function 1 servo for the wing lock (to drive a pneumatic valve) 1 for each wing fold (a linear actuator from Firgelli). When the wing fold is initiated it also takes control of the flaps and drives them to fully deployed and the throttle limiting it to 10% power. There is also interlock for this function that is the landing gear, all three, must be down (detected by a micro switch on each) before the wing fold can be initiated There is also a micro switch on each air cylinder used for the wing lock to verify that they are locked.
This unit also controls the landing gear sequencing, oil cooler flaps and cowl flaps can be set to be automatically adjusted by the temp of the engine of set to the same position of the flaps servo. Also controls the canopy open and close as well as the lights that are on board (navigation, identification, Landing, etc) There is also a battery monitor for all 5 batteries on board and the air pressure in the tanks is also monitored. Depending on what area monitored goes below a set limit a variety of things happen from sound an alarm and flash all lights to deploy landing gear. All areas servo end points, reversing, speed, alarm limits, etc can be set via a program on the computer which I have also created using visual studio There is a few extra IO digital and analogue as well as servos bought out just in case
Also I was going to use the mega to drive the servos directly however the servo lib and the pulsin function conflict with each other causing the pulsin (used to read the RX signals) to behave erratically. So 2 12ch servo pros are used instead. These take care of all the servo related control, speed, direction etc all stored on their own memory and accessed through I2C communication.
OK, unless you want to learn how to do schematics in Eagle, I'll do that for you.
The "learning curve" is to navigate through all the parts libraries, that is why I mentioned to have ALL the parts before you do the layout. Actually the layout is pretty much automated! Be aware that "free" Eagle is limited to about 4x3 inches in total size of PCB.
I have had a bit of a play today on eagle and I am finding it pretty easy to use. The hardest thing is finding the correct components in the library. Is there a way to make your own chip if you have the dimensions? I cannot find the 12ch pro servo controller however still have not looked that hard. I am also sure it would be a standard size chip so maybe just finding a chip with the same dimensions will do? I don't think the board will be larger than the free version allows. However I will cross that bridge if I have to.
Also I found that in the examples there is a schematic and board layout of the arduino mega WIN!!! Hopefully I will just be able to modify this to my needs and this will save a fair amount of time
Have you look at Teensy
No I have not heard of them until now. However I have invested so much time in the arduino environment (I would hate to think how many hrs if not 100s of hrs I have spent on this) so to swap platforms now would not be worth it. However I will keep it in mind for the next project.
A new component is usually a clone of existing one (pins / dimensions / package ) . It is not that easy and you need to make sure you are using correct grid so it matches the layout grid. If it does not the autorouter will not route it and adding stuff manually is VERY time consuming. I suggested Teensy because you asked for more I/O and small size. Mega is bigger than Uno and you probably won't need the com circuitry in you final product. If you are going to build it custom I would opt for a "bare bones" processor with removable com piggy-back just for download.
Good luck
I usually look for new component libraries at newark.com first, and if I can't find one I'll whip one up.
I've done quite a few now, and I find it pretty simple anymore, the hardest part being the footprint if the datasheet is not all that clear.
Making a printed-circuit-board isn't hard (with the method I use) : I just use a permanent / CD / special marker , draw everything on the board . When I'm done , I apply more layers , then just "put" it in a little plastic object (a plastic bowl for example) then pour acid and hot water . Then shake the plastic bowl and after 10-15 minutes all the copper is destroyed but the parts marked with marker . Then I clean it and drill with 1 (cm) drill bit !