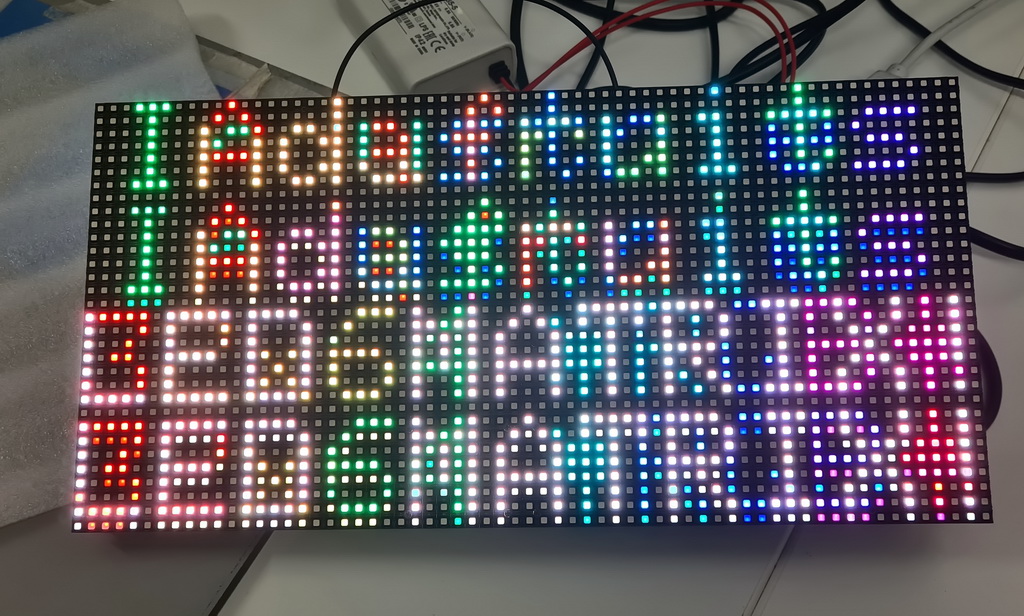
Above is my problem, I get everything duplicate on the LED Matrix.
I run the built-in example “testshapes_32x64” from the RGBmatrixPanel library.
WIRING
|R1|24|
|G1|25|
|B1|26|
|GND|GND|
|R2|27|
|G2|28|
|B2|29|
|GND|GND|
|A|A0|
|B|A1|
|C|A2|
|D|A3|
|CLK|11|
|LAT|10|
|OE|9|
|GND|GND|
I’m running this code and I get duplicate rows.
CODE
// testshapes demo for RGBmatrixPanel library.
// Demonstrates the drawing abilities of the RGBmatrixPanel library.
// For 32x64 RGB LED matrix.

// WILL NOT FIT on ARDUINO UNO -- requires a Mega, M0 or M4 board

#include <RGBmatrixPanel.h>

// Most of the signal pins are configurable, but the CLK pin has some
// special constraints.  On 8-bit AVR boards it must be on PORTB...
// Pin 11 works on the Arduino Mega.  On 32-bit SAMD boards it must be
// on the same PORT as the RGB data pins (D2-D7)...
// Pin 8 works on the Adafruit Metro M0 or Arduino Zero,
// Pin A4 works on the Adafruit Metro M4 (if using the Adafruit RGB
// Matrix Shield, cut trace between CLK pads and run a wire to A4).

//#define CLK  8   // USE THIS ON ADAFRUIT METRO M0, etc.
//#define CLK A4 // USE THIS ON METRO M4 (not M0)
#define CLK 11 // USE THIS ON ARDUINO MEGA
#define OE   9
#define LAT 10
#define A   A0
#define B   A1
#define C   A2
#define D   A3

RGBmatrixPanel matrix(A, B, C, D, CLK, LAT, OE, false, 64);

void setup() {

  matrix.begin();

  // draw a pixel in solid white
  matrix.drawPixel(0, 0, matrix.Color333(7, 7, 7));
  delay(500);

  // fix the screen with green
  matrix.fillRect(0, 0, matrix.width(), matrix.height(), matrix.Color333(0, 7, 0));
  delay(500);

  // draw a box in yellow
  matrix.drawRect(0, 0, matrix.width(), matrix.height(), matrix.Color333(7, 7, 0));
  delay(500);

  // draw an 'X' in red
  matrix.drawLine(0, 0, matrix.width()-1, matrix.height()-1, matrix.Color333(7, 0, 0));
  matrix.drawLine(matrix.width()-1, 0, 0, matrix.height()-1, matrix.Color333(7, 0, 0));
  delay(500);

  // draw a blue circle
  matrix.drawCircle(10, 10, 10, matrix.Color333(0, 0, 7));
  delay(500);

  // fill a violet circle
  matrix.fillCircle(40, 21, 10, matrix.Color333(7, 0, 7));
  delay(500);

  // fill the screen with 'black'
  matrix.fillScreen(matrix.Color333(0, 0, 0));

  // draw some text!
  matrix.setTextSize(1);     // size 1 == 8 pixels high
  matrix.setTextWrap(false); // Don't wrap at end of line - will do ourselves

  matrix.setCursor(8, 0);    // start at top left, with 8 pixel of spacing
  uint8_t w = 0;
  char *str = "AdafruitIndustries";
  for (w=0; w<8; w++) {
    matrix.setTextColor(Wheel(w));
    matrix.print(str[w]);
  }
  matrix.setCursor(2, 8);    // next line
  for (w=8; w<18; w++) {
    matrix.setTextColor(Wheel(w));
    matrix.print(str[w]);
  }
  matrix.println();
  //matrix.setTextColor(matrix.Color333(4,4,4));
  //matrix.println("Industries");
  matrix.setTextColor(matrix.Color333(7,7,7));
  matrix.println("LED MATRIX!");

  // print each letter with a rainbow color
  matrix.setTextColor(matrix.Color333(7,0,0));
  matrix.print('3');
  matrix.setTextColor(matrix.Color333(7,4,0));
  matrix.print('2');
  matrix.setTextColor(matrix.Color333(7,7,0));
  matrix.print('x');
  matrix.setTextColor(matrix.Color333(4,7,0));
  matrix.print('6');
  matrix.setTextColor(matrix.Color333(0,7,0));
  matrix.print('4');
  matrix.setCursor(34, 24);
  matrix.setTextColor(matrix.Color333(0,7,7));
  matrix.print('*');
  matrix.setTextColor(matrix.Color333(0,4,7));
  matrix.print('R');
  matrix.setTextColor(matrix.Color333(0,0,7));
  matrix.print('G');
  matrix.setTextColor(matrix.Color333(4,0,7));
  matrix.print('B');
  matrix.setTextColor(matrix.Color333(7,0,4));
  matrix.print('*');

  // whew!
}

void loop() {
  // Do nothing -- image doesn't change
}


// Input a value 0 to 24 to get a color value.
// The colours are a transition r - g - b - back to r.
uint16_t Wheel(byte WheelPos) {
  if(WheelPos < 8) {
   return matrix.Color333(7 - WheelPos, WheelPos, 0);
  } else if(WheelPos < 16) {
   WheelPos -= 8;
   return matrix.Color333(0, 7-WheelPos, WheelPos);
  } else {
   WheelPos -= 16;
   return matrix.Color333(WheelPos, 0, 7 - WheelPos);
  }
}
P5 outddoor 320x160mm Datasheet.pdf (42.2 KB)