Im doing serial communication between aa nodeMcu and an arduino Mega and i waned to know how to send data of 3 different sensors on the mega to the nodeMcu
Iv tried some tutorials but they didn't work
Which tutorials?
Post your best attempt at the code. Read the forum guidelines to see how to properly post code.
Use the IDE autoformat tool (ctrl-t or Tools, Auto format) before posting code in code tags. Tell us what the code actually does and how that differs from what you want.
Post a schematic of the connection between the NodeMCU and Mega.
I put together some example code for you using my Mega and an ESP8266-12 (I do not have a NodeMCU). The Mega sends 3 int data type numbers to the ESP via Mega Serial1. The ESP uses software serial to receive. I use the methods shown in Robin2's serial input basics tutorial to receive and parse the data.
Connect the Mega ground to the ESP ground. Connect the Mega Serial1 TX (pin 18) to the ESP pin 12 (software serial RX) through a level shifter 5V to 3.3V (resistor voltage divider). Software serial TX is not connected. Tested and works with my setup.
Transmit code (Mega)
int sensor_1 = 123;
int sensor_2 = 5378;
int sensor_3 = 9102;

void setup()
{
   Serial.begin(115200);
   Serial1.begin(9600);
}

void loop()
{
   static unsigned long timer = 0;
   unsigned long interval = 1000;
   if (millis() - timer >= interval)
   {
      timer = millis();

      char buffer[21];
      snprintf(buffer, 20, "%d,%d,%d", sensor_1, sensor_2, sensor_3);
      Serial.print("the data sent >> ");
      Serial.println(buffer);
      Serial1.println(buffer);
   }
}
Receive code (ESP)
#include <SoftwareSerial.h>

SoftwareSerial ss(12, -1);

const byte numChars = 33;
char receivedChars[numChars];   // an array to store the received data

char *strings[4];
char *ptr = NULL;

boolean newData = false;

int sensor_1 = 0;
int sensor_2 = 0;
int sensor_3 = 0;

void setup()
{
   Serial.begin(115200);
   Serial.println("<NodeMCU is ready>");
   ss.begin(9600);
}

void loop()
{
   recvWithEndMarker();
   parseData();
   displayData();
}

void recvWithEndMarker()
{
   static byte ndx = 0;
   char endMarker = '\n';
   char rc;

   if (ss.available() > 0 && newData == false)
   {
      rc = ss.read();
      //Serial.print(rc);
      if (rc == '\r')
      {
         return;
      }
      if (rc != endMarker)
      {
         receivedChars[ndx] = rc;
         ndx++;
         if (ndx >= numChars)
         {
            ndx = numChars - 1;
         }
      }
      else
      {
         receivedChars[ndx] = '\0'; // terminate the string
         ndx = 0;
         newData = true;
      }
   }
}

void parseData()
{
   if (newData == true)
   {
      byte index = 0;
      ptr = strtok(receivedChars, ",");
      while (ptr != NULL)
      {
         strings[index] = ptr;
         index++;
         ptr = strtok(NULL, ",");
      }
      //Serial.println(index);
      /*
      // print out the separated pieces
      for (int n = 0; n < index; n++)
      {
         Serial.print("piece # ");
         Serial.print(n);
         Serial.print("  ");
         Serial.println(strings[n]);
      }
      */
      sensor_1 = atoi(strings[0]);
      sensor_2 = atoi(strings[1]);
      sensor_3 = atoi(strings[2]);
      //newData = false;
   }
}

void displayData()
{
   if (newData == true)
   {
      Serial.println("data received");
      Serial.print("sensor 1 = ");
      Serial.println(sensor_1);
      Serial.print("sensor 2 = ");
      Serial.println(sensor_2);
      Serial.print("sensor 3 = ");
      Serial.println(sensor_3);
      Serial.println();
      newData = false;
   }
}
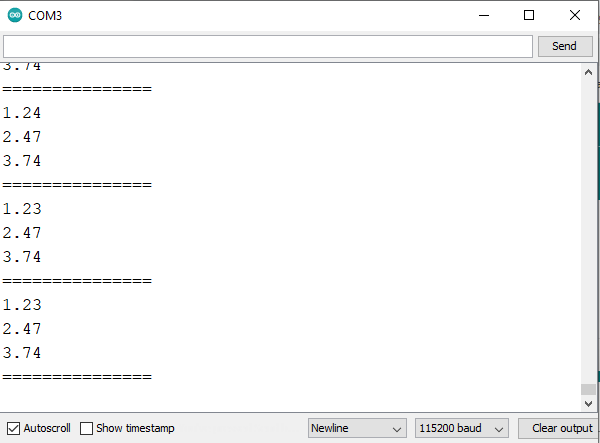
Example of output from ESP serial monitor:
data received
sensor 1 = 123
sensor 2 = 5378
sensor 3 = 9102
data received
sensor 1 = 123
sensor 2 = 5378
sensor 3 = 9102
Edited to add level shifter Mega TX to ESP RX. Thanks Paul.
1. Build the following hardware setup (Fig-1) between ESP8266 and MEGA. In this setup, MEGA will acquire three known DC voltages from external network, show them on its Serial Monitor (SM1) and then send them to ESP8266 using UART1 Port at 1-sec interval.
The three signals are comma seperated, ASCII coded for hex digits, and Newline (NL = '\n') terminated. The ESP8266 will receive the ASCII data, retrive the original DC voltages, and show them on its Serial Monitor (SM2).

Figure-1:
2. Upload the followinng sketch in MEGA (tested).
void setup()
{
  Serial.begin(115200);
  Serial1.begin(9600);
  analogReference(DEFAULT);
}

void loop()
{
  Serial1.print(analogRead(A0), HEX); Serial1.print(',');
  Serial.println((5 / 1023.0)*analogRead(A0), 2);

  Serial1.print(analogRead(A1), HEX); Serial1.print(',');
  Serial.println((5/1023.0)*analogRead(A1), 2);

  Serial1.print(analogRead(A2), HEX); Serial1.println(',');
  Serial.println((5/1023.0)*analogRead(A2), 2);

  Serial.println("===============");
  delay(1000);
}
3. Upload the following sketch in ESP8266/NodeMCU (tested).
#include<SoftwareSerial.h> //ESP8266 NodeMCU
SoftwareSerial SUART(D2, D1);  //SRX = D2, STX = D1

char myData[50];
char *temPtr;

void setup()
{
  Serial.begin(115200);
  SUART.begin(9600);
  Serial.println();
}

void loop()
{
  byte n = SUART.available();
  if (n != 0)
  {
    byte m = SUART.readBytesUntil('\n', myData, 50);
    //------------------------
    unsigned int x1 = strtoul(myData, &temPtr, 16);
    float V1 = (float)(5 / 1023.0) * x1;
    Serial.println(V1, 2);

    int x2 = strtoul(temPtr + 1, &temPtr, 16);
    float V2 = (float)(5 / 1023.0) * x2;
    Serial.println(V2, 2);

    int x3 = strtoul(temPtr + 1, &temPtr, 16);
    float V3 = (float)(5 / 1023.0) * x3;
    Serial.println(V3, 2);

    Serial.println("==============");
  }
}
4. Press RESET Button on both MEGA and ESP8266.
5. Check that SM1 of MEGA shows the voltages that are being sent to ESP8266.
6. Check that SM2 of ESP8266 shows the voltages being received from MEGA.

7. Working Principle of strtoul() Function:
The function parses (reads a character from a character type array and checks if it is a decimal or hexadecimal digit) a string (array of characters) and stops at the non-digit character. The ASCII codes of the digits which have been parsed so far are converted into a numerical number and are saved in a variable. For example:
char myArray[] = “1234, 56, 78”;
char *temPtr;r
unsigned int x1 = strtoul(myArray, &temPtr, 10); // x1 = 0x04D2
Serial.println(x1, DEC); //shows: 1234
The arg3 (= 10) says that the function looks for decimal digits in the array. The parsing stops at the first comma (,); there remains the sub-array/sub-string (, 56, 78) which will be parsed next time to extract 56. Now, we need a pointer variable (*temPtr) to point the beginning of the sub-array. The arg2 (= &temPtr) passes to the pointer variable the address of the character at which parsing had stopped and thus offers a way to the strtoul() function to locate the beginning of the sub-array.
Somewhat over-engineered. The WeMOS D1 Mini has almost exactly the same functionality, the differences are negligible in practice, and is smaller and cheaper.
Not a good idea. Does not include level shifting between the 3.3 V NodeMCU and the 5 V Mega. ![]()
Big question is - why make it hard for yourself by involving two microcontrollers and a communications protocol? The ESP is substantially more capable, just connect the sensors to it, using port expanders if necessary. ![]()
Some of the documents in the web says that the IO Pins of NodeMCU are 5V tolerant and practically they are?
It could be a learning session rather than making a commercial product.
On another forum thread here, a fellow is saying the ESP is even tolerant to operating at 5 V supply instead of 3.3 because he has been running it for some hours at 5 V and it is still working!
It certainly would not go down in a commercial product! ![]()
At least add a voltage divider so the TX of the AVR does not blow up the inputs of the NodeMCU. If you can, measure the voltages, if you cannot, I have both of them here and I can measure if you need measurement.
Noting down the excellent preventive action.
1 Like
This topic was automatically closed 120 days after the last reply. New replies are no longer allowed.