Stepper motor switching directions

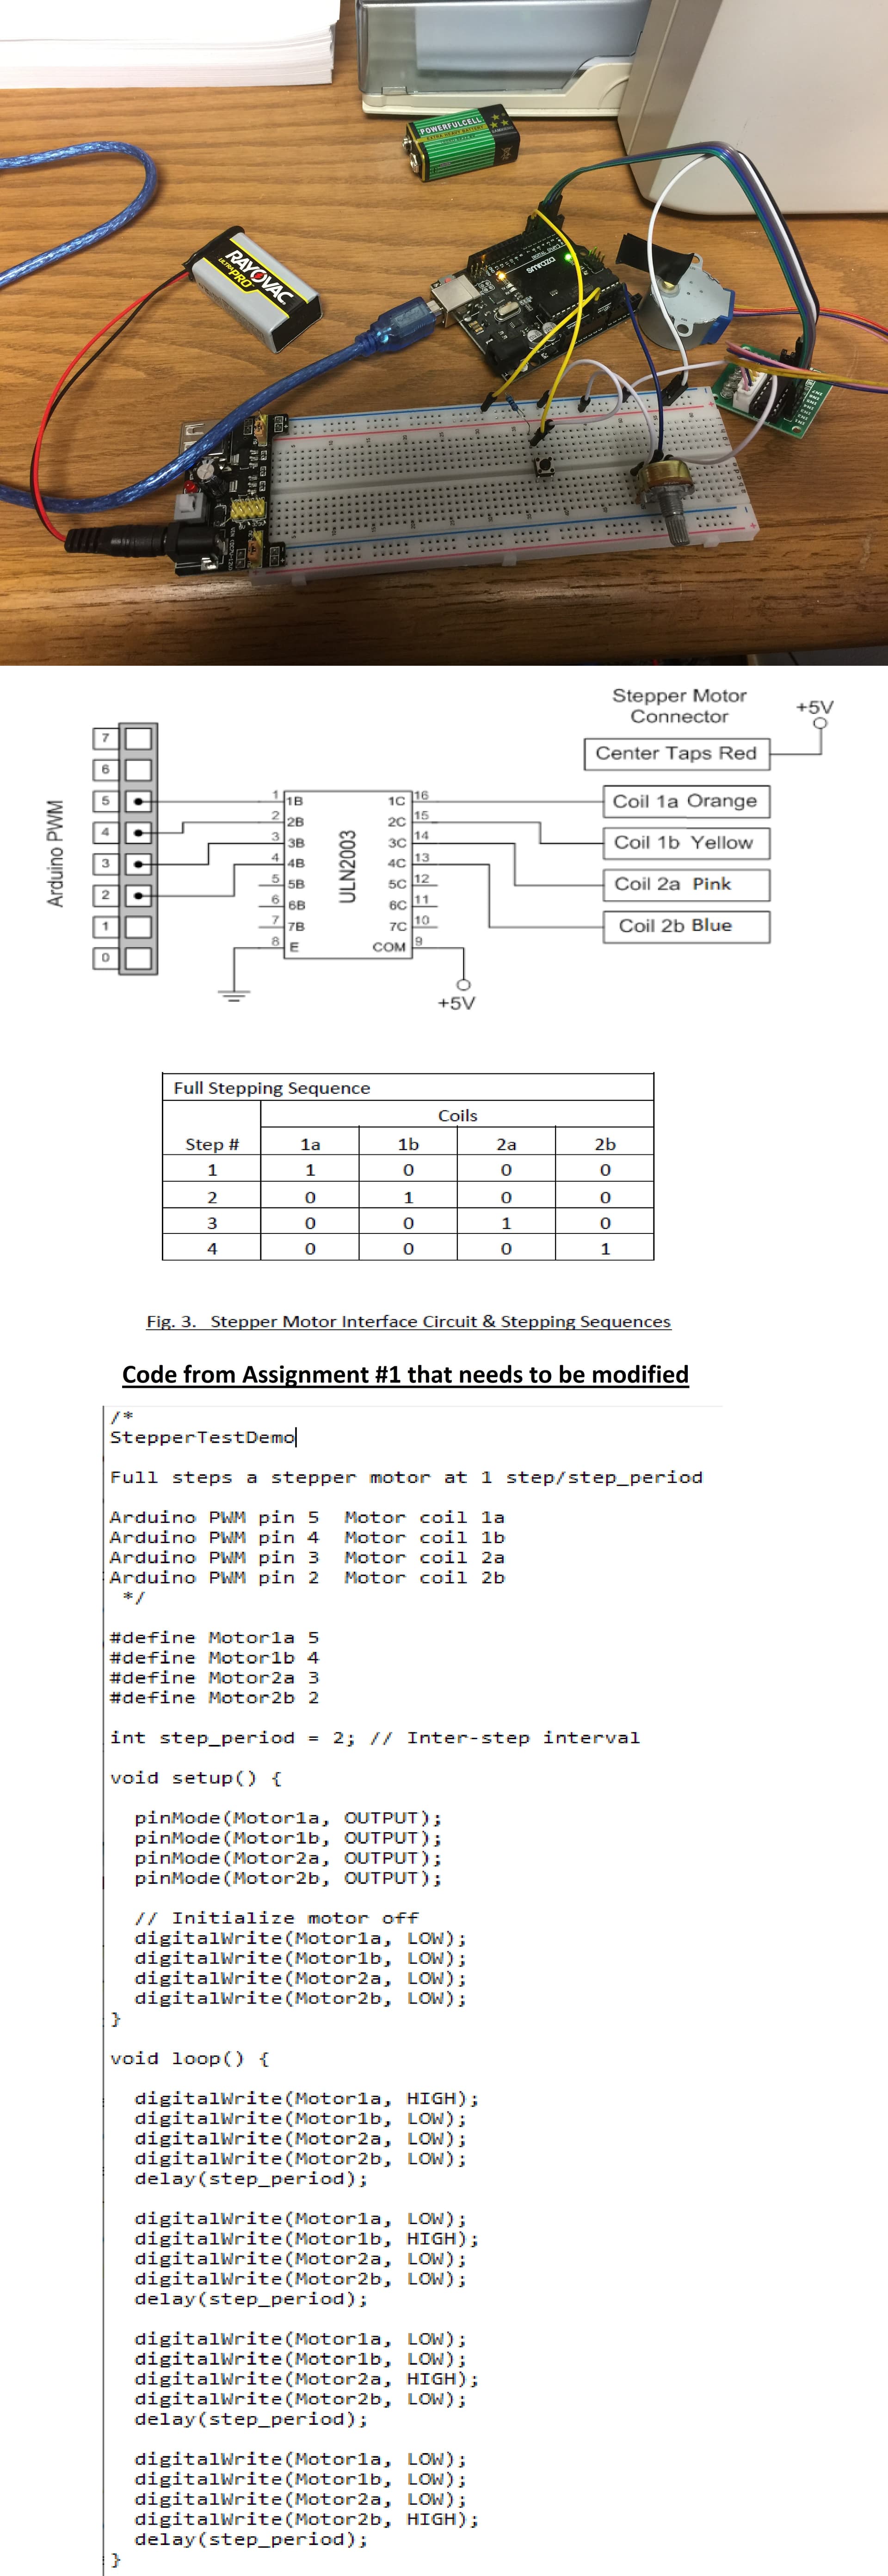
I'm here as a helper for my son and maybe learn something along the way for myself. I think he got me hooked on this stuff! Anyways, he needs to write a Arduino code using a stepper motor (28BYJ-48) which is connected to a ULN2003 Stepper Motor Driver Board. There is also a single button used to change direction of the stepper motor. Well, if you see the image below, you can see the setup. The image is showing the setup that was used to determine the max speed of the stepper motor (first assignment) - code below.
Now, he needs to modify the below code, to be able to do three things:

  1. Perform a "Full Step"
  2. Step counterclockwise when no button is pressed
  3. Step clockwise while HOLDING down the pushbutton

He is not allowed to use any functions from the stepper motor library. But there is a hint given: "The ULN2003 grounds whatever output is activated, for example, a 1 is output to Arduino pin 4 which is connected to ULN2003 pin 2B. This causes the ULN2003 pin 2C to go to ground potential thus turning on coil 1b (see Fig. 3)."
We both been putzing around for a while now to no previal and came to the conclusion that we both need help or some advise.

Setup / Connections / Code that needs to be modified:

Appreciate any help with this!

Here is a better (larger) attachment...hopefully:

welcome sir
I would have liked to explain, but I said this would be better so that what is in this video is applied and understood step by step

Thanks for the video. We were able to duplicate. Now we need to figure out how to use just one button and do the steps I explained above.

To better explain our end goal, here is a link to a youtube video of my sons experiment. No need to watch the whole thing (well, if you want to), just scroll to 16:40 of the video.
Stepper motor with a single button that switches direction.

Please post text as text, not images. With code post it as code too using </>

We cannot edit your code as a picture, post it as plain text using code tags.

My appologies. New to this. Below is the code that my son needs to modify to the steps 1,2,3 above. This code was based on the 1st assignment to figure out what is the max speed of the stepper motor before it stops moving:

/*
StepperTestDemo

Full steps a stepper motor at 1 step/step_period

Arduino PWM pin 5  Motor coil 1a
Arduino PWM pin 4  Motor coil 1b
Arduino PWM pin 3  Motor coil 2a
Arduino PWM pin 2  Motor coil 2b
 */

#define Motor1a 5    
#define Motor1b 4
#define Motor2a 3
#define Motor2b 2

int step_period = 2; // Inter-step interval
 
void setup() {

  pinMode(Motor1a, OUTPUT);  
  pinMode(Motor1b, OUTPUT);
  pinMode(Motor2a, OUTPUT);
  pinMode(Motor2b, OUTPUT);
  
  // Initialize motor off 
  digitalWrite(Motor1a, LOW);
  digitalWrite(Motor1b, LOW);
  digitalWrite(Motor2a, LOW);
  digitalWrite(Motor2b, LOW);
}

void loop() {
  
  digitalWrite(Motor1a, HIGH);
  digitalWrite(Motor1b, LOW);
  digitalWrite(Motor2a, LOW);
  digitalWrite(Motor2b, LOW);
  delay(step_period);
  
  digitalWrite(Motor1a, LOW);
  digitalWrite(Motor1b, HIGH);
  digitalWrite(Motor2a, LOW);
  digitalWrite(Motor2b, LOW);
  delay(step_period);
  
  digitalWrite(Motor1a, LOW);
  digitalWrite(Motor1b, LOW);
  digitalWrite(Motor2a, HIGH);
  digitalWrite(Motor2b, LOW);
  delay(step_period);
  
  digitalWrite(Motor1a, LOW);
  digitalWrite(Motor1b, LOW);
  digitalWrite(Motor2a, LOW);
  digitalWrite(Motor2b, HIGH);
  delay(step_period);
}

What does "Perform a full step" mean?

I'm not sure. I'm guessing that the stepper will just start rotating.

Well, ignoring that for now, I suggest that you copy the existing code and make a new version that turns the other way. I assume that running the listed states in reverse order will do it.

Some of the stepper motor libraries claim to produce partial steps. Doesn't make sense to me but its there in their descriptions

mick in glen innes 2370

Here's the 8 step "half step" sequence, 4096 steps per revolution:
FBD8BUKHMWVZNZQ.MEDIUM

Well, below is the code for completeing steps #1 & 2 (Stepper rotates CCW). Now all we needs to do is figure out step#3 (to make the stepper reverse direction -CW- when a single button is pushed and HELD). When the button is released, the stepper will change direction again (back to CCW).

/*

1. Perform a "Full Step"
2. Step counterclockwise when no button is pressed
3. Step clockwise while HOLDING down the pushbutton

Arduino PWM pin 2  Motor coil 1a
Arduino PWM pin 3  Motor coil 1b
Arduino PWM pin 4  Motor coil 2a
Arduino PWM pin 5  Motor coil 2b
 */

#define Motor1a 2    
#define Motor1b 3
#define Motor2a 4
#define Motor2b 5

int step_period = 2; // Inter-step interval
 
void setup() {

  pinMode(Motor1a, OUTPUT);  
  pinMode(Motor1b, OUTPUT);
  pinMode(Motor2a, OUTPUT);
  pinMode(Motor2b, OUTPUT);
  
  // Initialize motor off 
  digitalWrite(Motor1a, LOW);
  digitalWrite(Motor1b, LOW);
  digitalWrite(Motor2a, LOW);
  digitalWrite(Motor2b, LOW);
}

void loop() {
  
  digitalWrite(Motor1a, HIGH);
  digitalWrite(Motor1b, LOW);
  digitalWrite(Motor2a, LOW);
  digitalWrite(Motor2b, LOW);
  delay(step_period);
  
  digitalWrite(Motor1a, LOW);
  digitalWrite(Motor1b, HIGH);
  digitalWrite(Motor2a, LOW);
  digitalWrite(Motor2b, LOW);
  delay(step_period);
  
  digitalWrite(Motor1a, LOW);
  digitalWrite(Motor1b, LOW);
  digitalWrite(Motor2a, HIGH);
  digitalWrite(Motor2b, LOW);
  delay(step_period);
  
  digitalWrite(Motor1a, LOW);
  digitalWrite(Motor1b, LOW);
  digitalWrite(Motor2a, LOW);
  digitalWrite(Motor2b, HIGH);
  delay(step_period);
}

There is microstepping as well as full stepping.

Good point, so the instructions are to make the motor turn without bothering with microstepping.

It has been a while since I designed stepper motor drivers. But going from memory from over fifteen years ago. The current through the coils was varied over different levels.
So, to get one full step you energise coil A, say, then coil B, the motor rotates one step. De-energise coil A and the motor rotates another step. To get a microstep, your energise coil A, then energise coil B by a small fraction, say 1/8 of the normal energising current; the motor moves a little bit. Energise coil B by 1/4 of normal and the motor moves another small (micro) step, etc an so on.
(Caveat - I'm going from memory here. There are/were millions of motors using my design of driver out there somewhere)

Now my son and I are getting more and more confused...haha. We've been searching through all forums, YouTube videos for solving step#3. To the best of our knowledge, we'll need to incorporate the following into the above code?:

  1. buttonState = digitalRead(buttonPin);
  2. int stepDirection;
  3. if (buttonState == HIGH) {
  4. stepDirection = -1;
    We'll keep researching but hopefully we're on the right path.

Try this. It is by far not the best and smartest solution, but is is very close to your first try:

/*

1. Perform a "Full Step"
2. Step counterclockwise when no button is pressed
3. Step clockwise while HOLDING down the pushbutton

Arduino PWM pin 2  Motor coil 1a
Arduino PWM pin 3  Motor coil 1b
Arduino PWM pin 4  Motor coil 2a
Arduino PWM pin 5  Motor coil 2b
 */

#define Motor1a 2    
#define Motor1b 3
#define Motor2a 4
#define Motor2b 5
#define buttonPin 6

int step_period = 2; // Inter-step interval
 
void setup() {

  pinMode(Motor1a, OUTPUT);  
  pinMode(Motor1b, OUTPUT);
  pinMode(Motor2a, OUTPUT);
  pinMode(Motor2b, OUTPUT);
  pinMode(buttonPin, INPUT_PULLUP);
  
  // Initialize motor off 
  digitalWrite(Motor1a, LOW);
  digitalWrite(Motor1b, LOW);
  digitalWrite(Motor2a, LOW);
  digitalWrite(Motor2b, LOW);
}

void loop() {
  if ( digitalRead( buttonPin ) == LOW ) {
    stepCCW();
  } else {
    stepCW();
  }
}

void stepCCW() {
  digitalWrite(Motor1a, HIGH);
  digitalWrite(Motor1b, HIGH);
  digitalWrite(Motor2a, LOW);
  digitalWrite(Motor2b, LOW);
  delay(step_period);
  
  digitalWrite(Motor1a, LOW);
  digitalWrite(Motor1b, HIGH);
  digitalWrite(Motor2a, HIGH);
  digitalWrite(Motor2b, LOW);
  delay(step_period);
  
  digitalWrite(Motor1a, LOW);
  digitalWrite(Motor1b, LOW);
  digitalWrite(Motor2a, HIGH);
  digitalWrite(Motor2b, HIGH);
  delay(step_period);
  
  digitalWrite(Motor1a, HIGH);
  digitalWrite(Motor1b, LOW);
  digitalWrite(Motor2a, LOW);
  digitalWrite(Motor2b, HIGH);
  delay(step_period);
}

void stepCW() {
  digitalWrite(Motor1a, HIGH);
  digitalWrite(Motor1b, LOW);
  digitalWrite(Motor2a, LOW);
  digitalWrite(Motor2b, HIGH);
  delay(step_period);

  
  digitalWrite(Motor1a, LOW);
  digitalWrite(Motor1b, LOW);
  digitalWrite(Motor2a, HIGH);
  digitalWrite(Motor2b, HIGH);
  delay(step_period);
  
  digitalWrite(Motor1a, LOW);
  digitalWrite(Motor1b, HIGH);
  digitalWrite(Motor2a, HIGH);
  digitalWrite(Motor2b, LOW);
  delay(step_period);
  
  digitalWrite(Motor1a, HIGH);
  digitalWrite(Motor1b, HIGH);
  digitalWrite(Motor2a, LOW);
  digitalWrite(Motor2b, LOW);
  delay(step_period);
  
}

I engaged always two coils at once, because this gives more torque. With your version the stepper will not always change direction successfully and stop moving, because there is no acceleration and deceleration.
Why don't you try with a stepper library?

Thanks! We'll give this a try and let you know. From my son's teacher explaining about the stepper library:
"Note: DO NOT use functions from the stepper motor library (there is no need and they are a bit
complicated)"

1 Like