TFT LCD coordinate mapping is flipped

I am trying to make a GUI for my TFT LCD, when the first button on the first page is clicked three new buttons appear, however, the mapping has now been flipped. Instead of mapping where the screen has been touched from the top left it has done it from the bottom right. How would i go about fixing this.

#include <Adafruit_GFX.h>
#include <Adafruit_TFTLCD.h>
#include <TouchScreen.h>
#include <stdint.h>

#define LCD_CS A3
#define LCD_CD A2
#define LCD_WR A1
#define LCD_RD A0
#define LCD_RESET A4
// these pins define the pins being used by the Arduino^^
#define TS_MINX 118
#define TS_MINY 106
#define TS_MAXX 950
#define TS_MAXY 933
#define YP A3
#define XM A2
#define YM 9
#define XP 8
// this code calibrates the screen
Adafruit_TFTLCD tft(LCD_CS, LCD_CD, LCD_WR, LCD_RD, LCD_RESET);


TouchScreen ts = TouchScreen(XP, YP, XM, YM, 300);
// these define the pins used to activate the screen
#define BLACK 0x0000
#define BLUE 0x001F
#define RED 0xF800
#define GREEN 0x07E0
#define CYAN 0x07FF
#define MAGENTA 0xf81F
#define YELLOW 0xFFE0
#define WHITE 0xFFFF


int currentscreen = 0;
bool Camera = 0;
bool tracker = false;
bool Homevar = false;
bool backbutton = 1;
bool welcome = true;

void Home() {
  tft.fillScreen(RED);
  tft.setCursor(60, 100);
  tft.setTextSize(2);
  tft.print("CHOOSE APPLICATION");
  tft.fillRect(10, 10, 75, 75, BLUE);
  tft.fillRect(125, 10, 75, 75, BLUE);
  tft.fillRect(240, 10, 75, 75, BLUE);
  // creating buttons for applications, first test out using LED's
}
void Welcome() {
  tft.fillScreen(WHITE);                //WHat to fill the screen colour with- colours stated above
  tft.drawRect(0, 0, 319, 240, WHITE);  //the rectangularshape that the screen fills
  tft.setCursor(5, 5);                  //set cursor is where text will begin on the screen, top right corner of the text
  tft.setTextColor(BLACK);
  tft.setTextSize(2);
  tft.print("WELCOME LKAT");
  //add parameters
  tft.fillRect(50, 180, 210, 40, BLACK);
  tft.drawRect(50, 180, 210, 40, GREEN);
  tft.setCursor(60, 190);
  tft.setTextColor(WHITE);
  tft.setTextSize(2);
}

void LED() {
  tft.setCursor(5, 5);
  tft.fillScreen(BLUE);
  tft.print("HELLO");
}


void setup() {
  Serial.begin(9600);
  tft.reset();
  uint16_t identifier = tft.readID();
  tft.begin(identifier);
  tft.setRotation(1);  //changing this value between 1 and 0 will change the layout of the text on screen. landscape portarait
  currentscreen = 0;

  Welcome();
}

void loop() {

  TSPoint p = ts.getPoint();
  if (p.z > ts.pressureThreshhold) {
    p.y = map(p.y, TS_MINY, TS_MAXY, 0, 480);
    p.x = map(p.x, TS_MINX, TS_MAXX, 0, 320);
    pinMode(XM, OUTPUT);
    pinMode(YP, OUTPUT);

    Serial.println(p.x);
    Serial.println(p.y);
    //set screen resolution


    if (currentscreen == 0) {
      if (p.x > 50 && p.x < 260 && p.y > 180 && p.y < 260) {

        currentscreen = 1;

        Homevar = true;
        Home();
      }
    }


    if (currentscreen == 1 && Homevar == true) {

      //check coordinates, screen has rotated
      if (p.y > 10 && p.y < 85 && p.x > 10 && p.x < 85) {

        LED();
        currentscreen = 2;
      }
      //other if
    }
  }
}

This is a stab in the dark but do you need to set XM and PM as input before you call getpoint again.

Im not sure if the library your using does it for you, and those pins are probably shared with your display pins

Go back the version where the mapping was correct, and take a close look at what you changed.

The library should take care of setting those to input mode.
What does need to be done is to unconditionally set them back to output mode immediately after getpoint(), the OP has that inside an if statement.

To the OP, changing the rotation of the display should not affect the rotation of the touchscreen.
Simplest thing to do is to write code that will display the buttons, then print out the coordinates where you touch the screen. That will let you touch the corners of each button and see what the actual coordinates are.

Adding a few parenthesis to this would make it easier to read.

      if (p.x > 50 && p.x < 260 && p.y > 180 && p.y < 260) {

Correct i just looked up source and it does

If its simply because hes rotated the screen yes then he will need to remap the touch points

so would that mean setting them up as inputs in setup and then outputs in the vid loop, or before each if statement set up XM and XP as inputs or outputs

if I set them as inputs in the void setup and that made the screen blank, if I place it before the get point in the loop it does nothing

To clear this up. So that inputs have flipped as soon as you load the program?

Or after you touch the screen the inputs get flipped?

@david_2018 and @theboot have already posted what the most likely reason for your issue is: It is the rotation of your screen.

I checked with my ILI9341 LCD Touchdisplay

image

The picture shows the increasing values of touch coordinates. They always start on the top/left edge of the screen (the black part is the external power jack of the UNO). If I set rotation to 0 or 2 text is displayed as the text here.

The touchscreen does not know anything about the rotation of the display, it is handled as a separate device.

That's quite likely also the case with your device. You can try to change rotation

  • from 1 to 3 or
  • from 0 to 2

Good luck!
ec2021

So that did work but now for the other buttons, there is the same problem. The button on the far right is now read from the bottom left. but now the first button works
Have you tried it on your display, if it works for you it might be my display.


// create numbers for the vari
#include <Adafruit_GFX.h>
#include <Adafruit_TFTLCD.h>
#include <TouchScreen.h>


#define LCD_CS A3
#define LCD_CD A2
#define LCD_WR A1
#define LCD_RD A0
#define LCD_RESET A4
// these pins define the pins being used by the Arduino^^
#define TS_MINX 118
#define TS_MINY 106
#define TS_MAXX 950
#define TS_MAXY 933
#define YP A3
#define XM A2
#define YM 9
#define XP 8
// this code calibrates the screen
Adafruit_TFTLCD tft(LCD_CS, LCD_CD, LCD_WR, LCD_RD, LCD_RESET);


TouchScreen ts = TouchScreen(XP, YP, XM, YM, 300);
// these define the pins used to activate the screen
#define BLACK 0x0000
#define BLUE 0x001F
#define RED 0xF800
#define GREEN 0x07E0
#define CYAN 0x07FF
#define MAGENTA 0xf81F
#define YELLOW 0xFFE0
#define WHITE 0xFFFF


int currentscreen = 0;
bool Camera = 0;
bool tracker = false;
bool Homevar = false;
bool backbutton = 1;
bool welcome = true;

void Home() {
  tft.fillScreen(RED);
  tft.setCursor(60, 100);
  tft.setTextSize(2);
  tft.print("CHOOSE APPLICATION");
  tft.fillRect(10, 10, 75, 75, BLUE);
  tft.fillRect(125, 10, 75, 75, BLUE);
  tft.fillRect(240, 10, 75, 75, BLUE);
  // creating buttons for applications, first test out using LED's
}
void Welcome() {
  tft.fillScreen(WHITE);                //WHat to fill the screen colour with- colours stated above
  tft.drawRect(0, 0, 319, 240, WHITE);  //the rectangularshape that the screen fills
  tft.setCursor(5, 5);                  //set cursor is where text will begin on the screen, top right corner of the text
  tft.setTextColor(BLACK);
  tft.setTextSize(2);
  tft.print("WELCOME LKAT");
  //add parameters
  tft.fillRect(50, 180, 210, 40, BLACK);
  tft.drawRect(50, 180, 210, 40, GREEN);
  tft.setCursor(60, 190);
  tft.setTextColor(WHITE);
  tft.setTextSize(2);
}

void LEDB() {

  tft.fillScreen(BLUE);
  tft.print("HELLO");
}


void LEDR() {

  tft.fillScreen(GREEN);
  tft.print("HELLO");
}
void setup() {

  tft.reset();
  uint16_t identifier = tft.readID();
  tft.begin(identifier);
    tft.setRotation(1); //changing this value between 1 and 0 will change the layout of the text on screen. landscape portarait
  currentscreen = 0;

Welcome();

}

void loop() {
 
    pinMode(XM, INPUT);
 pinMode(YP, INPUT);
  TSPoint p = ts.getPoint();
  if (p.z > ts.pressureThreshhold) {
    p.x = map(p.x, TS_MINX, TS_MAXX, 0, 320);
    p.y = map(p.y, TS_MINY, TS_MAXY, 0, 480);
    pinMode(XM, OUTPUT);
    pinMode(YP, OUTPUT);
    //set screen resolution
  }
  if(welcome == true){
  if (currentscreen == 0 ) {
    if (p.x > 50 && p.x < 260 && p.y > 180 && p.y < 260) {

      currentscreen = 1;
welcome = false;
      Homevar = true;
            Home();
    }
  }

  }
  
    if (currentscreen == 1 && Homevar==true && welcome == false){

    
    if( (p.x > 10) && (p.x < 85) && (p.y > 10) && (p.y < 85) ){


      LEDB();
      currentscreen = 2;
    }
    else if( (p.x > 240) && (p.x < 315) && (p.y > 10) && (p.y < 85) ){

      LEDR();
      currentscreen = 3;
    //other if
  }
}
}

If orientation of the touchscreen is a problem, that can be handled in the two map() functions.
In the following code, I am swapping the x and y coordinates to match the display rotation. It might also be necessary to reverse the direction of the X or Y axis by reversing the last two arguments of the map().

I think it is a bit easier to read if there is a function for checking the button presses, that way you can use the same format as the fillrect() function for defining the bounds of the button.

void loop() {
  TSPoint p = ts.getPoint();
  pinMode(XM, OUTPUT);
  pinMode(YP, OUTPUT);
  
  if (p.z > ts.pressureThreshhold) {
    int y = map(p.x, TS_MINX, TS_MAXX, 0, 240);
    int x = map(p.y, TS_MINY, TS_MAXY, 0, 320);
   
    if (welcome == true) {
      if (currentscreen == 0 ) {
        if (buttonPressed(x, y, 50, 180, 210, 40)) {
          currentscreen = 1;
          welcome = false;
          Homevar = true;
          Home();
        }
      }
    }

    if (currentscreen == 1 && Homevar == true && welcome == false) {
      if (buttonPressed(x, y, 10, 10, 75, 75)) {
        tft.fillRect(10, 10, 75, 75, GREEN);
        tft.fillRect(125, 10, 75, 75, BLUE);
        tft.fillRect(240, 10, 75, 75, BLUE);
      }
      else if (buttonPressed(x, y, 125, 10, 75, 75)) {
        tft.fillRect(10, 10, 75, 75, BLUE);
        tft.fillRect(125, 10, 75, 75, GREEN);
        tft.fillRect(240, 10, 75, 75, BLUE);
      }
      else if (buttonPressed(x, y, 240, 10, 75, 75)) {
        tft.fillRect(10, 10, 75, 75, BLUE);
        tft.fillRect(125, 10, 75, 75, BLUE);
        tft.fillRect(240, 10, 75, 75, GREEN);
      }
    }
  }
}

bool buttonPressed(const int x, const int y, const int buttonX, const int buttonY, const int buttonWidth, const int buttonHeight) {
  return ( (x >= buttonX) && (x <= buttonX + buttonWidth) && (y >= buttonY) && (y <= buttonY + buttonHeight) );
}

Are you using a 320 x 480 display? The screen images seem to be formatted for 240 x 320.

1 Like

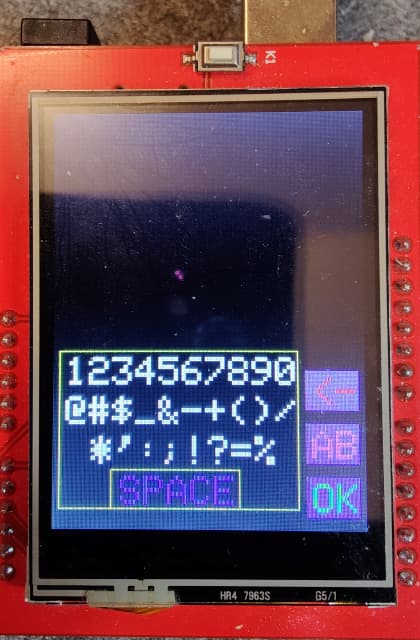
This is a sketch that works fine on my ILI9341 touchscreen lcd shield:

// Included libraries
#include <Adafruit_GFX.h>
#include <Adafruit_TFTLCD.h>
#include <TouchScreen.h>

#define DEBUG    // Prints helpful data via Serial if defined

// Color definitions for the tft (RGB565)
#define BLACK 0x0000
#define BLUE 0x001F
#define RED 0xF800
#define GREEN 0x07E0
#define CYAN 0x07FF
#define MAGENTA 0xf81F
#define YELLOW 0xFFE0
#define WHITE 0xFFFF


// These lines define the pins being used by the Arduino
// and the TFT touchscreen shield
#define LCD_CS A3
#define LCD_CD A2
#define LCD_WR A1
#define LCD_RD A0
#define LCD_RESET A4
#define YP A3
#define XM A2
#define YM 9
#define XP 8

// Values used to calibrate the touchscreen

#define TS_MINX 125         // Original 118
#define TS_MAXX 880         // Original 950

#define TS_MINY  76         // Original 106
#define TS_MAXY 905         // Original 933

// Values for screen width and height in landscape(!) mode
#define SCREEN_WIDTH 320
#define SCREEN_HEIGHT 240

// tft and touchscreen declaration and initialization
Adafruit_TFTLCD tft(LCD_CS, LCD_CD, LCD_WR, LCD_RD, LCD_RESET);
TouchScreen ts = TouchScreen(XP, YP, XM, YM, 300);

// Enumerations for different screens and status of the application
enum statusType {WELCOME, HOME, B_SCREEN, R_SCREEN, UNDEFINED};

// prevScreen stores the last active status. It assists to recognize when actScreen has changed!
// actScreen holds the actual (or new) active status
// UNDEFINED can be used to mark an unknown/undefined status. If recognized the application may go to e.g. WELCOME
statusType prevScreen  = UNDEFINED;
statusType actScreen   = WELCOME;

// Variables of type "boxType" hold coordinates, dimensions and color of a box to be drawn
// A well chosen name for the box makes it easy to follow the code.
// The box data are also used to check whether a touch was inside or not.
struct boxType {
  int x;
  int y;
  int width;
  int height;
  uint16_t color;
};

// The variable touch of type "touchType"  holds the x,y coordinates of a touch mapped to
// the dimensions and rotation(!) of the screen. The data are only considered valid if the 
// boolean variable "detected" is true.
struct touchType {
  int x;
  int y;
  boolean detected = false;
} touch;

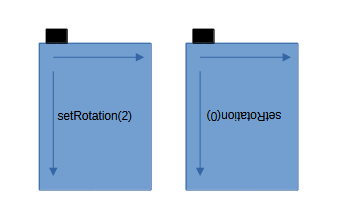
// The struct screenType is close to a class ;-). It holds the wanted screen rotation and
// - if the rotation is changed - automatically adopts the internal values for width and height
// External access to write or read data is only possible via specific functions to ensure
// correct matching of rotation/width/height.
// setRotation() ignores values higher than 3. 

struct screenType {
  private:
    byte rotation = 1;
    int width    = SCREEN_WIDTH;
    int height   = SCREEN_HEIGHT;
  public:
    int getWidth() {
      return width;
    }
    int getHeight() {
      return height;
    }
    byte getRotation() {
      return rotation;
    }
    void setRotation(byte aRot) {
      switch (aRot) {
        case 0:
        case 2:
          rotation = aRot;
          width    = SCREEN_HEIGHT;
          height   = SCREEN_WIDTH;
          break;
        case 1:
        case 3:
          rotation = aRot;
          width    = SCREEN_WIDTH;
          height   = SCREEN_HEIGHT;
         break;
      }
    }
} screen;


// As the controller is very quick we use a time restriction for checking the touchscreen after
// a status change. This is realized in checkTouchScreen() and lasts 500 ms.
// changeTime is the global variable that keeps the time of the last status change.
unsigned long changeTime = 0;

// Here a number of "input boxes" are defined as boxType(s)
// boyType exampleBox   { x coordinate, y coordinate, length, height, color}
// Most of them will be drawn but they must not ...
// Their dimensions are used later also for the boolean function "touchInside(aBox)" to detected
// whether a touch was inside their boundings or not
//
// The virtualHomeBox is never drawn, however it is used to detect a touch on a page
// inside a smaller box than the whole screen (some touchscreens create spurios touches
// at their borders ...) The color has to be set but is never used in this case.
// Use readable names (these are just examples ...) it makes live easier ...
boxType welcomeBox      { 50, 180, 210,  40, BLACK};
boxType virtualHomeBox  { 20,  20, 280, 200, BLACK}; // Used only for "handleBackHome" function ;-)
boxType applicationBox1 { 10,  10,  75,  75, BLUE};
boxType applicationBox2 {125,  10,  75,  75, BLUE};
boxType applicationBox3 {240,  10,  75,  75, BLUE};

// In Setup we use screen.setRotation() first to ensure the correct setting of screen.getWidth/getHeight for
// later use
// 
// To keep consistency we use screen. getRotation() with tft.setRotation(). 
void setup() {
  Serial.begin(115200);
  screen.setRotation(1);
  tft.reset();
  uint16_t identifier = tft.readID();
  tft.begin(identifier);
  tft.setRotation(screen.getRotation()); 
}

// loop() is quite short (how I like it) so that one can identify the main functions easily
// 
// checkTouchScreen()handles the touchscreen data
//
// drawNewScreen() draws a new screen if necessary
//
// screenMachine() handles the application depending on actScreen
//
void loop() {
  checkTouchscreen();
  drawNewScreen();
  screenMachine();
}


// drawNewScreen() checks if actScreen differs from prevScreen. If not -> it relaxes and does nothing
// If they differ it draws the newly requested screen and "memorizes" this in prevScreen to avoid
// drawing the same screen again in the next loop().
void drawNewScreen() {
  if (actScreen == prevScreen) {  // if not new -> return immediately
    return;
  }
  touch.detected = false;
  prevScreen = actScreen;
  switch (actScreen) {
    case WELCOME:
      drawWelcome();
      break;
    case HOME:
      drawHome();
      break;
    case B_SCREEN:
      drawBScreen();
      break;
    case R_SCREEN:
      drawRScreen();
      break;
    default: // otherwise do nothing
      break;
  }
  changeTime = millis();  // Store the time when the screen has changed to ignore touchscreen input for a short while ...
}

void drawHome() {
  Serial.println("Home");
  tft.fillScreen(RED);
  printXcentered(100, "CHOOSE APPLICATION", WHITE, 2);
  drawBox(applicationBox1);
  drawBox(applicationBox2);
  drawBox(applicationBox3);
}

void drawWelcome() {
  Serial.println("Welcome");
  tft.fillScreen(WHITE);                
  tft.drawRect(0, 0, 319, 240, WHITE);  
  printAt(5, 5, "WELCOME LKAT", BLACK, 2);
  drawBox(welcomeBox);
  tft.drawRect(50, 180, 210, 40, GREEN);
}

void drawBScreen() {
  Serial.println("LEDB");
  tft.fillScreen(BLUE);
  printXcentered(120, "HELLO", WHITE, 2);
}

void drawRScreen() {
  Serial.println("LEDR");
  tft.fillScreen(GREEN);
  printXcentered(120, "HELLO", BLACK, 2);
}

// screenMachine() uses the variable actScreen to choose what to do now.
// Each different status signalized by actState can (but must not necessarily) have it's own handling routine.
// These routines are coded separately later.

void screenMachine() {
  switch (actScreen) {
    case WELCOME:
      handleWelcome();
      break;
    case HOME:
      handleHome();
      break;
    case B_SCREEN:
      handleBackHome();
      break;
    case R_SCREEN:
      handleBackHome();
      break;
    default:  // Works for UNDEFINED and others
      actScreen = WELCOME;
      prevScreen = UNDEFINED;
      break;
  }
}

void handleWelcome() {
  if (touchInside(welcomeBox)) {
    actScreen = HOME;
  }
}

void handleBackHome() {
  if (touchInside(virtualHomeBox)) {
    actScreen = HOME;
  }
}

void handleHome() {
  if (touchInside(applicationBox1)) {
    Serial.println("APP 1");
    actScreen = B_SCREEN;
    return;
  }
  if (touchInside(applicationBox2)) {
    Serial.println("APP 2");
    actScreen = R_SCREEN;
    return;
  }
  if (touchInside(applicationBox3)) {
    Serial.println("APP 3");
    actScreen = WELCOME;
    return;
  }
}

// checkTouchScreen() reads touchscreen data, and - if any - maps them in accordance with
// the screen data and rotation.
void checkTouchscreen() {
  if (millis() - changeTime < 500) { // To give the user some time to release the touchscreen!
    touch.detected = false;          // If the change was within the last 500 ms we ignore all 
    return;                          // touches
  }
  // Read the toucscreen
  TSPoint p = ts.getPoint();
  pinMode(XM, OUTPUT);
  pinMode(YP, OUTPUT);
  // Let us assume we have nothing detected ...
  touch.detected = false;
  if (p.z > ts.pressureThreshhold) {
	// we use constrain to avoid values below TS_MIN and above TS_MAX 
	// in case that p.x. or p.y are outside our calibration data
    int x = constrain(p.x, TS_MINX, TS_MAXX);
    int y = constrain(p.y, TS_MINY, TS_MAXY);
	// Assignment of touchscreen x,y and pixel x,y  as well as 
	// the zero position depends on the screen rotation
	// For reasons of comprehensibility it has been written here 
	// in a readable way. Sometimes TS_MIN, TS_MAX have been exchanged
	// to cope with the situation that e.g. pixel.x goes from left to
	// right while p.x goes from right to left etc.
	// The same applies to pixel.y and p.y . Also sometimes
	// touch.y has to be calculated from p.x and so on.
    switch (screen.getRotation()) {
      case 0 :
        touch.x = map(x, TS_MAXX, TS_MINX, 0, SCREEN_HEIGHT);
        touch.y = map(y, TS_MAXY, TS_MINY, 0, SCREEN_WIDTH);
        break;
      case 1 :
        touch.x = map(y, TS_MAXY, TS_MINY, 0, SCREEN_WIDTH);
        touch.y = map(x, TS_MINX, TS_MAXX, 0, SCREEN_HEIGHT);
        break;
      case 2 :
        touch.x = map(x, TS_MINX, TS_MAXX, 0, SCREEN_HEIGHT);
        touch.y = map(y, TS_MINY, TS_MAXY, 0, SCREEN_WIDTH);
        break;
      case 3 :
        touch.x = map(y, TS_MINY, TS_MAXY, 0, SCREEN_WIDTH);
        touch.y = map(x, TS_MAXX, TS_MINX, 0, SCREEN_HEIGHT);
        break;
      default:
        touch.x = map(x, TS_MINX, TS_MAXX, 0, SCREEN_HEIGHT);
        touch.y = map(y, TS_MINY, TS_MAXY, 0, SCREEN_WIDTH);
        break;
    }
    touch.detected = true;
	// if DEBUG is defined above, these helpful data 
	// are printed with every touch detected ...
	// It also allows to check or identify the 
	// original touchscreen coordinates and 
	// to change the calibration data if required.
#ifdef DEBUG
    Serial.print(p.x);
    Serial.print(',');
    Serial.print(p.y);
    Serial.print(" - ");
    Serial.print(touch.x);
    Serial.print(',');
    Serial.println(touch.y);
#endif
  }
}

// touchInside immediately returns false if no touch was detected.
// If the touch data are valid, it checks the touch coordinates
// against the top and left boundaries of aBox,
// calculates the bottom and the right boundary of aBox
// by adding width and height to the respective coordinates
// If touch was inside it returns true, else false.
boolean touchInside(boxType &aBox) {
  if (!touch.detected) {
    return false;
  }
  return (touch.x > aBox.x && touch.x < (aBox.x + aBox.width) &&
          touch.y > aBox.y && touch.y < (aBox.y + aBox.height));
}

// drawBox() draws a filled rectangle using the data of the given
// boxType structure
void drawBox(boxType &aBox) {
  tft.fillRect(aBox.x, aBox.y, aBox.width, aBox.height, aBox.color);
}

// printAt() combines text color, size, position and text in one call
void printAt(int x, int y, char txt[80], uint16_t color, int tSize) {
  tft.setTextColor(color);
  tft.setTextSize(tSize);
  tft.setCursor(x, y);
  tft.print(txt);
}

// printXcenteres() combines text color, size, y position and text in one call
// It uses screen.getWidth() and the text length to calculate the x position
// where to start and then calls printAt to perform the rest.
// Just be aware: Text is limited to 80 char by this definition ...
// 
void printXcentered(int y, char txt[80], uint16_t color, int tSize) {
  int len = strlen(txt);
  int x = screen.getWidth()/2 - (6 * tSize * len) / 2;
  if (x < 0) {
    x = 0;
  }
  printAt(x, y, txt, color, tSize);
}

I rearranged your sketch. At least on my lcd the rotation is now taken care of "automatically" so that the touch positions are mapped in accordance to the fixed touchscreen and the variable pixel coordinate system.

Using structs to store and handle the "box" dimensions allows to define their data at one place and use them for drawing as well as for detecting touches inside the boundaries.

I have not put any effort in

  • changing from defines to constexpr
  • using PROGMEM to store text data
  • or any other optimization that might be possible

Feel free to check it out, I've put a lot of comments to allow you to follow the ideas behind.

It was an interesting task for me and I hope it is of any use for you now ... :wink:

Good luck!
ec2021

P.S.: The function printXcentered() uses hardcoded character width that works for the given font. The function may have to be adapted to other character fonts ... As it is not a significant function I'll leave this to the final user ... :slight_smile:

[Edit: I just removed hardcoded data in checkTouchScreen() to make it more flexible. But not tested with other dimensions ... ]

Along with a rotation of the screen, this version of the code works! Thank you! :facepunch: !

Would you be able to explain why you switched the x and y values, I'd like to fully understand the code and make comments as well for anyone else in the future who needs it.

  int y = map(p.x, TS_MINX, TS_MAXX, 0, 240);
    int x = map(p.y, TS_MINY, TS_MAXY, 0, 320);

The touchscreen and the display are separate hardware. Rotating the display does not rotate the touchscreen, and the touchscreen library has a fixed orientation for the x and y axis of the touchscreen. The reason I swapped the x and y coordinates returned from the touchscreen library was to align the touchscreen with the x and y axis of the display.

1 Like

So you can get an idea how it works

A touchscreen is 2 pieces of resistive material with a small gap between them mounted on top of your screen. When you put pressure on the screen that causes the 2 pieces to contact each ither

When you touch the screen the touch screen controller will read the resistance values along both axis. Touching different parts of the screen will give different resistance values on both axis.

These resistance values are what you are mapping to coordinates on your screen. Apart from having the logic chip for this on the display pcb, they share nothing in common

Rotating the display means you need to map these resistance values differently, as the same corner of the screen is always going to read similar resistance values

Every resisitve touch panel will give slightly different resistance, which is why you need to calibrate them.

Resistive touch screens are not very accurate, but they are good for when the screen will get moisture on it.

If you need very accurate touching (with reading multiple touches at once) you can get capacitive touch. These are what mobile phones use.

Final Code

// You need to just currentscreen vairaible,
//if statements

// create numbers for the vari
#include <Adafruit_GFX.h>
#include <Adafruit_TFTLCD.h>
#include <TouchScreen.h>
#include <stdint.h>

#define LCD_CS A3
#define LCD_CD A2
#define LCD_WR A1
#define LCD_RD A0
#define LCD_RESET A4
// these pins define the pins being used by the Arduino^^
#define TS_MINX 118
#define TS_MINY 106
#define TS_MAXX 950
#define TS_MAXY 933
#define YP A3
#define XM A2
#define YM 9
#define XP 8
// this code calibrates the screen
Adafruit_TFTLCD tft(LCD_CS, LCD_CD, LCD_WR, LCD_RD, LCD_RESET);


TouchScreen ts = TouchScreen(XP, YP, XM, YM, 300);
// these define the pins used to activate the screen
#define BLACK 0x0000
#define BLUE 0x001F
#define RED 0xF800
#define GREEN 0x07E0
#define CYAN 0x07FF
#define MAGENTA 0xf81F
#define YELLOW 0xFFE0
#define WHITE 0xFFFF


int currentscreen = 0;
bool Camera = 0;
bool tracker = false;
bool Homevar = false;
bool backbutton = 1;
bool welcome = true;

void Home() {
  tft.fillScreen(RED);
  tft.setCursor(60, 100);
  tft.setTextSize(2);
  tft.print("CHOOSE APPLICATION");
  tft.fillRect(10, 10, 75, 75, BLUE);
  tft.fillRect(125, 10, 75, 75, BLUE);
  tft.fillRect(240, 10, 75, 75, BLUE);
  // creating buttons for applications, first test out using LED's
}
void Welcome() {
  tft.fillScreen(WHITE);                //WHat to fill the screen colour with- colours stated above
  tft.drawRect(0, 0, 319, 240, WHITE);  //the rectangularshape that the screen fills
  tft.setCursor(5, 5);                  //set cursor is where text will begin on the screen, top right corner of the text
  tft.setTextColor(BLACK);
  tft.setTextSize(2);
  tft.print("WELCOME LKAT");
  //add parameters
  tft.fillRect(50, 180, 210, 40, BLACK);
  tft.drawRect(50, 180, 210, 40, GREEN);
  tft.setCursor(60, 190);
  tft.setTextColor(WHITE);
  tft.setTextSize(2);
}

void LEDB() {
  tft.setCursor(5, 5);
  tft.fillScreen(BLUE);
  tft.print("HELLO");
}

void LEDR() {
  tft.setCursor(5, 5);
  tft.fillScreen(RED);
  tft.print("HELLO");
}

void setup() {
  Serial.begin(9600);
  tft.reset();
  uint16_t identifier = tft.readID();
  tft.begin(identifier);
  tft.setRotation(3);  //changing this value between 1 and 0 will change the layout of the text on screen. landscape portarait
  currentscreen = 0;

  Welcome();
}

bool buttonPressed(const int x, const int y, const int buttonX, const int buttonY, const int buttonWidth, const int buttonHeight) {
  return ( (x >= buttonX) && (x <= buttonX + buttonWidth) && (y >= buttonY) && (y <= buttonY + buttonHeight) );
}

void loop() {

  TSPoint p = ts.getPoint();
      pinMode(XM, OUTPUT);
    pinMode(YP, OUTPUT);

   if (p.z > ts.pressureThreshhold) {
    int y = map(p.x, TS_MINX, TS_MAXX, 0, 240);
    int x = map(p.y, TS_MINY, TS_MAXY, 0, 320);

if (welcome == true) {
      if (currentscreen == 0 ) {
        if (buttonPressed(x, y, 50, 180, 210, 40)) {// x and y map variables and then the starting x,y coordinate and then width and then hieght
          currentscreen = 1;
          welcome = false;
          Homevar = true;
          Home();
        }
      }
    }
if (currentscreen == 1) {
  if( Homevar == true && welcome == false){
      if (buttonPressed(x, y, 10, 10, 75, 75)) {// starting xy coord and then width and height
       LEDB();
       currentscreen=2;
      }
   else if (buttonPressed(x, y, 125, 10, 75, 75)) {
   LEDR();
   currentscreen=3;

   }
      else if (buttonPressed(x, y, 240, 10, 75, 75)) {
        tft.fillScreen(GREEN);
        currentscreen=4;
  }
  }
}
   }
}

would you be able to explain the bool buttonpressed, so I can make comments.

This topic was automatically closed 180 days after the last reply. New replies are no longer allowed.