Two LEDs fading at half cycle rate

I was trying the fading example and experimenting with 2 LEDs and although it works but I couldn't get the required half cycle.

int ledPin = 5;  
int ledPin2 = 3;

void setup() {
  pinMode(ledPin, OUTPUT);   
  pinMode(ledPin2, OUTPUT);   
}

void loop() {
  // fade in from min to max in increments of 5 points:
  for (int fadeValue = 0 ; fadeValue <= 255; fadeValue = fadeValue+5) {
    // sets the value (range from 0 to 255):
    analogWrite(ledPin, fadeValue);
    // wait for 30 milliseconds to see the dimming effect
    delay(30);
  }

  // fade out from max to min in increments of 5 points:
  for (int fadeValue = 255 ; fadeValue >= 0; fadeValue = fadeValue-5) {
    // sets the value (range from 0 to 255):
    analogWrite(ledPin, fadeValue);
    // wait for 30 milliseconds to see the dimming effect
    delay(30);
  }

  // fade in from min to max in increments of 5 points:
  for (int fadeValue = 0 ; fadeValue <= 255; fadeValue = fadeValue+5) {
    // sets the value (range from 0 to 255):
    analogWrite(ledPin2, fadeValue);
    // wait for 30 milliseconds to see the dimming effect
    delay(30);
  }

  // fade out from max to min in increments of 5 points:
  for (int fadeValue = 255 ; fadeValue >= 0; fadeValue = fadeValue-5) {
    // sets the value (range from 0 to 255):
    analogWrite(ledPin2, fadeValue);
    // wait for 30 milliseconds to see the dimming effect
    delay(30);
  }

  
}

My code works like red LED glows and fades and then green LED glows and fades. When red LED is on the green will be off and vice-versa. What I want is to get the red LED to glow and when it reaches full bright on then the green must slowly start glowing and when the red is faded completely then the green must glow bright fully.

I'm explain it better with a graph.


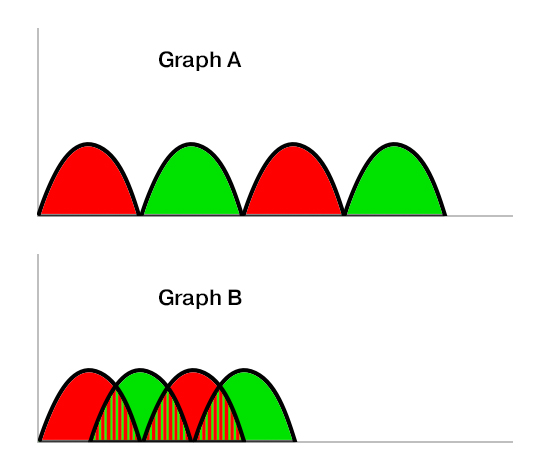
Graph A shows how my code works

Graph B is what I want to do. Is it possible to do that?

your code is sequential and blocking with delay. You need to get rid of the delays.

For extra information and examples look at

Which Arduino are you using?

look this over - corrected

should be

        msec0 += MsecPeriod;

const int MinVal = 150;
const int MaxVal = 255;

const int N = 2;
const byte Pin [N] = { 10,  11 };  // 5, 3
      int  dir [N] = {  1,   1 };
      int  val [N] = { MinVal, (MaxVal + MinVal) / 2 };

const unsigned long MsecPeriod = 150;
unsigned long msec0;

bool dbg = true;

char s [90];

// -----------------------------------------------------------------------------
void loop()
{
    unsigned long msec = millis ();

    if (msec - msec0 >= MsecPeriod)  {
        msec0 += MsecPeriod;

        for (int n = 0; n < N; n++)  {
            val [n] += dir [n];
            analogWrite (Pin [n], val [n]);

            if (MinVal >= val [n] || MaxVal <= val [n])
                dir [n] = -dir [n];

            if (dbg) {
                sprintf (s, " %d: %2d %4d", n,dir [n], val [n]);
                Serial.print (s);
            }
        }
        if (dbg)
            Serial.println ();
    }
}


// -----------------------------------------------------------------------------
void setup()
{
    Serial.begin (115200);

    for (int n = 0; n < N; n++)
        pinMode (Pin [n],  OUTPUT);
}

Nano

It looks sophisticated but it works. I changed MinVal from 150 to 5 and it looks better.
How can I change the interval time to make it fade longer?.

MsecPeriod

not very

just a single timer with an array of "things"
instead of separate code to up and down, uses a direction variable
starts one at the halfway point which keeps it out of phase
KISS

Yes.

In learning the code in the links in @J-M-L post #2, you will use a running counter to start each LED phase. The first LED will start increasing the PWM level at "time 0/100" and count toward "100/100." As the first LED crosses "50/100," the second LED PWM level will start counting from "0/100" toward "100/100." After the first LED reaches "100/100," it will begin to decrease the PWM level to the LED, as LED2 continues increasing to "100/100."

I see your curves are sinusoidal, so the increases will not be 1:1, but here is a grid of how it will look: (I used my fingers to count these... not certain they are right... )

  #  LED1 LED2
  0    0    0
  1    1    0
  2    2    0
.
.
 49   49    0
 50   50    1
 51   51    2
.
.
 98   98   48
 99   99   49
100   98   50
101   97   51
.
.
148   50   98
149   49   99
150   48   98
151   47   97
.
.
198    1   51
199    0   50
200    1   49

MsecPeriod is not changing the interval. Increasing the value makes just the initial program/boot to be delayed .

Hello Noobian

Take a view and mod then sketch to your project needs.

//https://forum.arduino.cc/t/two-leds-fading-at-half-cycle-rate/1334436
//https://europe1.discourse-cdn.com/arduino/original/4X/7/e/0/7e0ee1e51f1df32e30893550c85f0dd33244fb0e.jpeg
#define ProjectName "Two LEDs fading at half cycle rate"
#define NotesOnRelease "Arduino MEGA tested"
// make names
enum TimerEvent {NotExpired, Expired};
enum UpDown {Up, Down};
// make variables
uint32_t currentMillis = millis();
constexpr uint8_t LedPins[] {5, 3};
constexpr uint16_t StartValue[] {0, 128};
constexpr uint32_t Interval {35};
// make structures
//-----------------------------------------
struct TIMER
{
  uint32_t interval;
  uint32_t now;
  uint8_t expired(uint32_t currentMillis)
  {
    uint8_t timerEvent = currentMillis - now >= interval ;
    if (timerEvent == Expired) now = currentMillis;
    return timerEvent;
  }
};
struct DIMLED
{
  uint8_t led;
  uint16_t value;
  uint8_t upDown;
  TIMER dimmer;
  void make(uint8_t led_, uint16_t value_, uint32_t interval_ )
  {
    led = led_;
    pinMode(led, OUTPUT);
    value = value_;
    upDown = Up;
    dimmer.interval = interval_;
  }
  void exec(uint32_t currentMillis)
  {
    if (dimmer.expired(currentMillis) == Expired)
    {
      (upDown == Up) ? value++ : value--;
      if ((value == 0 ) or (value == 255)) upDown = upDown ? Up : Down;
      analogWrite(led, value);
    }
  }
} dimLeds[sizeof(LedPins)];
//-----------------------------------------
// make objects
//-----------------------------------------
// make support
void heartBeat(const uint8_t LedPin, uint32_t currentMillis)
{
  static bool setUp = false;
  if (setUp == false) pinMode (LedPin, OUTPUT), setUp = true;
  digitalWrite(LedPin, (currentMillis / 500) % 2);
}
// make application
void setup()
{
  Serial.begin(115200);
  for (uint8_t n = 0; n < 32; n++) Serial.println("");
  Serial.print("Source: "), Serial.println(__FILE__);
  Serial.print(ProjectName), Serial.print(" - "), Serial.println(NotesOnRelease);
  uint8_t element = 0;
  for (auto &dimLed : dimLeds)
  {
    dimLed.make(LedPins[element], StartValue[element], Interval);
    element++;
  }
  delay(2000);
  Serial.println(" =-> and off we go\n");
}
void loop()
{
  currentMillis = millis();
  for (auto &dimLed : dimLeds) dimLed.exec(currentMillis);
}
//------

Have a nice day and enjoy coding in C++.

see corrected code

It works real good. Your code fits perfectly.

I was hoping can I make it beginner friendly.

`
int ledA = 9;         // the PWM pin the LED is attached to
int ledB = 11;
int brightnessA = 0;  // how bright the LED is
int brightnessB = 0;  // how bright the LED is

int fadeAmountA = 5;  // how many points to fade the LED by
int fadeAmountB = 5;  // how many points to fade the LED by
// the setup routine runs once when you press reset:
void setup() 
{
  // declare pin 9 to be an output:
  pinMode(ledA, OUTPUT);
  pinMode(ledB, OUTPUT);
}

// the loop routine runs over and over again forever:
void loop() 
{
  // set the brightness of pin 9:
  analogWrite(ledA, brightnessA);
  analogWrite(ledB, brightnessB);
  // change the brightness for next time through the loop:
  brightnessA = brightnessA + fadeAmountA;
  brightnessB = brightnessB + fadeAmountB;
  // reverse the direction of the fading at the ends of the fade:
  if (brightnessA <= 0 || brightnessA >= 255 || brightnessB <= 0 || brightnessB >= 255) 
  {
    fadeAmountA = -fadeAmountA;
    fadeAmountB = -fadeAmountB;
  }
  delay(10);
}
`

I tried tinkering with the basic fade with two separate function but I'm still struggling to make it works. It works if both LEDs are the same brightness but if I try to inverse the other LED then the code breaks.

1 Like

why would you reverse the direction of both if only one hit the top of bottom value ?

may be something like this

const byte ledAPin = 3;         // the PWM pin the LED is attached to
const byte ledBPin = 9;

int brightnessA = 0;    // how bright the LED is
int brightnessB = 127;  // how bright the LED is

int fadeAmountA = 5;  // how many points to fade the LED by
int fadeAmountB = 5;  // how many points to fade the LED by

// the setup routine runs once when you press reset:
void setup()
{
  pinMode(ledAPin, OUTPUT);
  pinMode(ledBPin, OUTPUT);
  Serial.begin(115200);
}

// the loop routine runs over and over again forever:
void loop()
{
  analogWrite(ledAPin, brightnessA);
  analogWrite(ledBPin, brightnessB);

  // to see the values on the Serial plotter
  Serial.print(brightnessA);
  Serial.write('\t');
  Serial.println(brightnessB);

  // change the brightness for next time through the loop:
  brightnessA += fadeAmountA;
  if (brightnessA < 0 || brightnessA > 255 ) {  // we overshot, time to change direction
    if (fadeAmountA > 0) brightnessA = 255;     // we were going up
    else brightnessA = 0;                       // we were going down
    fadeAmountA = -fadeAmountA;
  }

  brightnessB += fadeAmountB;
  if (brightnessB < 0 || brightnessB > 255 ) {  // we overshot, time to change direction
    if (fadeAmountB > 0) brightnessB = 255;     // we were going up
    else brightnessB = 0;                       // we were going down
    fadeAmountB = -fadeAmountB;
  }

  delay(10);
}

Yess...you did it. Now it's works and is also noob friendly. Thank you for the effort.

I'm also thankful for paulpaulson and gcjr for providing the working code first.

Good so now you see how it works and you see we repeated lots of code. This could be aggregated into a class grouping the PIN number, the fadeAmount and the current brightness. and the class you basically have two methods, one to setup the led and one to update the led status

the class would look like this

class PulsingLed {
  private:
    byte pin;
    int brightness;
    int fadeAmount;

  public:
    PulsingLed(byte pin, int initialBrightness, int fadeAmount)
      : pin(pin), brightness(initialBrightness), fadeAmount(fadeAmount) {}

    void setup() {
      pinMode(pin, OUTPUT);
    }

    void update() {
      analogWrite(pin, brightness);
      brightness += fadeAmount;
      if (brightness < 0 || brightness > 255) {
        brightness = constrain(brightness, 0, 255); 
        fadeAmount = -fadeAmount;
      }
    }
};

(I've used the constrain() function to keep the value between 0 and 255.)

Now that you have described what a pulsing led is, the code for your needs is super simple, we define two pulsing leds , set them up and update them as often as we want in the loop.

PulsingLed ledA(3, 0, 5);     // pin, initial brightness, fadeAmout
PulsingLed ledB(9, 127, 5);   // pin, initial brightness, fadeAmout

void setup() {
  // let's configure the LEDs
  ledA.setup();  
  ledB.setup();
}

void loop() {
  // pulse the LEDs
  ledA.update();
  ledB.update();
  delay(10);
}

you can put all this together in one file

class PulsingLed {
  private:
    byte pin;
    int brightness;
    int fadeAmount;

  public:
    PulsingLed(byte pin, int initialBrightness, int fadeAmount)
      : pin(pin), brightness(initialBrightness), fadeAmount(fadeAmount) {}

    void setup() {
      pinMode(pin, OUTPUT);
    }

    void update() {
      analogWrite(pin, brightness);
      brightness += fadeAmount;
      if (brightness < 0 || brightness > 255) {
        brightness = constrain(brightness, 0, 255); 
        fadeAmount = -fadeAmount;
      }
    }
};

PulsingLed ledA(3, 0, 5);     // pin, initial brightness, fadeAmout
PulsingLed ledB(9, 127, 5);   // pin, initial brightness, fadeAmout

void setup() {
  // let's configure the LEDs
  ledA.setup();  
  ledB.setup();
}

void loop() {
  // pulse the LEDs
  ledA.update();
  ledB.update();
  delay(10);
}

and here you go ! :slight_smile:

2 Likes

cool :ok_hand:

This topic was automatically closed 180 days after the last reply. New replies are no longer allowed.