Using a KA2284 LED sound meter module to drive a servo

Hi every body:

I asked questions on this sketch before, and got some great help. I have continued developing my project, and now have a new problem. This project is basically a skeleton that (when an IR Remote is pressed) turns his head, says an MP3 file, and turns his head back. The attached sketch works almost all of the time. Once in a while, the MP3 player just plays a second of the MP3, but if I reload the sketch, it works fine again. The phase I am working on now is to have the skeleton’s jaw move in sync to the MP3. I am using some of Mike North’s Jawduino method. He uses a KA2284 LED sound meter module, with three of the LEDs connected to three analog pins in the Arduino. This is a relatively common method to do this.

My current sketch does not yet address the KA2284 LED sound meter module. However, when I plug just the ground wire of the KA2284 LED sound meter module into the common ground of the rest of the project, the MP3 then only plays a second of the message. If I disconnect the KA2284 LED sound meter module ground wire, and re-load the sketch, it works fine again.

So it looks like my sketch is OK, but something happens when I touch the KA2284 LED sound meter module ground wire to the project’s common ground. Should I power the KA2284 LED sound meter module with its own isolated power supply? Could the KA2284 LED sound meter module be defective? Do I have an issue with interrupts in the libraires? This is outside my expertise.

I am using a Arduino Uno R3, and a DFRobot DFPlayer Mini. I will attach the sketch in question, which seems to work, but does not yet address the KA2284 LED sound meter module. I wired in the module and started writing the sketch that will use it to move the skeleton’s jaw when it all went downhill.

#include <SoftwareSerial.h> //Allows us to assign different pins for serial use

#include <DFRobotDFPlayerMini.h>

#include <IRremote.h>

#include <Servo.h>

//This sketch is an upgraded sketch that adds the IR Remote triggering the MP3 player

//It tries some ideas form DeBaros video, substituting the IR remote for the PIR

//THIS WORKS - EACH BUTTON PRESS PLAYS TRACK FOR THAT BUTTON

int rxPin = 3;

int txPin = 2; //Sets up the send/receive from the Mp3 player

int track = 0001; //This is the track number on the micro SD card

SoftwareSerial fxSerial(rxPin, txPin); //calls the Mp3 player fxSerial

DFRobotDFPlayerMini fxPlayer;

int remoteStatus= 0; //This sets the trigger to start the talking as zero (no talking, just shoveling).

int remoteState= 0; //This is the label of the current remote status (on or off)

int IRPin = 11; //for the ir remote

Servo HeadTurnServo;

int servoHeadPin = 12; //This is the servo that rotates the head. Does this need to be a squiggly pin? NO it does not

void setup() {

// put your setup code here, to run once:

HeadTurnServo.attach(servoHeadPin);

HeadTurnServo.write (90);//Zeroes the head to straight ahead.

pinMode (IRPin, INPUT);//sets the pin from the IR Remote to input

pinMode(rxPin, INPUT);

pinMode(txPin, OUTPUT); // Tells Arduino what the Mp3 pins are doing

fxSerial.begin(9600); //Sets up the serial function for the Mp3 player

fxPlayer.begin(fxSerial); //this tells Arduino that the serial path for the Mp3 player is fxSerial (the name of the MP3 player)

Serial.begin(9600); // Do I need this?

fxPlayer.volume(20);// Volume can be 10 to 30). Set this to 20 to use less power

Serial.println("Enabling IRin"); //for the IR remote

IrReceiver.begin(IRPin, ENABLE_LED_FEEDBACK);//for the IR remote

Serial.println("Enabled IRin");//for the IR remote

delay (1000); //Gives things a chance to stabilize

}

void loop() {

// put your main code here, to run repeatedly:

//remoteStatus = digitalRead(IRPin);// Checks what the current status of the IR output is

//if (remoteStatus == HIGH) { //If high, it means a button was pressed at some time.

//if (remoteState == LOW) { //If remoteStatus is now High, and remoteState was Low, it means a new button press occured.

//This prevents rapid repeats.

//Serial.println ("A button was pressed");

// remoteState = HIGH;

//}

//}

//else {

//if (remoteState == HIGH) {

// Serial.println ("Button press has ended");

// remoteState = LOW; //This flps the remoteState back to Low for the next button press

// Serial.println (remoteState);

// }

//}

if (IrReceiver.decode()){ //TRUE if an IR button was pressed, FALSE if not //for the IR remote

Serial.println(IrReceiver.decodedIRData.decodedRawData, HEX);/*prints the decoded raw IR data to the serial monitor in hexadecimal format. The decodedRawData field holds the raw, unprocessed IR signal. */

if (IrReceiver.decodedIRData.decodedRawData == 0xBA45FF00){//add the next rows to try other buttons

Serial.println ("Button 1 was pressed");

HeadTurnServo.write(170); //turns the head to the right

fxPlayer.play(1);// plays message 1 because button 1 was pressed

delay(10000); //gives the head a short pause before turning back.

HeadTurnServo.write(90); //turns the head back to straight ahead

}//end of IF statement

//

if (IrReceiver.decode()){ //TRUE if an IR button was pressed, FALSE if not //for the IR remote

if (IrReceiver.decodedIRData.decodedRawData == 0xB946FF00){//add the next rows to try other buttons

Serial.println ("Button 2 was pressed");

//fxplayer.play(2)// plays message 2 because button 2 was pressed

}//end of IF statement

}

//fxPlayer.play(2);// Plays track 2

//delay(10000); //this plays track for 10 seconds. The speech must be less than 10 seconds long -Does this need to be in the loop?

IrReceiver.resume();/*prepares the IR receiver to start listening for the next IR signal. It essentially tells the IR receiver to reset its internal state and prepare for a new incoming signal.*/

}

} //End of void loop

I don't think the following sketch is of value to this post, but this is a draft of the portion of the sketch to use the KA2284 LED sound meter module:


// to make a servo move in sync with audio.

//This is a bare bones test of the HiLetgo 5pcs KA2284 Level Indicator Module

#include <DFRobotDFPlayerMini.h>

#include <Servo.h>

#include <SoftwareSerial.h> //For the MP# player

#include <IRremote.h>

int rxPin = 3; //Sets up the send/receive from the Mp3 player

int txPin = 2; //Sets up the send/receive from the Mp3 player

int track = 0001; //This is the track number on the micro SD card

SoftwareSerial fxSerial(rxPin, txPin); //calls the Mp3 player fxSerial

DFRobotDFPlayerMini fxPlayer;

Servo JawServo;

int servoJawPin = 10; //This is the servo that moves the jaw

int IRPin = 11; //for the ir remote

int val; //This will be the mapped value for the Jawservo to move

int audio_value; //This will be the value from the KA2284 Level Indicator Module

int MP3BusyPin;

void setup()

{

JawServo.attach(servoJawPin);

JawServo.write (15);//Guessing that this is the correct degrees to close the jaw

pinMode (IRPin, INPUT);//sets the pin from the IR Remote to input

pinMode(rxPin, INPUT);

pinMode(txPin, OUTPUT); // Tells Arduino what the Mp3 pins are doing

fxSerial.begin(9600); //Sets up the serial function for the Mp3 player

fxPlayer.begin(fxSerial); //this tells Arduino that the serial path for the Mp3 player is fxSerial (the name of the MP3 player)

Serial.begin(9600); // Do I need this?

fxPlayer.volume(20);// Volume can be 10 to 30). Set this to 20 to use less power

Serial.println("Enabling IRin"); //for the IR remote

IrReceiver.begin(IRPin, ENABLE_LED_FEEDBACK);//for the IR remote

Serial.println("Enabled IRin");//for the IR remote

delay (1000); //Gives things a chance to stabilize

}

void loop()

{

if (IrReceiver.decode()){ //TRUE if an IR button was pressed, FALSE if not //for the IR remote

Serial.println(IrReceiver.decodedIRData.decodedRawData, HEX);/*prints the decoded raw IR data to the serial monitor in hexadecimal format. The decodedRawData field holds the raw, unprocessed IR signal. */

if (IrReceiver.decodedIRData.decodedRawData == 0xBA45FF00){//add the next rows to try other buttons

Serial.println ("Button 1 was pressed");

//Add head trun here if this works

audio_value = 0;

fxPlayer.play(1);// plays message 1 because button 1 was pressed

//delay(10000); //gives the head a short pause before turning back.

if (MP3BusyPin = HIGH) { //this will be HIGH as long as the MP3 is playing

Serial.println(MP3BusyPin);

//While (fxPlayer.isPlaying());

if(analogRead(A0) < 341) audio_value += 60;

if(analogRead(A1) < 341) audio_value += 60;

if(analogRead(A2) < 341) audio_value += 60;

//val = map(audio_value, 72, 92, 0, 180); // scale it to use it with the servo (value between 0 and 160)

JawServo.write(audio_value); // sets the servo position according to the scaled value

Serial.println(audio_value);

//JawServo.write (audio_value);

} //this closes the busy pin IF loop

//HeadTurnServo.write(90); //turns the head back to straight ahead

}//end of IF statement

}

}

Thanks for your help, I know I sent a lot here, but did not know what you folks would need to help me.
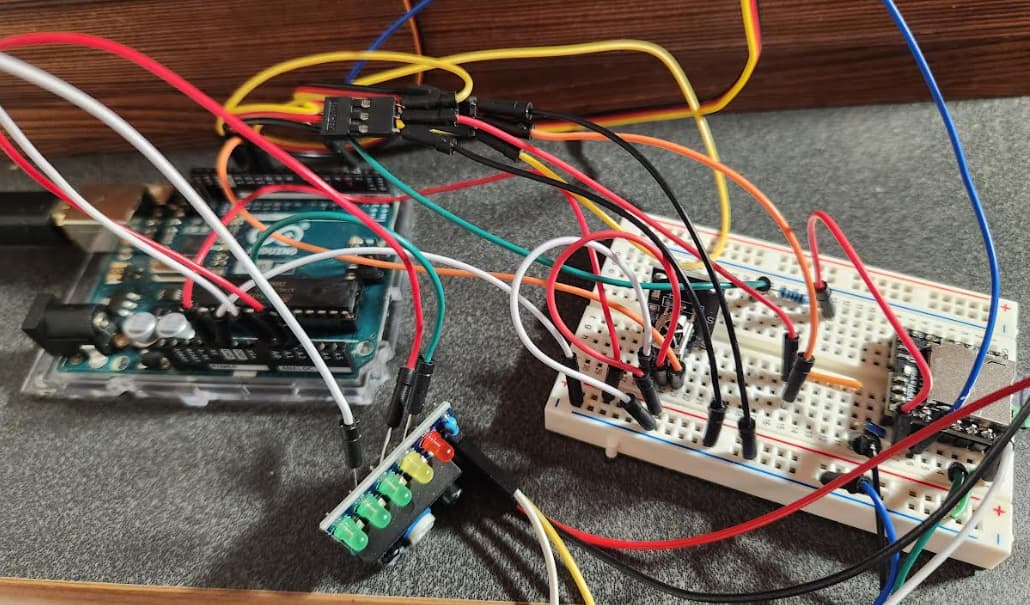
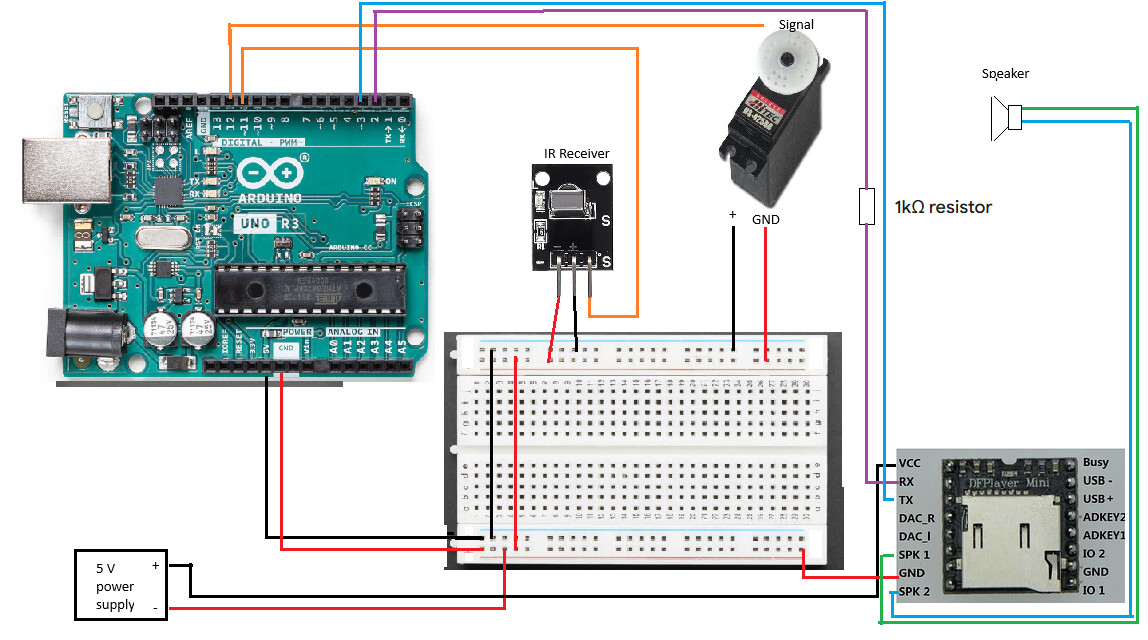
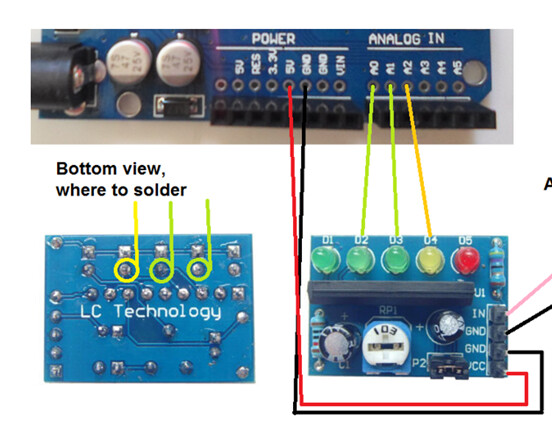
Here's the wiring:

The code needs to be formatted. Use IDE Tools/Auto Format.
The photo of a jumble of wires is not helpful. Normally, a photo of a hand-drawn diagram is ok, but you may have too many wires. Can you reduce the circuit to just the parts needed to resolve your concerns? In other words, if a segment is working OK, then leave it out.

Thank you for helping me. I am very confused as to what‘s happening. The current version of my sketch is the longer (first) code in my post (above). It works perfectly; when button 1 is pressed, the servo turns, and the MP3 plays, and the servo turns back. This happens every time I try it (which is good), until all of a sudden, when button 1 is pressed, the servo turns, and the MP3 only plays for a second. I thought I had this fixed, but as of yesterday, it still fails once in a while. I did notice that when it fails, if I reload the sketch, it works fine again. I have not been able to find out why, so I guess that is my first question.

I formatted the code as you suggested, and added it here:

#include <SoftwareSerial.h>  //Allows us to assign different pins for serial use
#include <DFRobotDFPlayerMini.h>
#include <IRremote.h>
#include <Servo.h>
//This sketch is an upgraded sketch that adds the IR Remote triggering the MP3 player
//It tries some ideas form DeBaros video, substituting the IR remote for the PIR
//THIS WORKS - EACH BUTTON PRESS PLAYS TRACK FOR THAT BUTTON
int rxPin = 3;
int txPin = 2;                          //Sets up the send/receive from the Mp3 player
int track = 0001;                       //This is the track number on the micro SD card
SoftwareSerial fxSerial(rxPin, txPin);  //calls the Mp3 player fxSerial
DFRobotDFPlayerMini fxPlayer;

int remoteStatus = 0;  //This sets the trigger to start the talking as zero (no talking, just shoveling).
int remoteState = 0;   //This is the label of the current remote status (on or off)
int IRPin = 11;        //for the ir remote

Servo HeadTurnServo;
int servoHeadPin = 12;  //This is the servo that rotates the head. Does this need to be a squiggly pin? NO it does not


void setup() {
  // put your setup code here, to run once:

  HeadTurnServo.attach(servoHeadPin);
  HeadTurnServo.write(90);  //Zeroes the head to straight ahead.


  pinMode(IRPin, INPUT);  //sets the pin from the IR Remote to input
  pinMode(rxPin, INPUT);
  pinMode(txPin, OUTPUT);    // Tells Arduino what the Mp3 pins are doing
  fxSerial.begin(9600);      //Sets up the serial function for the Mp3 player
  fxPlayer.begin(fxSerial);  //this tells Arduino that the serial path for the Mp3 player is fxSerial (the name of the MP3 player)
  Serial.begin(9600);        // Do I need this?
  fxPlayer.volume(20);       // Volume can be 10 to 30).  Set this to 20 to use less power

  Serial.println("Enabling IRin");               //for the IR remote
  IrReceiver.begin(IRPin, ENABLE_LED_FEEDBACK);  //for the IR remote
  Serial.println("Enabled IRin");                //for the IR remote
  delay(1000);                                   //Gives things a chance to stabilize
}

void loop() {
  // put your main code here, to run repeatedly:


  //remoteStatus = digitalRead(IRPin);// Checks what the current status of the IR output is

  //if (remoteStatus == HIGH) { //If high, it means a button was pressed at some time.
  //if (remoteState == LOW) { //If remoteStatus is now High, and remoteState was Low, it means a new button press occured.
  //This prevents rapid repeats.
  //Serial.println ("A button was pressed");
  // remoteState = HIGH;
  //}

  //}

  //else {
  //if (remoteState == HIGH) {
  //   Serial.println ("Button press has ended");
  //   remoteState = LOW; //This flps the remoteState back to Low for the next button press
  //   Serial.println (remoteState);
  // }

  //}


  if (IrReceiver.decode()) {                                      //TRUE if an IR button was pressed, FALSE if not //for the IR remote
    Serial.println(IrReceiver.decodedIRData.decodedRawData, HEX); /*prints the decoded raw IR data to the serial monitor in hexadecimal format. The decodedRawData field holds the raw, unprocessed IR signal. */
    if (IrReceiver.decodedIRData.decodedRawData == 0xBA45FF00) {  //add the next rows to try other buttons
      Serial.println("Button 1 was pressed");

      HeadTurnServo.write(170);  //turns the head to the right

      fxPlayer.play(1);                                             // plays message 1 because button 1 was pressed
      delay(10000);                                                 //gives the head a short pause before turning back.
      HeadTurnServo.write(90);                                      //turns the head back to straight ahead
    }                                                               //end of IF statement
                                                                    //
    if (IrReceiver.decode()) {                                      //TRUE if an IR button was pressed, FALSE if not //for the IR remote
      if (IrReceiver.decodedIRData.decodedRawData == 0xB946FF00) {  //add the next rows to try other buttons
        Serial.println("Button 2 was pressed");
        //fxplayer.play(2)// plays message 2 because button 2 was pressed
      }  //end of IF statement
    }
    //fxPlayer.play(2);// Plays track 2
    //delay(10000); //this plays track  for 10 seconds.  The speech must be less than 10 seconds long -Does this need to be in the loop?

    IrReceiver.resume(); /*prepares the IR receiver to start listening for the next IR signal. It essentially tells the IR receiver to reset its internal state and prepare for a new incoming signal.*/
  }
}  //End  of void loop

In my earlier post (above) I mentioned that my current sketch does not yet address the KA2284 LED sound meter module. However, when I plug just the ground wire of the KA2284 LED sound meter module into the common ground of the rest of the project (while running the big code above), the MP3 then only plays a second of the message. If I disconnect the KA2284 LED sound meter module ground wire, and re-load the sketch, it works fine again. I appear to have solved this. I hooked up the KA2284 LED sound meter module to its own power supply, and did not connect its ground to the project’s common ground. The MP3 plays fine now, so I guess that part is solved. I have noticed that the yellow LED on the KA2284 LED sound meter module is always on if the audio input ground wire is attached, so that may be my next problem, unless it is related to my not using a common power ground for the KA2284 LED sound meter module. If anyone has ideas on this as well, I’m all ears.

By the way, the DFRobotDFPlayerMini and the servo are running off another power supply. The IR remote is running off the Arduino power.

I realize the photo of the wiring is a jumble. Here is a conceptual diagram:

So, my remaining question is now why does the MP3 player sometimes stop playing the full MP3, until I reload the sketch? I realize this drifted off a bit from the post’s subject heading (sorry). I hope I gave enough (and not too much) info. Sometimes the real problem is knowing what to ask.

Sorry to add to my post; the servo in my project makes a clicking sound depending on which "squiggly" pin I use for the signal. Are some pins better than others for servos?

The -V from the external power supply is connected to the V+ of the Uno? This is a strange concept indeed, and I don't think it will work at all.

No Arduino pin is suitable for powering the servo. It needs to be powered by an external power supply and connected directly to it, both for +V and ground. This external power supply must have a common ground with the Uno ground. That common ground can go via the breadboard.

Also motors of any kind should generally not be powered through a breadboard. The internal contacts inside a breadboard are not designed for the high current that motors draw. The power and ground should come direct from the external power supply, as mentioned. The control signal for the servo can go via the breadboard. Only a tiny current flows in that wire.

Oh man, i am SO SORRY. NO, the drawing is wrong. The only thing the Arduino is powering is the IR Remote detector. Here is a (hopefully) correct drawing:

.

As I think I've suggested to you before, please follow standard practice of using red for wires to +V and black for wires to ground.

IMO your confusion is largely down to your poor communication. Your subject is headed 'Using a KA2284 LED sound meter module to drive a servo'. Yet in your opening post you tell us "My current sketch does not yet address the KA2284 LED sound meter module." For which project are you seeking help? By 'project' most of us mean the sketch and accompanying wiring schematic, plus details of all hardware and supplies involved. Accurately presented. And with a concise description of any errors when you compile, upload and run it.

To get this working, start by setting aside "Mike North’s Jawduino method" and at least get the DFR and servo working reliably. Not "...almost all of the time." How can you expect to proceed from an unstable start point?

As for the bizarre "something happens when I touch the KA2284 LED sound meter module ground wire to the project’s common ground", that sounds like loose wiring. If the wire you attach is electrically isolated it should not have any effect.

Thank you for the reply. I somewhat expected (justifiable) blowback on my post. I actually struggled over sending it. Since my experience is still somewhat limited in Arduino, I was not sure which aspects of the project were relevant to the current issue. My thought, therefore, was to give what I knew, so I did not miss something important. I will endeavor to not do that in the future.

Also, if my posts seem to branch off to a related issue, I am not sure If I should create a new post, repeating the large sketch, wiring diagrams and hardware, or just append the new information to the existing post. I am fine doing it either way.

I will forgo any issues with the KA2284 LED sound meter module for now. Apparently, I still need to address the issue of the DF player, which I thought was solved:
The current version of my sketch is the formatted code in my post (above). It works perfectly; when button 1 is pressed, the servo turns, and the MP3 plays, and the servo turns back. This happens every time I try it (which is good), until all of a sudden, when button 1 is pressed, the servo turns, and the MP3 only plays for a second. I thought I had this fixed, but it still fails once in a while. It will work perfectly maybe a dozen times, and then stop. When it fails, the IR receiver still lights, and the blue light on the MP3 player lights, but the MP# player just gives a one second buzz and stops. The only way to fix this is to re-load the sketch. The wiring has not changed, and the code has not changed. I will repost this as a new post. Please let me know if that is not the desired approach.

Thank you for your patience.

Please let us have details of your IR receiver or a link to its data sheet.

What procedure are you using with the unspecified remote to test your sketch? Show us the sketch you used to confirm the receiver is working correctly, and its schematic.

How many MP3 files are you using? Duration? Are you satisfied they meet the DFR modules organisation requirements?

As we previously got the DFR player working correctly, check your current DFR code against it.

In summary, a methodical approach from now on.

Topic closed, see: