Take it easy on me please, I am very knew to the tinkering and electronic field in terms of Arduino projects. So I wanted to make a Arduino Uno based vending machine.
I have taken a design from Gabriel, full credit to him. On Hackaday ( Mini vending machine | Hackaday.io ) and made it more specialized for Arduino Uno, this was very stupid of me, but I want to learn so I have thrown myself into the middle of it. Unfortunately when I connected my LCD today, I discovered the black box display problem, I tried many solutions including switching data ports etc. but had no luck and thought it was time to consult the many wise humans on this forum.
I have no idea whether its related to using the analogue ports on my Arduino, or something to do with the trim pot, but I am exhausted and know somebody here will have much more of an idea then me
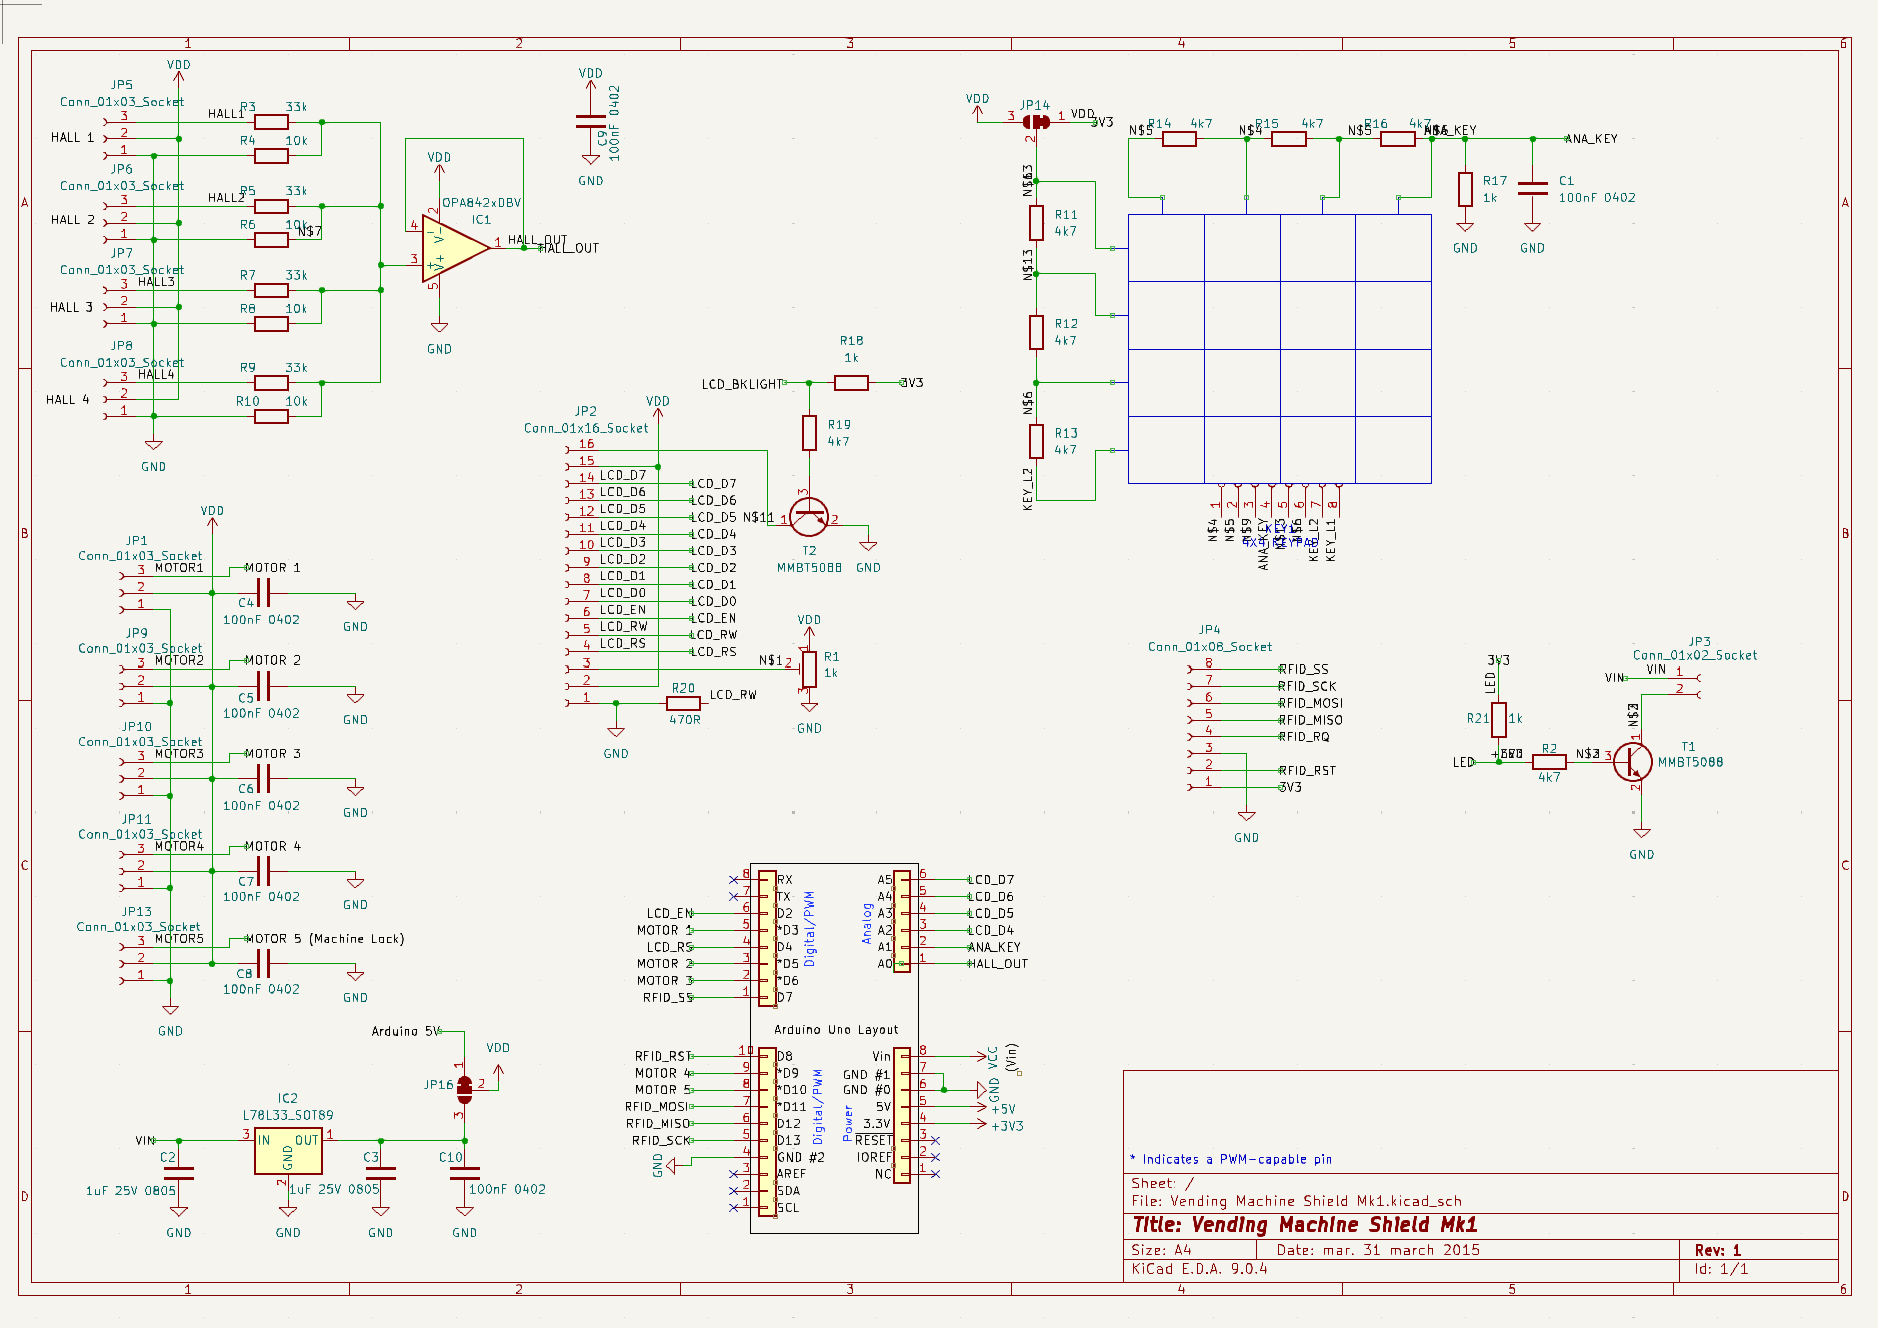
I have attached my pcb file, schematic and code, so y'all can have a field day. Any help is welcome and I am open to being scolded, as I know that this project is a real mess.
Have a lovely day or night wherever you may be, and thanks for any help ,
If y'all need anything more leave a reply and I'll attach more things.
Please follow the advice given in the link below when posting code, in particular the section entitled 'Posting code and common code problems'
Use code tags (the < CODE/ > icon above the compose window) to make it easier to read and copy for examination
Please post your full sketch, using code tags when you do
Posting your code using code tags prevents parts of it being interpreted as HTML coding and makes it easier to copy for examination
In my experience the easiest way to tidy up the code and add the code tags is as follows
Start by tidying up your code by using Tools/Auto Format in the IDE to make it easier to read. Then use Edit/Copy for Forum and paste what was copied in a new reply. Code tags will have been added to the code to make it easy to read in the forum thus making it easier to provide help.
It is also helpful to post full error messages in code tags as it makes it easier to scroll through them and copy them for examination
I will attach a photo tomorrow, but it shows black boxes in the space where text is meant to be, my trim pot works correctly but I can't seem, to get any signal cause no matter what I tried I couldn't get any text to appear.
And yes I played with the trim pot to see if contrast was the issue, and that didn't appear to be the problem.
Have you tried to test the display and it's wiring to the board with a simple test sketch with none of the other code?
There is an example in the ide under the pull down menu
File>Examples>ExamplesForAnyBoard>LiquidCrystal>HelloWorld
Change the pins in the sketch to what you are using, and see if you can get the display to show the text in the example.
/*
  LiquidCrystal Library - Hello World

 Demonstrates the use a 16x2 LCD display.  The LiquidCrystal
 library works with all LCD displays that are compatible with the
 Hitachi HD44780 driver. There are many of them out there, and you
 can usually tell them by the 16-pin interface.

 This sketch prints "Hello World!" to the LCD
 and shows the time.

  The circuit:
 * LCD RS pin to digital pin 12
 * LCD Enable pin to digital pin 11
 * LCD D4 pin to digital pin 5
 * LCD D5 pin to digital pin 4
 * LCD D6 pin to digital pin 3
 * LCD D7 pin to digital pin 2
 * LCD R/W pin to ground
 * LCD VSS pin to ground
 * LCD VCC pin to 5V
 * 10K resistor:
 * ends to +5V and ground
 * wiper to LCD VO pin (pin 3)

 Library originally added 18 Apr 2008
 by David A. Mellis
 library modified 5 Jul 2009
 by Limor Fried (http://www.ladyada.net)
 example added 9 Jul 2009
 by Tom Igoe
 modified 22 Nov 2010
 by Tom Igoe
 modified 7 Nov 2016
 by Arturo Guadalupi

 This example code is in the public domain.

 http://www.arduino.cc/en/Tutorial/LiquidCrystalHelloWorld

*/

// include the library code:
#include <LiquidCrystal.h>

// initialize the library by associating any needed LCD interface pin
// with the arduino pin number it is connected to
const int rs = 12, en = 11, d4 = 5, d5 = 4, d6 = 3, d7 = 2;
LiquidCrystal lcd(rs, en, d4, d5, d6, d7);

void setup() {
  // set up the LCD's number of columns and rows:
  lcd.begin(16, 2);
  // Print a message to the LCD.
  lcd.print("hello, world!");
}

void loop() {
  // set the cursor to column 0, line 1
  // (note: line 1 is the second row, since counting begins with 0):
  lcd.setCursor(0, 1);
  // print the number of seconds since reset:
  lcd.print(millis() / 1000);
}
Thanks for the reply. Turns out I was tired and stoopid. I just hadn't defined my analogue pins correctly in my code and RW wasn't grounded correctly. I now have a working LCD.
I would still like to thank everybody for helping and assisting, your words of constructive feedback allowed me to fault find more effectively and I have been better for it.
Have a fantastic week everybody and once again thanks for the help :))