Good morning, I'm having a problem with my Arduino project because
the code doesn't do what's shown in the video
I took it from, even though it's the same code and the same project with the same components.
The video I took the project from is
in Spanish, but you can find it in English.

El código es el siguiente:
/*Thanks. Remember to visit my Youtube channel
I've used a i2c LCD screen module and 9g servo motor.
*/
//LCD config
#include <Wire.h>
#include <LiquidCrystal_I2C.h>
LiquidCrystal_I2C lcd(0x3f,20,4);
#include <Servo.h>
#include <Keypad.h>
//Variables
int mot_min = 90; //min servo angle (set yours)
int mot_max = 180; //Max servo angle (set yours)
int character = 0;
int activated =0;
char Str[16] = {' ', ' ', ' ', ' ', ' ', ' ', '-', '', '', '*', ' ', ' ', ' ', ' ', ' ', ' '};
//Pins
Servo myservo;
int buzzer=11; //pin for the buzzer beep
int external = 12; //pin to inside open
int internal = 13; //pin to inside close
//Keypad config
const byte ROWS = 4; //four rows
const byte COLS = 4; //four columns
//define the cymbols on the buttons of the keypads
char hexaKeys[ROWS][COLS] = {
{'1','4','7','*'},
{'2','5','8','0'},
{'3','6','9','#'},
{'A','B','C','D'}
};
byte rowPins[ROWS] = {5, 4, 3, 2}; //connect to the row pinouts of the keypad
byte colPins[COLS] = {9, 8, 7, 6}; //connect to the column pinouts of the keypad
//initialize an instance of class NewKeypad
Keypad customKeypad = Keypad( makeKeymap(hexaKeys), rowPins, colPins, ROWS, COLS);
void setup(){
myservo.attach(10); //attach the servo to pin D10
pinMode(buzzer,OUTPUT);
pinMode(external,INPUT);
pinMode(internal,INPUT);
//Init the screen and print the first text
lcd.init();
lcd.backlight();
lcd.clear();
lcd.print(" PASSWORD");
lcd.setCursor(0,1);
lcd.print(" -*** ");
//put the servo in the close position first
myservo.write(mot_min);
}
void loop(){
///////////////EMERGENCY OPEN/CLOSE/////////
if (digitalRead(external))
{
myservo.write(mot_max);
lcd.clear();
lcd.setCursor(2,0);
lcd.print("INSIDE OPEN");
activated = 2;
analogWrite(buzzer,240);
delay(250);
analogWrite(buzzer,200);
delay(250);
analogWrite(buzzer,180);
delay(250);
analogWrite(buzzer,250);
delay(250);
analogWrite(buzzer,LOW);
  lcd.clear();
  lcd.setCursor(4,0);
  lcd.print("WELLCOME");

  lcd.setCursor(2,1);
  lcd.print("ELECTRONOOBS");


  lcd.clear();
  lcd.setCursor(3,0);
  lcd.print("DOOR  OPEN");
  lcd.setCursor(2,1);
  lcd.print("ELECTRONOOBS");
  delay(500);
}
if (digitalRead(internal))
{
myservo.write(mot_min);
activated = 0;
character=0;
Str[6]= '-';
Str[7]= '';
Str[8]= '';
Str[9]= '*';
Str[10]= ' ';
lcd.clear();
lcd.setCursor(0,0);
lcd.print(" PASSWORD");
lcd.setCursor(0,1);
lcd.print(Str);
}
///////////////KEYPAD OPEN/CLOSE////////////
char customKey = customKeypad.getKey(); //this function reads the presed key
if (customKey){
if (character ==0)
{
Serial.println(customKey);
Str[6]= customKey;
lcd.clear();
lcd.setCursor(0,0);
lcd.print("    PASSWORD");
lcd.setCursor(0,1);
lcd.print(Str);

}

if (character ==1)
{
Serial.println(customKey);
Str[7]= customKey;
lcd.clear();
lcd.setCursor(0,0);
lcd.print("    PASSWORD");
lcd.setCursor(0,1);
lcd.print(Str);

}

if (character ==2)
{
Serial.println(customKey);
Str[8]= customKey;
lcd.clear();
lcd.setCursor(0,0);
lcd.print("    PASSWORD");
lcd.setCursor(0,1);
lcd.print(Str);

}

if (character ==3)
{
Serial.println(customKey);
Str[9]= customKey;
lcd.clear();
lcd.setCursor(0,0);
lcd.print("    PASSWORD");
lcd.setCursor(0,1);
lcd.print(Str);

}

if (character ==4)
{
Serial.println(customKey);
Str[10]= customKey;
activated=1;

}
character=character+1;
}
if (activated == 1)
{
/Change your password below!!!
Change each of Str[6], Str[7], Str[8], Str[9]/
if(Str[10]='A' && character==5 && Str[6]=='3' && Str[7]=='0' && Str[8]=='0' && Str[9]=='7' )
{
  myservo.write(mot_max);
  lcd.clear();
  lcd.setCursor(4,0);
  lcd.print("ACCEPTED");
  activated = 2;
  analogWrite(buzzer,240);
  delay(250);
  analogWrite(buzzer,200);
  delay(250);
  analogWrite(buzzer,180);
  delay(250);
  analogWrite(buzzer,250);
  delay(250);
  analogWrite(buzzer,LOW);
  delay(1000);

  lcd.clear();
  lcd.setCursor(4,0);
  lcd.print("WELLCOME");
  delay(500);
  lcd.setCursor(2,1);
  lcd.print("ELECTRONOOBS");
  delay(1000);

  lcd.clear();
  lcd.setCursor(3,0);
  lcd.print("DOOR  OPEN");
  lcd.setCursor(2,1);
  lcd.print("ELECTRONOOBS");

}
else
{
  lcd.clear();
  lcd.setCursor(1,0);
  lcd.print("PASSWORD ERROR");
  lcd.setCursor(3,1);
  lcd.print("TRY  AGAIN");
  analogWrite(buzzer,150);
  delay(3000);
  analogWrite(buzzer,LOW);
  character=0;
  Str[6]= '-';
  Str[7]= '*';
  Str[8]= '*';
  Str[9]= '*';
  Str[10]= ' ';
  activated = 0;
  lcd.clear();
  lcd.setCursor(4,0);
  lcd.print("PASSWORD");
  lcd.setCursor(0,1);
  lcd.print(Str);
}
}
if (activated == 2)
{
if(customKey == 'B' )
{
myservo.write(mot_min);
activated = 0;
character=0;
Str[6]= '-';
Str[7]= '';
Str[8]= '';
Str[9]= '*';
Str[10]= ' ';
lcd.clear();
lcd.setCursor(0,0);
lcd.print(" PASSWORD");
lcd.setCursor(0,1);
lcd.print(Str);
}
}
}
This is the schematic of the project in Arduino.
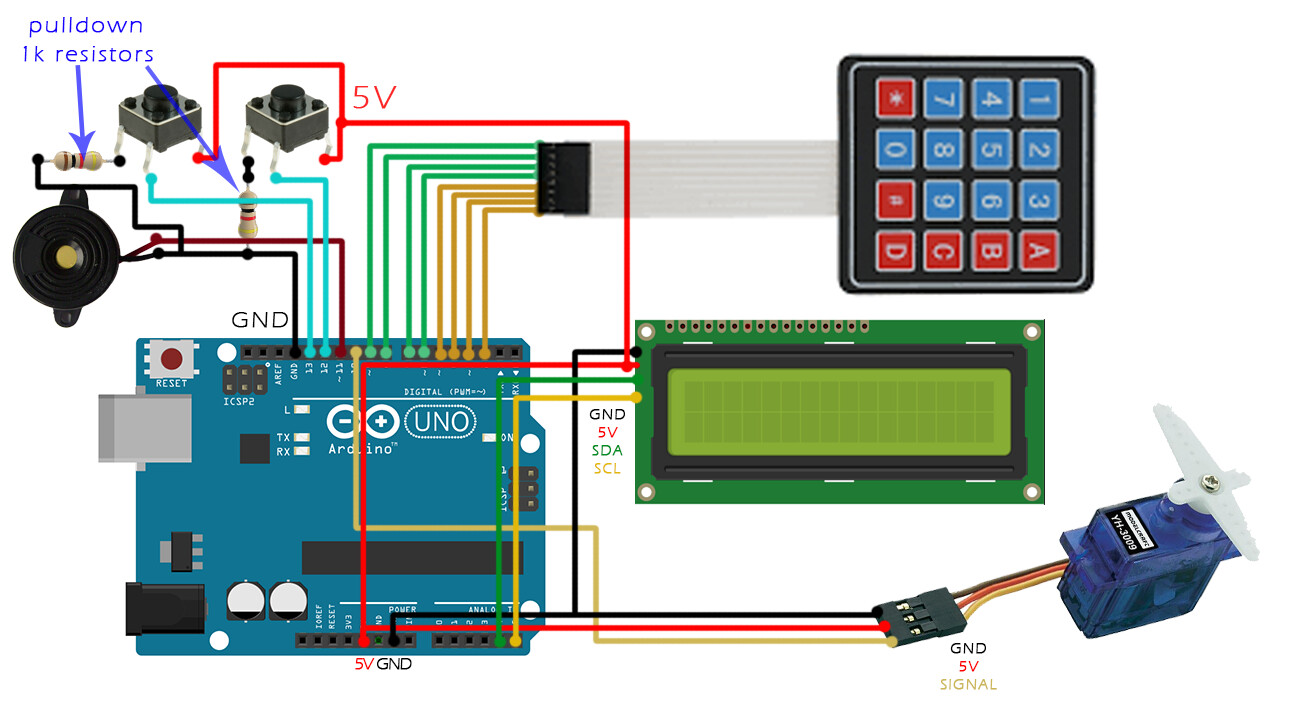
When I run the code to make the project functional and display the password screen so that the password can be entered on the Mitral keyboard, below the password there are asterisks that hide the characters and cover the password. I want to know why when I enter the password it is overwritten in the same position without making a line break to enter the second digit of the password, and even if I press enter, it does not allow me to enter at least an incorrect password.
 below your existing posts.