Just posted some photos
Hi,
That is a pulse rate monitor.
How are you testing it?
This may help;
Have you damaged your sensor when you "shorted" something?
Tom... ![]()
![]()
![]()
![]()
Thanks, I have read this article.. Well it was working the same as it is now. Green LED is shining, when I wave above it LED13 blinks, but not registering pulse when finger is place on top of it.
It can be considered neater but it's not necessary; I do consider it neater. analogRead() actually works with numbers from zero upwards. If you pass A0, it will subtract 14 (for an Uno)
int analogRead(uint8_t pin)
{

#if defined(analogPinToChannel)
#if defined(__AVR_ATmega32U4__)
	if (pin >= 18) pin -= 18; // allow for channel or pin numbers
#endif
	pin = analogPinToChannel(pin);
#elif defined(__AVR_ATmega1280__) || defined(__AVR_ATmega2560__)
	if (pin >= 54) pin -= 54; // allow for channel or pin numbers
#elif defined(__AVR_ATmega32U4__)
	if (pin >= 18) pin -= 18; // allow for channel or pin numbers
#elif defined(__AVR_ATmega1284__) || defined(__AVR_ATmega1284P__) || defined(__AVR_ATmega644__) || defined(__AVR_ATmega644A__) || defined(__AVR_ATmega644P__) || defined(__AVR_ATmega644PA__)
	if (pin >= 24) pin -= 24; // allow for channel or pin numbers
#else
	if (pin >= 14) pin -= 14; // allow for channel or pin numbers
#endif
Have you tried different fingers, including other peoples fingers?
Can you see the LED in the sensor glowing?
The LED is , 565nm, which is Green-Yellow.
Tom.. ![]()
![]()
![]()
![]()
I think that is a step in the wrong direction.
With a delay of 100ms you are only taking 10 samples per second, and are less likely to capture the peak of the waveform.
See the following plots from the serial monitor:
(I don't have a pulse sensor, the traces are from an arbitrary waveform generator to simulate the pulse sensor).

With a delay of 10ms the waveform is captured nicely - all peaks the same height.
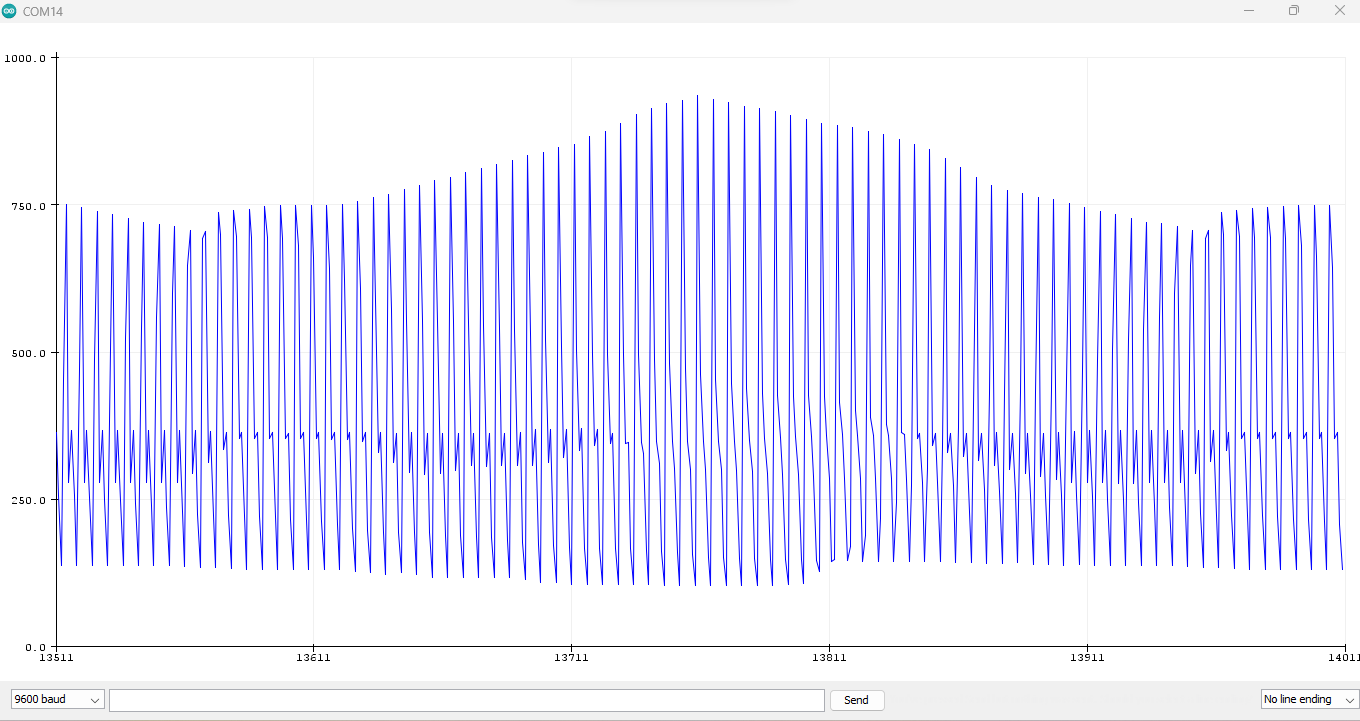
With a delay of 100ms the apparent amplitude varies considerably.
1 Like
Tried all 10 fingers and a pulse on my wrist - which I can see with my eyes ![]()
Yes, green LED on sensor is glowing. I will try and test it with multimeter - just watched on YT. Then I can post some pictures with Arduino and Pulse Sensor powered to my computer, so you may see how it looks lights with lights glowing.
lc95,
Could you show us a plot of what you get on the serial monitor?
EDIT - Sorry, I meant the serial plotter.
Sure, screenshot below. Heartbeat happen only when I wave above the sensor, when finger is placed on the sensor, nothing happens.

thank you for clarifying that ![]()
Sorry, haven't seen EDIT, sure, this is serial plotter. First photo without the finger, second with finger on the sensor.


I started that thread, because this one was about TX and RX LEDs. Thank you for posting it here, I didn't know hot to connect them. Anyway, still have the same problem..
Which of your threads are you using?
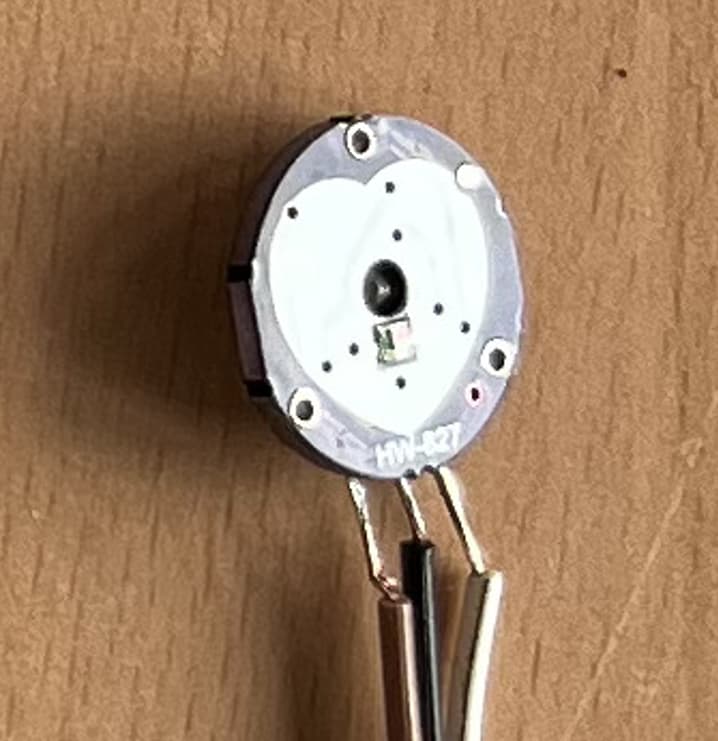
Show a close picture of the component side.
Not sure what you mean ![]() Here is a close up photo, hope it helps.
Here is a close up photo, hope it helps.
Sensor is connected to 5V, GND and A0. LED is connected to 13 and GND

Hi,
I have a problem with my pulse sensor. I have installed Pulse sensor library. Using GettingStartedProject I have uploaded a sketch on Arduino Uno. Sensor lights up green, picks up noise, when I wave above the sensor, it detects heartbeat at LED13 blinks, but when I put my finger directly on the sensor, nothing happens - no heartbeat detected, LED13 does not blink. When I remove my finger it blinks again.
I have changed the Treshold, tried different analog pin, different delay. Not sure what else to do. Thank you for your help.
Try posting an annotated schematic and your code. Most important post links to technical information on the hardware devices.
Here are some troubleshooting tips for a pulse sensor issue:
- Check the wiring for loose connections or broken wires.
- Review the code for correct library setup and appropriate threshold values.
- Adjust finger placement on the sensor.
- Use a different sensor to test for problems with setup or sensor.
- Check for interference from other electronic devices.
Don't have a annotated schematic, but here is a photo of Arduino I'm using and pulse sensor connected to it.
Code:
/*  PulseSensor Starter Project and Signal Tester
 *  The Best Way to Get Started  With, or See the Raw Signal of, your PulseSensor.com™ & Arduino.
 *
 *  Here is a link to the tutorial
 *  https://pulsesensor.com/pages/code-and-guide
 *
 *  WATCH ME (Tutorial Video):
 *  https://www.youtube.com/watch?v=RbB8NSRa5X4
 *
 *
-------------------------------------------------------------
1) This shows a live human Heartbeat Pulse.
2) Live visualization in Arduino's Cool "Serial Plotter".
3) Blink an LED on each Heartbeat.
4) This is the direct Pulse Sensor's Signal.
5) A great first-step in troubleshooting your circuit and connections.
6) "Human-readable" code that is newbie friendly."

*/


//  Variables
int PulseSensorPurplePin = 0;        // Pulse Sensor PURPLE WIRE connected to ANALOG PIN 0
int LED = LED_BUILTIN;   //  The on-board Arduion LED


int Signal;                // holds the incoming raw data. Signal value can range from 0-1024
int Threshold = 580;       // Determine which Signal to "count as a beat", and which to ingore.


// The SetUp Function:
void setup() {
  pinMode(LED,OUTPUT);         // pin that will blink to your heartbeat!
   Serial.begin(9600);         // Set's up Serial Communication at certain speed.

}

// The Main Loop Function
void loop() {

  Signal = analogRead(PulseSensorPurplePin);  // Read the PulseSensor's value.
                                              // Assign this value to the "Signal" variable.

   Serial.println(Signal);                    // Send the Signal value to Serial Plotter.


   if(Signal > Threshold){                          // If the signal is above "550", then "turn-on" Arduino's on-Board LED.
     digitalWrite(LED,HIGH);
   } else {
     digitalWrite(LED,LOW);                //  Else, the sigal must be below "550", so "turn-off" this LED.
   }


delay(10);


}