Fallo comunicación impresora térmica EPSON T88IV por serial

Hola a todos,

En primer lugar pedir disculpas si no es el foro más adecuado porque el dispositivo que estoy utilizando no es un Arduino, sino un ESP32, en concreto un Lilygo TTGO T-CALL Sim800L. El motivo de acudir a este foro es porque creo que el problema está en la configuración de la impresora y he visto en otros hilos que hay personas que tienen bastantes conocimientos en esta materia.

En resumen, mi problema es que solamente consigo imprimir cuando la impresora se enciende después que el ESP32. Si lo hago al revés, es decir, la impresora ya se encuentra encendida y posteriormente se enciende el ESP32, la impresora no imprime.

Utilizo SoftwareSerial para la conexión y la librería creado por docwisdom para Epson TM-T88II que hay en GitHub.

Para la conexión entre el ESP32 y la impresora utilizo un adaptador que posee un MAX3232.

En la consola se imprime en cada ciclo/loop el estado de la impresora. Cuando el dispositivo ESP32 se enciende antes que la impresora no pasa del estado offline con valor -1 (si no me confundo, creo que simplemente no hay respuesta). Sin embargo, si apago la impresora y vuelvo a encender mientras sigue el ESP32 encendido, los valores cambian hasta que el programa indica por consola que la impresora está online y manda a imprimir un ejemplo. Los valores de estado cambian y deja el -1 para mostrar el 30, 20, 0, 0 y por último el 15 antes de pasar a online e imprimir (un valor por ciclo).

No es operativo tener que acordarse de encender la impresora después que el ESP32. Como curiosidad, si el ESP32 tiene la comunicación con la impresora por respetarse el orden de encendido y se reinicia tras la compilación y subida por parte del IDE del programa, sí recupera la comunicación y vuelve a imprimir al igual que al pulsar el botón de reset. Sin embargo, si le quito la alimentación y se la vuelvo a conectar no.

He revisado la documentación de EPSON para la impresora y he probado incluso varias configuraciones de los DIP Switch. El único cambio significativo y que hace perder la comunicación por completo aunque use el truco de encender después, es Handshaking (BUSY condition) (DIP 2-1) que de fábrica trae OFF (Offline + Receive buffer full) y lo tengo que cambiar a ON (Receive buffer full) para que imprima con dicho truco.

La impresora está establecida a 9600bps, 8 bits para datos, sin paridad, 1 bit o más para stop, handshaking mediante DTR/DSR aunque entiendo que no se está utilizando al carecer de la correspondiente conexión.

La placa que posee el MAX3232 tiene dos leds, uno que indica la transmisión y otro la recepción. El de la transmisión parpadea constantemente (entiendo cada petición de estado en cada ciclo) y el de recepción solamente parpadea a la vez cuando realmente hay una comunicación del estado (si se ha respetado el orden de encendido).

La cuestión es: ¿por qué solamente responde la impresora si se enciende después que el ESP32? ¿Qué podría cambiar de la configuración para que termine de funcionar correctamente?

Una vez más, pido disculpas si no es el sitio más adecuado y también por la extensión del mensaje.

Muchas gracias a todos!
No necesitas SoftwareSerial.

Coloca tu código pero revisa como usar los puertos Serie en un ESP32. Te dejo un link

ESP32 Hardware Serial2 Example

December 31, 2018ESP32ESP32, Serial2

There are three serial ports on the ESP32 known as U0UXD, U1UXD and U2UXD all work at 3.3V TTL Level. There are three hardware supported serial interfaces on the ESP32 known as UART0, UART1 and UART2. Like all peripherals, the pins for the UARTs can be logically mapped to any of the available pins on the ESP32. However, the UARTs can also have direct access which marginally improves performance. The pin mapping table for this hardware assistance is as follows.

UART RX IO TX IO CTS RTS
UART0 GPIO3 GPIO1 N/A N/A
UART1 GPIO9 GPIO10 GPIO6 GPIO11
UART2 GPIO16 GPIO17 GPIO8 GPIO7

Ahi los tienes. Tiene 3 puertos serie.

Un ejemplo

/*
 * There are three serial ports on the ESP known as U0UXD, U1UXD and U2UXD.
 * 
 * U0UXD is used to communicate with the ESP32 for programming and during reset/boot.
 * U1UXD is unused and can be used for your projects. Some boards use this port for SPI Flash access though
 * U2UXD is unused and can be used for your projects.
 * 
*/

#define RXD2 16
#define TXD2 17

void setup() {
  // Note the format for setting a serial port is as follows: Serial2.begin(baud-rate, protocol, RX pin, TX pin);
  Serial.begin(115200);
  //Serial1.begin(9600, SERIAL_8N1, RXD2, TXD2);
  Serial2.begin(9600, SERIAL_8N1, RXD2, TXD2);
  Serial.println("Serial Txd is on pin: "+String(TX));
  Serial.println("Serial Rxd is on pin: "+String(RX));
}

void loop() { //Choose Serial1 or Serial2 as required
  while (Serial2.available()) {
    Serial.print(char(Serial2.read()));
  }
}

Gracias por la información, no sabía que se podía asignar a cualquier pin las serial interfaces. He modificado el código al respecto y parece que el problema persiste. No obstante será mejor utilizar el modo por hardware. Muchas gracias Surbyte!

He intentado adjuntar los archivos de código por si puede arrojar algo más de luz, pero no me dejan por ser usuario nuevo. Como digo, he utilizado una librería publicada en GitHub, que he modificado para usar el SerialHardware.

Expongo la parte principal:

#include "thermalprinter.h"

#define ONBOARD_LED 13
#define rxPin 18
#define txPin 19

int printStatus = 0;
int pending = 1;

Epson serialPrinter = Epson(rxPin, txPin); // init the Printer with Output-Pin

void setup()
{
  pinMode(ONBOARD_LED, OUTPUT);
  Serial.begin(115200); //open the USB connection too

  serialPrinter.start();
}

void loop()                     // run over and over again
{
  digitalWrite(ONBOARD_LED, HIGH);    // sets the LED on

  printStatus = serialPrinter.getStatus();     // get the current status of the serialPrinter printer
  if (printStatus == 22) {            // if status is 22 then we are good
    Serial.println("printer online");     // debug that we are online

    if (pending == 1) {
      task();
      pending = 0;
    }
  } else {
    Serial.print("printer offline: ");    // debug that we are offline
    Serial.println(printStatus);          // debug the returned status code  
  } 
  
  if (Serial.available() > 0) {
    serialPrinter.print(Serial.read());
  }

  delay(1000);                  // waits for a second
  digitalWrite(ONBOARD_LED, LOW);    // sets the LED off
}

void task()
{
  serialPrinter.justifyCenter();
  serialPrinter.println("Hello World start");  
  
  serialPrinter.justifyLeft();
  serialPrinter.println("Feed 3 start");  
  serialPrinter.feed(3); 
  serialPrinter.println("Feed 3 end");  
  serialPrinter.feed(2); 
  serialPrinter.lineSpacing(30);  
  serialPrinter.println("line spacing 30 start");  
  serialPrinter.println("line spacing 30 end");  
  serialPrinter.feed(2); 

  serialPrinter.lineSpacing(90);  
  serialPrinter.println("line spacing 90 start");  
  serialPrinter.println("line spacing 90 end");  
  serialPrinter.feed(2);  
  
  serialPrinter.defaultLineSpacing();  
  serialPrinter.println("default line spacing (60) start");  
  serialPrinter.println("default line spacing (60) end");  
  

  serialPrinter.println("Print umlauds with German character set:");    
  
  serialPrinter.println("äöü ÄÖÜ ß");  
  serialPrinter.println("\x7B\x7C\x7D \x5B\x5C\x5D \x7E");  
  serialPrinter.println("start");  
  
  serialPrinter.characterSet(2);
  
  serialPrinter.println("äöü ÄÖÜ ß");  
  serialPrinter.println("\x7B\x7C\x7D \x5B\x5C\x5D \x7E");  

  serialPrinter.doubleHeightOn();
  serialPrinter.println("double height on");  
  
  serialPrinter.doubleHeightOff();
  serialPrinter.println("double height off");  
  
  serialPrinter.boldOn();
  serialPrinter.println("bold on");  
  
  serialPrinter.boldOff();  
  serialPrinter.println("bold off");  
  
  serialPrinter.underlineOn();
  serialPrinter.println("underline on");  
  
  serialPrinter.underlineOff();   
  serialPrinter.println("underline off");  

  serialPrinter.reverseOn();
  serialPrinter.println("reverse on");  
  serialPrinter.println(" Hamburgefonts ");  
  serialPrinter.reverseOff();   
  serialPrinter.println("reverse off");      
  
  serialPrinter.justifyCenter();
  serialPrinter.barcodeHeight(50);
  serialPrinter.barcodeWidth(3);
  serialPrinter.barcodeNumberPosition(2);
  serialPrinter.printBarcode(67,12);
  serialPrinter.println("496595707379");
  
  serialPrinter.justifyRight();
  serialPrinter.println("Hello World end");  
  
  serialPrinter.cut(); 
}

El archivo thermalprinter.cpp:

/*******************************************
 * see header-file for further informations
 ********************************************/

#include "Arduino.h"
#include "thermalprinter.h"

static const char LF = 0xA; // print buffer and line feed  
    
    
Epson::Epson(int rxPin, int txPin)
{
  this->_rxPin = rxPin;
  this->_txPin = txPin;
  this->start();
}

void Epson::start(){
  this->_printer->begin(9600, SERIAL_8N1, this->_rxPin, this->_txPin);
}

// query status of printer. when online returns value 22.
int Epson::getStatus(){
  this->write(0x10);    
  this->write(0x04);  
  this->write(1);
  int result;
  result = this->_printer->read();
  return result;
}

int Epson::read(){
    int result;
    result = this->_printer->read();
    return result;
}

// Print and feed n lines
// prints the data in the print buffer and feeds n lines
void Epson::feed(uint8_t n){
  this->write(0x1B);  
  this->write(0x64);
  this->write(n);    
}

// Print one line
void Epson::feed(){
  this->feed(1);    
}


// Set line spacing
// sets the line spacing to n/180-inch
void Epson::lineSpacing(uint8_t n){
  this->write(0x1B);  
  this->write(0x33);
  this->write(n);  
}

// Select default line spacing
// sets the line spacing to 1/6 inch (n=60). This is equivalent to 30 dots.
void Epson::defaultLineSpacing(){
  this->write(0x1B);  
  this->write(0x32);
}

// Select an international character set
//  0 = U.S.A. 
//  1 = France 
//  2 = Germany 
//  3 = U.K. 
//  4 = Denmark I 
//  5 = Sweden 
//  6 = Italy 
//  7 = Spain 
//  8 = Japan 
//  9 = Norway 
// 10 = Denmark II 
// see reference for Details! 
void Epson::characterSet(uint8_t n){
  this->write(0x1B);  
  this->write(0x52);
  this->write(n);  
}

void Epson::doubleHeightOn(){
  this->write(0x1B);    
  this->write(0x21);  
  this->write(16);
}

void Epson::doubleHeightOff(){
  this->write(0x1B);  
  this->write(0x21);    
  this->write(0);
}

void Epson::boldOn(){
  this->write(0x1B);  
  this->write(0x21);    
  this->write(8);
}

void Epson::boldOff(){
  this->write(0x1B);  
  this->write(0x21);    
  this->write(0);
}

void Epson::underlineOff() {
  this->write(0x1B);  
  this->write(0x21);    
  this->write(0);
}
void Epson::underlineOn() {
  this->write(0x1B);  
  this->write(0x21);    
  this->write(128);
}


// Turn white/black reverse printing mode on/off
void Epson::reverseOn() {
  this->write(0x1D);  
  this->write(0x42);    
  this->write(1);
}
  
void Epson::reverseOff() {
  this->write(0x1D);  
  this->write(0x42);    
  this->write(0);
}

void Epson::justifyLeft() {
  this->write(0x1B);  
  this->write(0x61);    
  this->write(0);
}

void Epson::justifyCenter() {
  this->write(0x1B);  
  this->write(0x61);    
  this->write(1);
}

void Epson::justifyRight() {
  this->write(0x1B);  
  this->write(0x61);    
  this->write(2);
}
//n range 1-255
void Epson::barcodeHeight(uint8_t n) {
  this->write(0x1D);  
  this->write(0x68);    
  this->write(n);
}
//n range 2-6
void Epson::barcodeWidth(uint8_t n) {
  this->write(0x1D);  
  this->write(0x77);    
  this->write(n);
}
//n range 0-3
void Epson::barcodeNumberPosition(uint8_t n) {
  this->write(0x1D);  
  this->write(0x48);    
  this->write(n);
}
//m range 65-73 (code type)
//n (digit length)
void Epson::printBarcode(uint8_t m, uint8_t n) {
  this->write(0x1D);  
  this->write(0x6B);    
  this->write(m);
  this->write(n);
}

void Epson::cut() {
  this->write(0x1D);
  this->write('V');
  this->write(66);
  this->write(0xA); // print buffer and line feed
}

size_t Epson::write(uint8_t c) {
  this->_printer->write(c);
  return 1;
}

El archivo thermalprinter.h

#ifndef thermalprinter_h
#define thermalprinter_h

 #include "Arduino.h"

class Epson : public Print {
public:
  
  Epson(int rxPin, int txPin);
  

size_t write(uint8_t c);
int read();


void start();

int getStatus();
void boldOff();
void boldOn();
void characterSet(uint8_t n);
void defaultLineSpacing();
void doubleHeightOff();
void doubleHeightOn();
void feed(uint8_t n);
void feed();
void lineSpacing(uint8_t n);
void reverseOff();
void reverseOn();
void underlineOff();
void underlineOn();
void justifyLeft();
void justifyCenter();
void justifyRight();
void barcodeHeight(uint8_t n);
void barcodeWidth(uint8_t n);
void barcodeNumberPosition(uint8_t n);
void printBarcode(uint8_t m,uint8_t n);
void cut();


private:
  int _rxPin;  
  int _txPin;
  
  HardwareSerial* _printer = &Serial2;
};

#endif

Cambió el comportamiento o sigue igual?

Sigue igual, solamente imprime si la impresora es la última en encenderse. He probado incluso a volver al estado de fábrica el DIP 2-1 para comprobar que mantiene el mismo comportamiento (cuando lo cambio a OFF no hace nada aunque encienda la impresora por último, por lo que está en ON).

Encendiende primero la impresora y despues el ESP32 y prueba a quitarle la alimentacion al MAX3232 y despues vuelvesela a dar.
O con la alimentacion del MAX3232 quitada encendiende primero la impresora y despues el ESP32 y despues le das la alimentacion al MAX3232.

A ver si con alguna de esas dos operativas funciona corretamente.

PD: Algunos MAX3232 traen un pin para darle RST si es asi pruebalo tambien

Yo creo tmb que es el DTR/RTS prueba a ver si unes los pines de la impresora aislándote del conjunto ESP32/MAX/Printer.

Hi,
Trata de ponerle un jumper al connector del printer de 25 pines en los pines (4 y 5) y (6-8-20). Esto pondra el printer en listo para recibir informacion de la computadora. Esta senale se supone que las controlen el driver de la computadora.

Ante todo disculpad el subir este hilo algo antiguo.
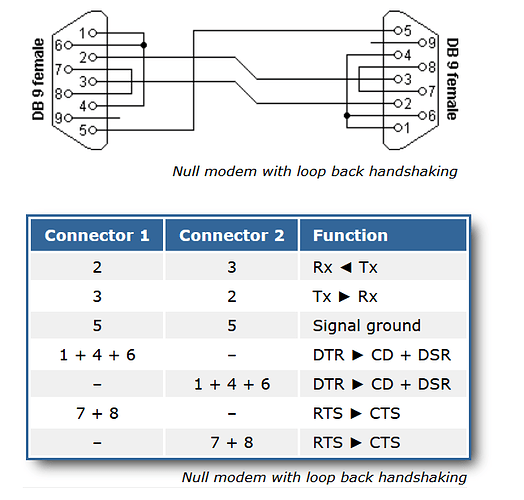
Estoy algo oxidado en impresoras serie pero yo creo también que deberías modificar el cable. actualmente estás usando, supongo, un cable de 3 hilos (tx,rx y gnd) al db9 de la impresora, pero quizá la impresora necesita que se indiquen señales data terminal ready, clear to send, etc.
Te dejo un esquema del db9 para "engañar" a la impresora que crea que está el host preparado para enviar:

Normalmente las impresoras utilizan esas líneas para indicar que estan off o que no tienen papel o tapa abierta para que el programa sepa que no puede imprimir.
Si no las controlas, y la impresora acaba el rollo de papel, no sabrás si se ha podido imprimir correctamente el ticket/boleta.

Yo primero probaría el ver que con el db9 puenteando las señales 1+4+6 y 7+8 funciona bien y después simularía esas señales con el micro por i/o digitales.
Por ejemplo la señal "CD" (carrier detect) sirve para saber si el cable está enchufado (no que la impresora esté encendida), Request to send que la impresora admite caracteres,...
También la impresora los activa para indicar que el buffer está lleno y así los programas o sistemas operativos esperan a que se vacíe para no perder datos.
Saluidos.

This topic was automatically closed 180 days after the last reply. New replies are no longer allowed.