LCD Smartie with multiple Displays ? (2*2*16=4x16 & 2*4x20=4*40)

Hello guys.
I try work LCD Smartie with arduino 2x16 lcd. I got an idea. I have many displays. Can i work it together?
Lcd Smartie supported:

1x10, 1x16, 1x20, 1x24, 1x40,
2x16, 2x16, 2x20, 2x24, 2x40,
4x16, 4x20, 4x40

I think, i can use 2 * 2x16 lcd and i can select 4x16 in LCD smartie program. Or i can use 2* 4x20 LCD and i can select 4*40 in lcd smartie program. But how ?

this is one lcd, lcd smartie code;

// include the library code:
#include <LiquidCrystal.h>

// these constants won't change.  But you can change the size of
// your LCD using them:
const int numRows = 2;
const int numCols = 16;

// initialize the library with the numbers of the interface pins
LiquidCrystal lcd(10, 11, 12, 5, 4, 3, 2);
// RS, RW, Enable, 4,5,6,7 (Refer to the back of your LCD for details)


void setup() { 
  Serial.begin(9600);
  // set up the LCD's number of rows and columns: 
  lcd.begin(numRows, numCols);
  lcd.clear();
  lcd.setCursor(0,0);
  lcd.print("**LCD  SMARTIE**");
  lcd.setCursor(0,1);
  lcd.print("on Arduino");
}

byte serial_getch(){
  
  int incoming;  
  while (Serial.available()==0){}
  // read the incoming byte:
  incoming = Serial.read();

  return (byte) (incoming &0xff);
}

void loop(){

  byte rxbyte;
  byte temp;

  rxbyte = serial_getch();

  if (rxbyte == 254) //Matrix Orbital uses 254 prefix for commands
  {
    switch (serial_getch())
    {
    case 66: //backlight on (at previously set brightness)
      // not implemented        

      break;
    case 70: //backlight off
      // not implemented        
      break;
    case 71:  //set cursor position
      temp = (serial_getch() - 1);  //get column byte
      switch (serial_getch())  //get row byte
      {
        //line 1 is already set up
      case 2:
        temp += 0x40;
        break;
      case 3:
        temp += 0x14;
        break;
      case 4:
        temp += 0x54;
        break;
      default:
        break;
      }
      lcd.command(0b10000000 + temp);
      break;
    case 72:  //cursor home (reset display position)
      lcd.command(2);
      break;
    case 74:  //show underline cursor
      lcd.command(0b00001110);
      break;
    case 75:  //underline cursor off
    case 84:  //block cursor off
      lcd.command(0b00001100);
      break;
    case 76:  //move cursor left
      lcd.command(16);
      break;
    case 77:  //move cursor right
      lcd.command(20);
      break;
    case 78:  //define custom char
      lcd.command(64 + (serial_getch() * 8));  //get+set char address
      for (temp = 7; temp != 0; temp--)
      {
        lcd.write(serial_getch()); //get each pattern byte
      }
      break;
    case 83:  //show blinking block cursor
      lcd.command(0b00001111);
      break;
    case 86:  //GPO OFF
      //implement later
      break;
    case 87:  //GPO ON
      /*temp = serial_getch();
              if (temp == 1)
              {
                GPO1 = GPO_ON;
              }*/
      break;
    case 88:  //clear display, cursor home
      lcd.command(1);
      break;
    case 152: //set and remember (doesn't save value, though)
    case 153: //set backlight brightness
      //not implemented
      break;

      //these commands ignored (no parameters)
    case 35: //read serial number
    case 36: //read version number
    case 55: //read module type
    case 59: //exit flow-control mode
    case 65: //auto transmit keypresses
    case 96: //auto-repeat mode off (keypad)
    case 67: //auto line-wrap on
    case 68: //auto line-wrap off
    case 81: //auto scroll on
    case 82: //auto scroll off
    case 104: //init horiz bar graph
    case 109: //init med size digits
    case 115: //init narrow vert bar graph
    case 118: //init wide vert bar graph
      break;
    default:
      //all other commands ignored and parameter byte discarded
      temp = serial_getch();  //dump the command code
      break;
    }
    return;
  } //END OF COMMAND HANDLER

  //change accented char to plain, detect and change descenders
  //NB descenders only work on 5x10 displays. This lookup table works
  //  with my DEM-20845 (Display Elektronik GmbH) LCD using KS0066 chip.
  switch (rxbyte)
  {
    //chars that have direct equivalent in LCD charmap
    /*    case 0x67: //g
          rxbyte = 0xE7;
          break;
        case 0x6A: //j
          rxbyte = 0xEA;
          break;
        case 0x70: //p
          rxbyte = 0xF0;
          break;
        case 0x71: //q
          rxbyte = 0xF1;
          break;
        case 0x79: //y
          rxbyte = 0xF9;
          break;
     */  case 0xE4: //ASCII "a" umlaut
    rxbyte = 0xE1;
    break;
  case 0xF1: //ASCII "n" tilde
    rxbyte = 0xEE;
    break;
  case 0xF6: //ASCII "o" umlaut
    rxbyte = 0xEF; //was wrong in v0.86
    break;
  case 0xFC: //ASCII "u" umlaut
    rxbyte = 0xF5;
    break;

    //accented -> plain equivalent
    //and misc symbol translation
  case 0xA3: //sterling (pounds)
    rxbyte = 0xED;
    break;
    /*    case 0xB0: //degrees symbol
          rxbyte = 0xDF;
          break;
     */  case 0xB5: //mu
    rxbyte = 0xE4;
    break;
  case 0xC0: //"A" variants
  case 0xC1:
  case 0xC2:
  case 0xC3:
  case 0xC4:
  case 0xC5:
    rxbyte = 0x41;
    break;
  case 0xC8: //"E" variants
  case 0xC9:
  case 0xCA:
  case 0xCB:
    rxbyte = 0x45;
    break;
  case 0xCC: //"I" variants
  case 0xCD:
  case 0xCE:
  case 0xCF:
    rxbyte = 0x49;
    break;
  case 0xD1: //"N" tilde -> plain "N"
    rxbyte = 0x43;
    break;
  case 0xD2: //"O" variants
  case 0xD3:
  case 0xD4:
  case 0xD5:
  case 0xD6:
  case 0xD8:
    rxbyte = 0x4F;
    break;
  case 0xD9: //"U" variants
  case 0xDA:
  case 0xDB:
  case 0xDC:
    rxbyte = 0x55;
    break;
  case 0xDD: //"Y" acute -> "Y"
    rxbyte = 0x59;
    break;
    /*    case 0xDF: //beta  //mucks up LCDSmartie's degree symbol??
          rxbyte = 0xE2;
          break;
     */  case 0xE0: //"a" variants except umlaut
  case 0xE1:
  case 0xE2:
  case 0xE3:
  case 0xE5:
    rxbyte = 0x61;
    break;
  case 0xE7: //"c" cedilla -> "c"
    rxbyte = 0x63;
    break;
  case 0xE8: //"e" variants
  case 0xE9:
  case 0xEA:
  case 0xEB:
    rxbyte = 0x65;
    break;
  case 0xEC: //"i" variants
  case 0xED:
  case 0xEE:
  case 0xEF:
    rxbyte = 0x69;
    break;
  case 0xF2: //"o" variants except umlaut
  case 0xF3:
  case 0xF4:
  case 0xF5:
  case 0xF8:
    rxbyte = 0x6F;
    break;
  case 0xF7: //division symbol
    rxbyte = 0xFD;
    break;
  case 0xF9: //"u" variants except umlaut
  case 0xFA:
  case 0xFB:
    rxbyte = 0x75;
    break;
  default:
    break;
  }

  lcd.write(rxbyte);  //otherwise a plain char so we print it to lcd
  return;


}

I need help for modifiy this code.
Thank you for reading and helping me.
(sorry for my bad english.)

I found this video:

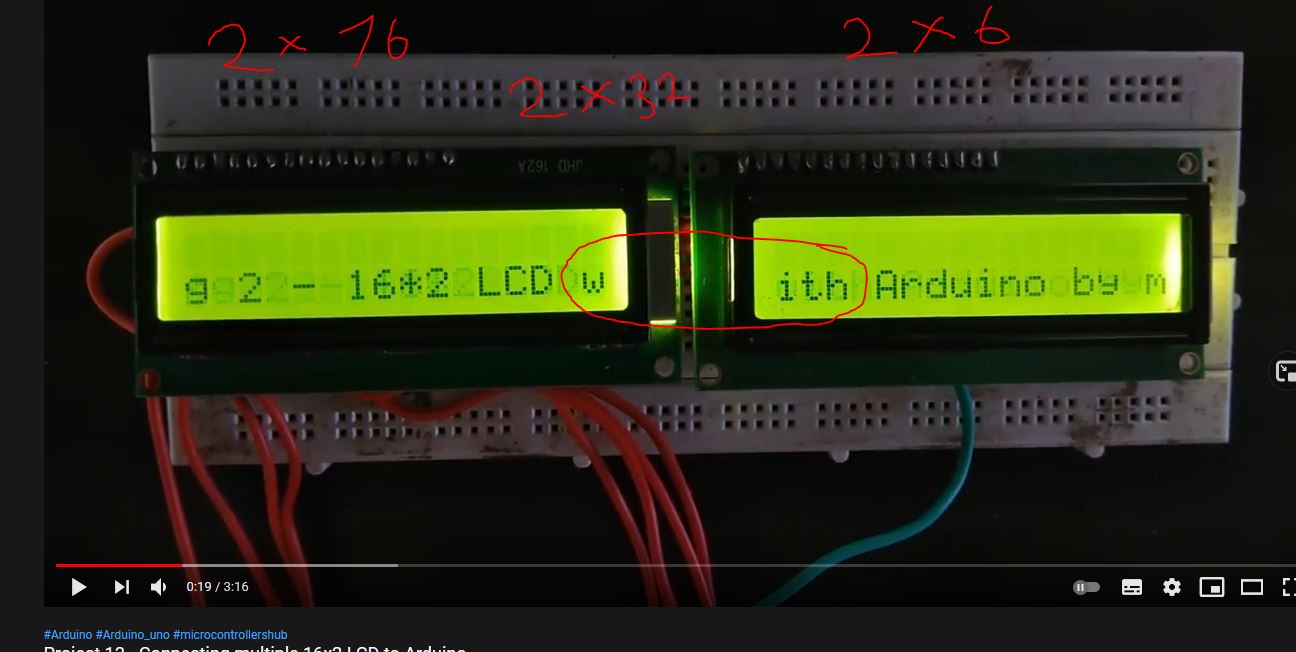
I wan this with lcd smartie.

I found one video for about like my project:

You could control up to 16 LCDs with just 2 Arduino pins, if you used i2c backpacks on your LCDs.

--- bill

For the 16, you would need two different versions of the backpack, eight of each version. Not easy to tell from the descriptions in eBay and Aliexpress, which is which, :astonished:

Paul__B:
For the 16, you would need two different versions of the backpack, eight of each version. Not easy to tell from the descriptions in eBay and Aliexpress, which is which, :astonished:

bperrybap:
You could control up to 16 LCDs with just 2 Arduino pins, if you used i2c backpacks on your LCDs.

--- bill

Thank you for answer guys but you dont understanding me. I can use 2 lcd displays with I2C or normal D1-7 pins.
I want to use 2 lcd displays with lcd smartie. Just need modifiy code(first message code) but i cant that. :confused:

// include the library code:
#include <LiquidCrystal.h>

// these constants won't change.  But you can change the size of
// your LCD using them:
const int numRows = 4;
const int numCols = 16;

// initialize the library with the numbers of the interface pins
LiquidCrystal lcd(10, 11, 12, 5, 4, 3, 2);
LiquidCrystal lcd2(10, 9, 12, 5, 4, 3, 2);

// RS, RW, Enable, 4,5,6,7 (Refer to the back of your LCD for details)

I need search lcd smartie topic in this froum.

This is a bit of a puzzle. :roll_eyes:

As I understand it, "LCD Smartie" is a Windoze program to display on these LCDs.

This is an Arduino forum. You need to explain what "LCD Smartie" has to do with Arduino. :astonished: It clearly require an interface board but it is not immediately apparent on the rater turgid website, whether an Arduino is specified. Would you care to give links to this?

Are you wanting to pair two LCDs and make them behave like a single larger LCD smartie display?

I don't know much about LCD smartie.
You could definitely do that with code in a sketch.

But perhaps LCD smartie has a way to configure this type thing?
i.e. bind/pair multiple separate devices into a single larger display.
This would be much easier, but for that you would need to consult the LCD smartie documentation.

--- bill

bperrybap:
But perhaps LCD smartie has a way to configure this type thing?

I expect it does, but since it appears so far, foreign to Arduinox, I think the OP needs to explain himself. :roll_eyes:

bperrybap:
Are you wanting to pair two LCDs and make them behave like a single larger LCD smartie display?

Yess!!! :confused:

Paul__B:
This is a bit of a puzzle. :roll_eyes:

As I understand it, "LCD Smartie" is a Windoze program to display on these LCDs.

This is an Arduino forum. You need to explain what "LCD Smartie" has to do with Arduino. :astonished: It clearly require an interface board but it is not immediately apparent on the rater turgid website, whether an Arduino is specified. Would you care to give links to this?

Paul__B:
I expect it does, but since it appears so far, foreign to Arduinox, I think the OP needs to explain himself. :roll_eyes:

Thank you for again answer. ı am sorrry for my bad english. :frowning:
LCD smartie is old project free open source LCD software. You can see your pc's cpu temp or winamp music name .. ..
LCD smartie first version working just parellel port. But now you can work usb arduino.
official web sites for about this:

i using this mode for my code:

We can select lcd sizes in program (2x16, 2x20, 4x40 .. ..)
And my first message, i sharing working lcd smartie arduino code for single displays(this code for all character displays).
My code working perfectly for a single lcd. But i want: Are you wanting to pair two LCDs and make them behave like a single larger LCD smartie display?

My english and my arduino programming not good. I need just modified this code for 2 lcds..

Can anyone help me? :confused: :frowning:

Than first i need to understand how to work this code; This code 2 x 2*16 LCD ekran same like working one 2 x 32 this code; (VIDEO)

I need modify this code "no scroll" version. Just text.

// Connecting multiple 16*2 LCD Display to Arduino
// by Varad Kulkarni <http://www.microcontrollershub.com>
// Created on 18 June 2018

#include <LiquidCrystal.h>
LiquidCrystal lcd1(12, 11, 5, 4, 3, 2);
LiquidCrystal lcd2(12, 10, 5, 4, 3, 2);

// Change following variables as per your need
char * LargeText = "    Connecting 2 - 16*2 LCD with Arduino by microcontrollershub.       ";

int iLineNumber = 1;                                                                   // Line number to show your string (Either 0 or 1)

int iCursor = 0;

void setup() 
{
  lcd1.begin(16, 2);                                                                   // Initialise both LCD.
  lcd2.begin(16, 2);
  lcd1.clear();
  lcd2.clear();
}

void loop() 
{
  UpdateLCDDisplay();                                                                  // Update text on LCD Display.
  delay(160);                                                                          // Change this value to change speed of scrolling text.
  lcd1.clear();
  lcd2.clear();
  delay(60);
}

void UpdateLCDDisplay()
{
  int iLenOfLargeText = strlen(LargeText);                                            // Calculate length of string.
  if (iCursor == (iLenOfLargeText - 1) )                                              // Reset variable for rollover effect.
  {
    iCursor = 0;
  }
  lcd1.setCursor(0,iLineNumber);
  lcd2.setCursor(0,iLineNumber);
  if(iCursor < iLenOfLargeText - 32)                                                  // This loop executed for normal 16 characters.
  {
    for (int iChar = iCursor; iChar < iCursor + 16 ; iChar++)
    {
      lcd1.print(LargeText[iChar]);
    }
    for (int iChar = iCursor + 16 ; iChar < iCursor + 32 ; iChar++)
    {
      lcd2.print(LargeText[iChar]);
    }
  }
  else
  {
      for (int iChar = iCursor; iChar < (iLenOfLargeText - 1) ; iChar++)                //  This code takes care of printing characters of current string.
      {
        if(16 > (iChar - iCursor))
        {
          lcd1.print(LargeText[iChar]);
        }
        else
        {
          lcd2.print(LargeText[iChar]);
        }
      }
      for (int iChar = 0; iChar <= 32 - (iLenOfLargeText - iCursor); iChar++)           //  Remaining characters will be printed by this loop.
      {
        
        if(16 > (32 - (iLenOfLargeText - iCursor)))
        {
          lcd2.print(LargeText[iChar]);
        }
        else
        {
          if( ((32 - (iLenOfLargeText - iCursor)) - 16) >=  iChar)
          {
            lcd1.print(LargeText[iChar]);
          }
          else
          {
            lcd2.print(LargeText[iChar]);
          }
          
        }  
      }
  }
  iCursor++;
}

Than i need modify to LCD smartie arduino code.

This topic was automatically closed after 61 days. New replies are no longer allowed.