I have a project that uses Adafruit's Dotstar LED strip:
Addressable Lighting Dotstar 72 LED Strip (Black) Serial (Shift Register) Red, Green, Blue (RGB) 500.00mm
( https://www.digikey.com/en/products/detail/adafruit-industries-llc/2328/5638310 )
(Digikey 1528-2455-ND)
but I need runs of 16 LEDs. That requires removing the plastic enclosure, cutting the strip into segments and attaching wires - and I'm having problems wiring. The strip is very densely packed (I need the LEDs to be that close together, so this is the strip I need) and the tiny pads have nearly microscopic holes in them, far too small to push wires into. I spent a few hours with an xacto knife, very fine wire and a soldering gun and managed to get enough of a connection to run the strip, but the wire is so thin it has a tendency to snap off easily. To get even that far, I had to skip one LED in the strip, push wire strands though the tiny hole between the 1st and 2nd LED, carefully solder (maddening), and then carefully cut away the 1st LED, avoiding the holes. Far harder than it sounds (at least with my fine motor skill), and the result isn't robust.
Basically, I have no idea how you're supposed to make usable connections to these things. Adafruit recommended connectors on their page for these strips, but the recommended connector doesn't fit, unless I'm missing something. If you had success with this particular strip, how did you do it?
A non-starter option - buying one complete strip for each 16 LED segment I need, and cutting off and discarding most of the strip. Not an option at these prices. Help appreciated, thanks in advance.
What you need is some backing, if the strips do not have to bend.
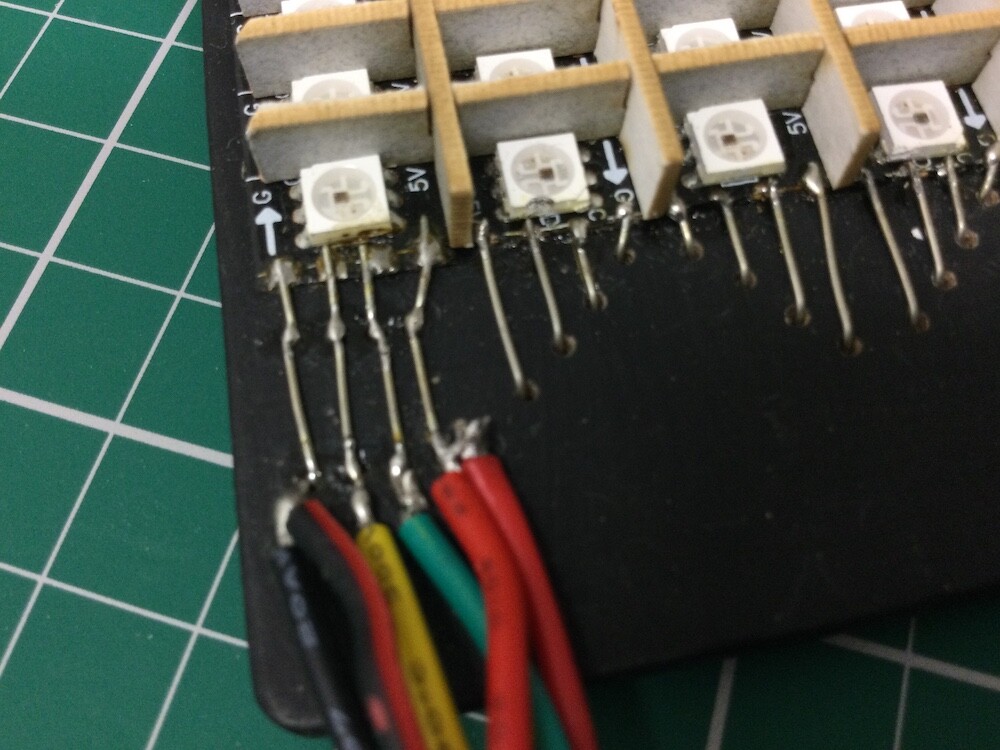
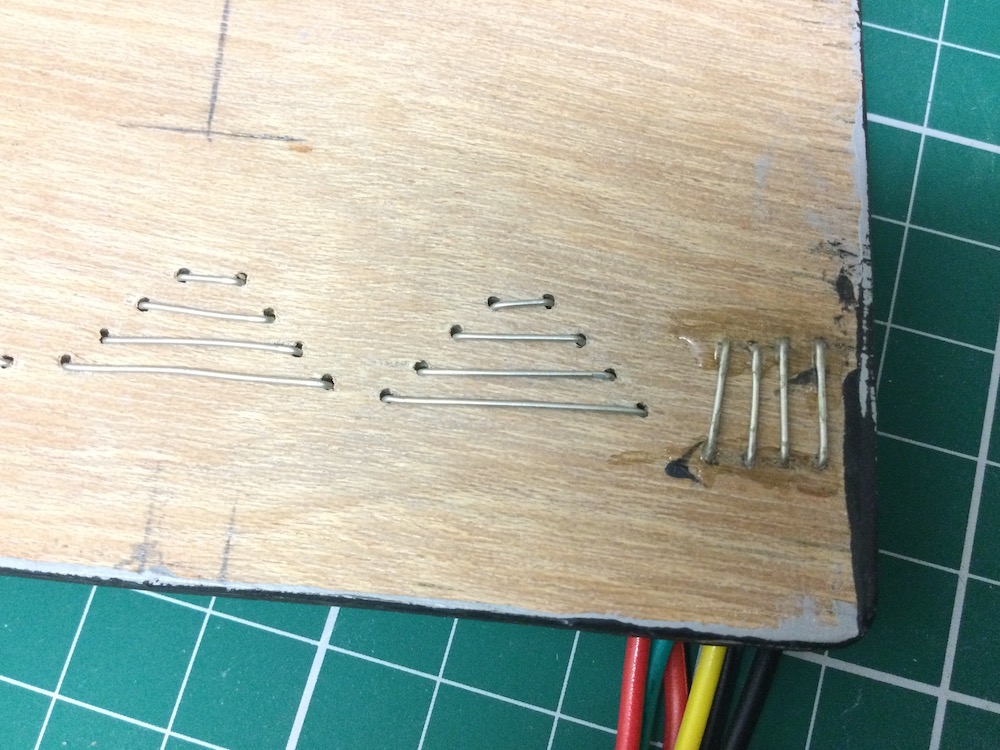
I used 0.5mm diameter tinned copper wire, this is very strong, you can not break it. I uses some thin ( 3mm ) plywood for backing when I made a matrix using this sort of LEDs. But you can just use a thin strip, or even smaller piece if the strip needs to bend beyond the first LED.
I drilled two 0.7mm holes for each wire connection and bent the wires under along and out the other side of the board. Then I bent the wire towards the strip connectors, and cut then off after they overlapped the connector. Then I soldered them in place with a fine tipped soldering iron. I also added a short piece of wire to the top of the board, basically in parallel with the piece that goes under the board to get a good mechanical fix on the wire.
I think a solder gun is way too heavy and has too big a tip to do the job. Also they tend to be under powered for this sort of job.
These photos are of the matrix I built but you can adapt the technique for a single strip. It is easy to solder things on the stubs of wire that stick out of the board. I would recommend you use fine core ( 0.56mm ) MULTICORE solder lead / tin 40/60.
I can't see through the solder, of course, but it looks like the pads on the LED strips are different than the ones on mine. But the takeaway seems to use stiff, solid, thin wire, solder to the top of the pad and don't try to go through the microscopic holes, and don't do a design where the wire can flex in any way.
I've also found that sparkfun sells these dotstars mounted on rigid circuit board strips with castellated ends, which means they could be mounted on a second board, pressed up against pins and soldered. Much nicer and more stable than fussing with wire. And, since I'd like the LEDs to be even closer together than they are on the strip, maybe it's time I learned to solder SMDs.
This will be my fallback solution though..
Wow do I wish these dotstars came with a through-hole pinout.
Well it’s not thin, 0.5mm diameter is quite chunky for solid wire. You need to bend it with pliers.
The thing is that the technique of laying the wire over the pad and then soldering it down, is what you need to do. Even to the extent of hold it down when molten with a very thin screwdriver. To stop it springing back.
Now what would be a rather good idea, would be to bridge each "zigzag" of the power wires - 5 V and ground - together across the back of the board - the way you have arranged it makes this dead easy, just connect all the top jumpers together one to the next, and all bottom jumpers.
Because you lose voltage along the thin foils in the strips, it is a good idea to inject power onto as many points as possible along the strip. You may otherwise notice loss of voltage as yellowing of the colour along the strip when you run it at full brightness white.