Pulldown resistor sizing

I am creating an application with results based on three inputs. In this situation, I either have a HIGH input or no input. To read this, I am using 10k ohm pulldown resistors. My inputs read as high unless I pull them down to ground.

I was wondering if a smaller value of pulldown resistor might give me LOW value when I remove the HIGH input. Don't tell me to change the sketch to check for LOW instead of HIGH, with this arrangement, the failure mode is important.

The pull-down resistor holds the logic signal near to zero volts (0V) when no other active device is connected. It should have a larger resistance than the impedance of the logic circuit generating the HIGH, so the effect of a lower value will work depends on your circuit.

Since you didn't tell us what processor or board you're using (I guess we're not supposed to ask that either), I'll use the ATmega328P as an example.

Minimum Iil is 1uA. For a 5V supply, maximum Vil is 1.5v. That works out to a maximum input resistance of 1.5M to ground before that input won't reliably read as low.

You also didn't tell us how you have the pins on your unknown processor configured. INPUT? INPUT_PULLUP? INPUT_PULLDOWN (which is supported on some processors)? Or if there are physical pull up resistors on the board.

It might be premature to decide that the value of your pull down resistors is the problem.

1 Like

The board I'm using is the Sparkfun Redboard Qwiic.
Here's the sketch, inputs are analog inputs, not digital.
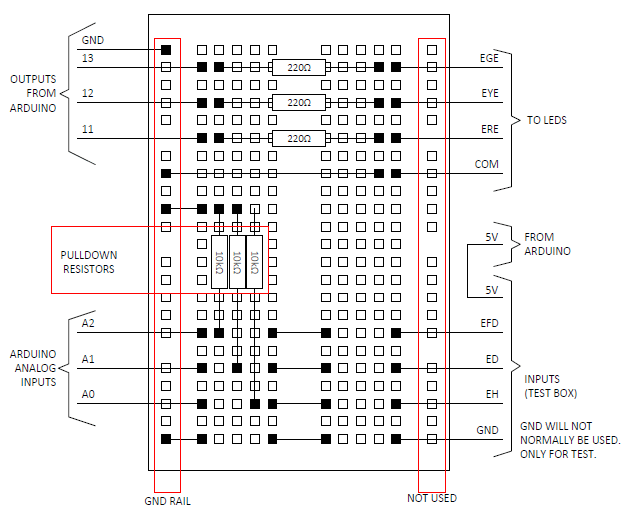
Inputs come from double throw, center off toggles which connect to either 5V or GND.

/*****************************************************************
The line inputs are treated as binary digits to select eight
possible conditions which are passed to the light outputs.

          EH ED  EFD  RESULT
Case 0 =   0  0   0   RED SIGNAL
Case 1 =   0  0   1   RED SIGNAL
Case 2 =   0  1   0   RED SIGNAL
Case 3 =   0  1   1   RED SIGNAL
Case 4 =   1  0   0   YELLOW SIGNAL
Case 5 =   1  0   1   FLASHING YELLOW SIGNAL
Case 6 =   1  1   0   GREEN SIGNAL
Case 7 =   1  1   1   GREEN SIGNAL

*****************************************************************/
// Define the line circuit input pins
// Use pulldown resistors on these inputs
const int EH = A0; // H line input for eastward moves
const int ED = A1; // D line input for eastward moves
const int EFD = A2; // FD line input for eastward moves

// Define the signal output pins
const int ERE = 13; // Eastward signal Red LED output
const int EYE = 12; // Eastward signal Yellow LED output
const int EGE = 11; // Eastward signal Green LED output

void setup() {
pinMode(EGE, OUTPUT); // Green LED
pinMode(EYE, OUTPUT); // Yellow LED
pinMode(ERE, OUTPUT); // Red LED
pinMode(EH, INPUT); // H toggle switch
pinMode(ED, INPUT); // D toggle switch
pinMode(EFD, INPUT); // FD toggle switch
}

void loop() {
// The variable "input"
// is a 3-bit binary number.
// Bit 0 is read from the FD input,
// bit 1 from the D input and
// bit 2 from the H input.

int input;
bitWrite(input, 0, digitalRead(EFD)); // Read all line
bitWrite(input, 1, digitalRead(ED)); // inputs into
bitWrite(input, 2, digitalRead(EH)); // "input" variable
switch (input)
{
case 0:
digitalWrite(EGE, LOW);
digitalWrite(EYE, LOW);
digitalWrite(ERE, HIGH);
break;

case 1: // Signal aspect is RED
  digitalWrite(EGE, LOW);
  digitalWrite(EYE, LOW);
  digitalWrite(ERE, HIGH);
  break;

case 2: // Signal aspect is RED
  digitalWrite(EGE, LOW);
  digitalWrite(EYE, LOW);
  digitalWrite(ERE, HIGH);
  break;

case 3: //Signal aspect is RED
  digitalWrite(EGE, LOW);
  digitalWrite(EYE, LOW);
  digitalWrite(ERE, HIGH);
  break;

case 4: // Signal aspect is YELLOW
  digitalWrite(EGE, LOW);
  digitalWrite(EYE, HIGH);
  digitalWrite(ERE, LOW);
  break;

case 5: // Signal aspect is YELLOW
  digitalWrite(EGE, LOW);
  digitalWrite(EYE, HIGH);
  digitalWrite(ERE, LOW);
  break;

case 6: // Signal aspect is FLASHING YELLOW
  digitalWrite(EGE, LOW);
  digitalWrite(ERE, LOW);
  digitalWrite(EYE, HIGH);
  delay(500);
  digitalWrite(EYE, LOW);
  delay(500);
  break;

case 7: // Signal aspect is GREEN
  digitalWrite(EGE, HIGH);
  digitalWrite(EYE, LOW);
  digitalWrite(ERE, LOW);
  break;

}
}

It appears that your program is using positive logic for the input toggle switches so wire the switches between the positive rail and the arduino pins. Use a 10k resistor between the Arduino pin and ground.

The switch then toggles in 3 indexed states say up, middle and down, but you require only 2 states so say up and middle represent off and down indicates on.
The switch has 3 contacts. One will be unused.
Certainly do not wire both power rails directly to the switch.

1 Like

Connect the middle pin of the switch to ground, and the other pins to two inputs with internal pull up. No resistors needed.
pinMode(leftSwitch, INPUT_PULLUP);
A LOW on one input indicates that the switch is in that position.
Leo..

That won't work for me. Inputs have to be high or nothing.

Hello OM k6mug

Welcome to the best Arduino forum ever :slight_smile:

Post the current sketch in code tags
grafik
to see how we can help.

What´s the task of the sketch in real life?

Check this information for your project.

One of us doesn't understand the problem.
You only need two inputs* to detect the position of a 3-position toggle switch.
Leo..

// middle pin of the 3-pin toggle switch to ground
const byte leftSwitch = A0; // left pin
const byte rightSwitch = A1; // right pin
byte state;

void setup() {
  Serial.begin(115200);
  pinMode(leftSwitch, INPUT_PULLUP); // enable internal pull up
  pinMode(rightSwitch, INPUT_PULLUP);
}

void loop() {
  if (digitalRead(leftSwitch) == LOW && digitalRead(rightSwitch) == HIGH) state = 1;
  else if (digitalRead(leftSwitch) == HIGH && digitalRead(rightSwitch) == LOW) state = 2;
  else state = 0;
  
  Serial.println(state);
  delay(250); // for testing only, to stop flooding the serial monitor
}

Of course it would but why are you considering a smaller value, doesn't the 10K work?

1 Like

To recap and add info, the switches are only for a test setup. I will be checking inputs from a remote source that is either a voltage or open circuit. In the hope of eliminating an interface relay, I added the pulldown resistors in the hope that they would pull the input to ground when no voltage is present. That did not happen.

They input leads are shielded to prevent picking up stray signals. The test switches are in a steel box as well.

A loss of input due to a broken wire must be treated the same way as no voltage

You need to post your code correctly, currently it's unreadable.
In the IDE click on Edit then Copy for Forum, that will copy your code. Then just come here and do a paste.
A 10K should pull an input LOW. If not then you have a wiring error, bad resistors or a value higher than you think.

I'll try to put the circuit here. The code works, this is a circuit and or input problem.
The pulldown resistors all check out, but one of them is a 10% tolerance and reads 11.37kohm.

Shouldn't you be using opto couplers?

Opto transistor between pin and ground, with internal pull up on the pin.
Opto LED driven by the voltage source through a current limiting resistor (1mA will do).
Opto coupler close to the Arduino. Opto LEDs don't need shielded wiring.

From your breadboard text: "GND will not normally be used, only for test"
Your don't need a ground connection with opto couplers, but you do with your setup.
Leo..

As I said, I didn't want to create an interface circuit, but I may have to.
The GND connection marked as "not normally used" is for the switches only. That is for future use, but in my testing I used to bring the inputs down when the pulldown resistor would not.
There will be a common for the inputs.

I've been following this but not commented so far. A 10k resistor will easily pull down and Arduino input, so if it's not doing so then something isn't as you think it is or isn't as you have told us.

Start with just a 10k resistor between an input and ground and nothing else. Configure the pin as input, read it and print the result to the serial monitor. Use a piece of wire between the pin and 5V to pull it up, see if it goes high. When that works ok try you larger circuit.

Please post code in code tags.

Please post clear photos of your setup.

Worth asking if your drawing is of a solderless breadboard that has the notorious "breadboard gap" like this one that needs to have the sections of the rails jumped together?

Edit: I had to fake my picture. @LarryD has a picture of the real thing in post #20

  • I just had to help :wink:

2 Likes

My breadboard has single column
rails. One left and one right. I'm not using the one on the right.

I would perform a simple test to ensure that I could measure continuity between the GND connection of the microcontroller and the end of the resistors that are supposed to be connected to ground and then from the other end of the resistors to the intended microcontroller pins. It doesn't make sense that that is the case on your circuit and that the pins don't read as logical 0.