Yup,Mine is one of 2 items that I still have since I first played with electronics almost 50 yrs ago. Still works great!
LarryD
April 8, 2022, 5:22am
1052
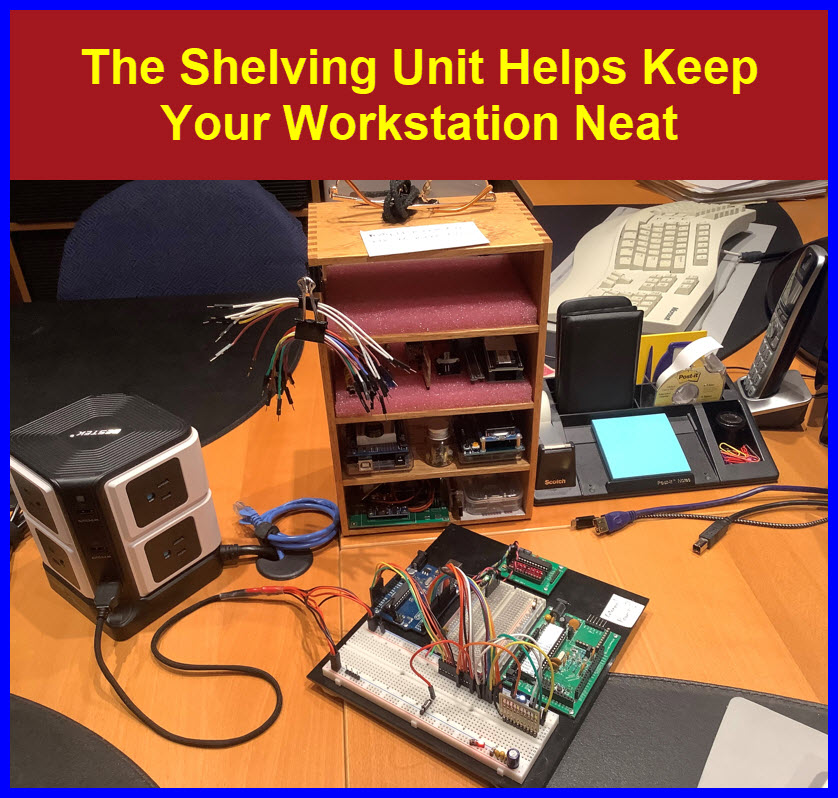
If you have a few wood working skills make a component shelving unit to keep items organized at your computer workstation.
1/4-inch oak gives a nice-looking addition to your desktop.
Antistatic foam is great for holding components that you commonly use in your breadboarding projects.
A binder clip can be used to hold your breadboard wires which in turn are held by other binder clips.
EDIT
Further to post #1052.
Just got some extra thin proto board FR4 material, thickness: 0.4 mm.
[C]
[A]
[B]
LarryD
April 9, 2022, 6:56pm
1053
Place a proto-typing board on top of 1/2" anti-static foam.
This can keep components spaced when using the foam as a storage holding medium.
LarryD
April 10, 2022, 1:37am
1055
Yes, I like them very much, goes up to 40 pin too.
Did not use the supplied header pins, I used male machine pin headers as they are smaller and easier to plug into the breadboard.
LarryD
April 10, 2022, 3:13am
1056
A label prevents wiring errors as the adaptor is reversed.
LarryD
April 15, 2022, 10:00pm
1057
The following images show how to make formed jumper wires to join breadboard power rails.
LarryD
April 16, 2022, 7:38pm
1058
For about $15.00 USD, you can buy a very useful programming board for your ESP32 controllers.
This board allows you to upload your sketch to a raw ESP32 board and has male header pins that you can use to test the I/O pins.
After you check out the ESP32 you can remove it from the programming springs and solder the castellated ESP32 to your final mother board.
It would be wise to add an FTDI header to the mother board in the event the ESP32 needs reprogramming.
Designing your own mother board allows you to take full advantage of the LOW power features of the ESP32.
LarryD
April 21, 2022, 11:59pm
1059
Getting old leads to mistakes.
Mark the +5V and 0V male header pins on the Arduino ICSP headers.
Use 1mm silicone insulation from 22 AWG wire.
LarryD
April 30, 2022, 5:24am
1060
Further to post #1052 .
[1]
[2]
[3]
[4]
Just got some extra thin proto board FR4 material, thickness: 0.4 mm.
LarryD
May 3, 2022, 2:55am
1061
Further to Post #813
Constructing a ‘High Boy’ soldering hold down clamp.
The first version of the soldering ‘Hold Down Clamp’ is one of the most useful tools on my workbench.
Taking this idea a bit further, the new adjustable version of the tool is just as useful.
For the lack of a better name, I will refer to the new tool as a ‘High Boy’ soldering clamp.
This clamp allows you to secure components that are higher than I.C.s or SMDs; the height adjustment tunes the tool to the level of what is being soldered.
S…
The old sharp tipped Hold Down tool, works well for most SMD components like 1206s etc.
When it comes to bare wire busbars or MELF diodes, it can be quite challenging to solder them properly on your prototype PCBs.
The following images describe how to fabricate a new attachment that makes your soldering jobs easy and faster.
LarryD
May 4, 2022, 8:09pm
1062
Further to the previous post.
A double arm and a sliding tip might be a good addition.
LarryD
May 4, 2022, 8:18pm
1063
Slide silicone insulation on to your tweezers ends.
This gives more friction for things being held and adds softness to the grip when soldering plastic insulated wires etc.
The silicone insulation prevents heat transfer to the metal tweezers, up to 200°C.
That should read 14 AWG
LarryD
May 5, 2022, 4:18pm
1064
An old trick you can use to drill holes in sheet metal (or plastic).
Suggest you first drill a small pilot hole at the required location.
Use smooth Knipex pliers wrench to hold the metal.
Always drill a few test holes to gain confidence.
LarryD
May 7, 2022, 2:46am
1066
Further to post #738
When soldering, remember to use air filtration to remove flux fumes from the air.
See Amazon and eBay for reasonably priced air filters.
A noisy fan makes it much less likely that you will continue to use your air filter.
I replaced the noisy 120VAC fan in the unit below for the much quieter 12VDC computer fan.
A small booster fan gives you more distance between your work and the filter location.
If you do a lot of soldering, you might want to invest in a small HEPA room air purifier.
A s…
Use a plastic storage box ~$5.00 to house the Hepa air filter.
Holes are made in the side (5") and lid (7.8") of the box.
The hole faces the direction you are soldering.
LarryD
May 11, 2022, 9:05pm
1067
The Pinch clamps discussed for holding PCBs are great when you need to join two or more wires together.
The following images show the method.
If you use 2 pinch clamps, you can still join 3 wires, just hold 2 of the wires with one pinch clamp.